FordParts
My Garage
My Account
Cart
OEM Ford Air Suspension Compressor
Suspension Levelling Compressor- Select Vehicle by Model
- Select Vehicle by VIN
Select Vehicle by Model
orMake
Model
Year
Select Vehicle by VIN
For the most accurate results, select vehicle by your VIN (Vehicle Identification Number).
9 Air Suspension Compressors found


Ford Air Compressor Part Number: FCPZ-19G525-A
$110.57 MSRP: $160.95You Save: $50.38 (32%)Ships in 1-3 Business DaysProduct Specifications- Other Name: Compressor Assembly; Tire Repair Kit


Ford Compressor Part Number: 6L1Z-5319-AA
$301.91 MSRP: $443.33You Save: $141.42 (32%)Ships in 1-3 Business DaysProduct Specifications- Other Name: Compressor - Suspension Leveling; Air Suspension Compressor; Air Compressor; Compressor - Suspension Levelling
- Replaces: 5L1Z-5319-AA


Ford Air Compressor Part Number: F77Z-5319-AA
Product Specifications- Other Name: Compressor - Suspension Leveling; Air Suspension Compressor; Compressor; Compressor - Suspension Levelling
- Manufacturer Note: FROM 10/28/97
- Replaces: F57Z-5319-AA


Ford Compressor Assembly Part Number: 8W1Z-5319-A
Product Specifications- Other Name: Compressor - Suspension Leveling; Air Suspension Compressor; Air Compressor; Compressor; Compressor - Suspension Levelling
- Replaces: 6W1Z-5319-AA


Ford Air Compressor Part Number: 7L1Z-5319-AE
Product Specifications- Other Name: Compressor - Suspension Leveling; Air Suspension Compressor; Compressor; Compressor - Suspension Levelling
- Replaces: 7L1Z-5319-A


Ford Compressor Part Number: 1L1Z-5319-BA
Product Specifications- Other Name: Compressor - Suspension Leveling; Air Suspension Compressor; Air Compressor; Compressor - Suspension Levelling
- Manufacturer Note: Mounting kit is 4L1Z-5Z205-AA, 4x2 - less rear load leveling, FROM 2/2/02

Ford Compressor Part Number: F75Z-5319-BC
Product Specifications- Other Name: Compressor - Suspension; Air Suspension Compressor; Compressor - Suspension Levelling

Ford Compressor Part Number: F6AZ-5319-AA
Product Specifications- Other Name: Compressor - Suspension Leveling; Air Suspension Compressor; Air Compressor; Compressor - Suspension Levelling
Ford Compressor Part Number: 1L1Z-5319-AA
Product Specifications- Other Name: Compressor - Suspension Leveling; Air Suspension Compressor; Air Compressor; Compressor - Suspension Levelling
- Replaces: F75Z-5319-AB
Ford Air Suspension Compressor
If you own Ford and want to keep it in top shape, choosing OEM Air Suspension Compressor is a smart move. They are precisely engineered and follow strict factory standards. They are made in advanced facilities that use cutting edge technology. Each part goes through thorough testing to confirm strength and safety, so you can trust it. FordPartsDeal.com gives you genuine Ford Air Suspension Compressor at some of the affordable online prices without cutting quality. Every OEM Ford part includes the manufacturer's warranty, easy returns, and super-fast delivery. So why wait? Shop now and get your vehicle back to peak condition.
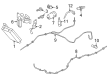
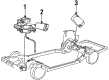
Ford Air Suspension Compressor forces air in a short period to maintain the ride height at a constant and smooth level. Practical innovation to make driving easier for ordinary people has eluded Ford since 1903. Subsequently, Ford introduced EcoBoost power plants that pack large hits on small volumes of fuel. The recent move by Ford was the introduction of battery trucks such as the Lightning, which demonstrates the fact that eco progress is not merely a buzzword. Throughout this model, Ford continues to make fun steering and good value in the middle of all decisions. The Air Suspension Compressor is located close to the chassis and pulls outside air within a few seconds. A change in payload causes the Air Suspension Compressor to either inflate the air springs or expel the air to level the frame. The larger motor and tighter seals enable the Air Suspension Compressor to respond more quickly and be less noisy than older ones. Since the Air Suspension Compressor maintains the right ride height, steering remains accurate and tires wear evenly on the two backroads. Aluminum housing protects this pump against mud, snow, and heat in the desert. When hauling heavy equipment, drivers experience fewer shocks and increased control.
Ford Air Suspension Compressor Parts and Q&A
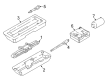
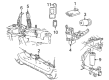
- Q: How to service and repair the air suspension compressor on Ford Crown Victoria?A:The first step for servicing the air suspension compressor involves turning off power to the system because unintended air spring movements might shift the vehicle while repairing which could cause injury to personnel. The switch for air suspension service should be set to off. The vehicle should rest in neutral position while positioned on a hoist. The air cleaner along with the air compressor drier cover needs to be removed by detaching the pushpins. Open the compressor canister by removing its pushpin and pull out the canister. To remove the air suspension compressor plug the quick connect locking ring by compressing it before pulling the air line out then disconnect the electrical connector. When reinstalling the air suspension compressor retain the nuts tightly at 7 Nm (62 inch lbs.). The last step is compressor air suspension removal. Check the installation success by inserting at least 3 mm (1/8 inch) of white air line visibility in the compressor drier fitting before finishing the installation procedure.
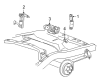
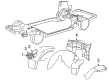
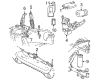
- Q: How to service and repair the air suspension compressor on Ford Expedition?A:The service and repair process for air suspension compressors starts with removing the air suspension relay when present on the bracket. First step involves unbolting the air suspension relay that may be connected to its bracket. The orange quick-connect lock ring requires compression as you pull the air supply line outward to make the connection successful. First detach the electrical connector that control the air compressor unit. First unscrew the bolts holding the air compressor bracket then remove the combination of air compressor/drier assembly from its place. The white air line should be completely inserted inside the fitting until the components are correctly installed. ampionship of the steps used for removal will perform the process inversion.


Related Ford Parts
 Ford Relay
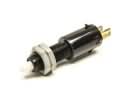 Ford Brake Light Switch
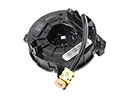 Ford Clock Spring
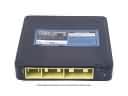 Ford Engine Control Module
 Ford Speedometer
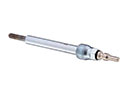 Ford Glow Plug
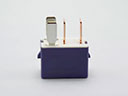 Ford Ignition Relay
 Ford PCV Valve Hose
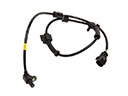 Ford Speed Sensor
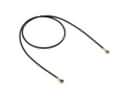 Ford Speedometer Cable
 Ford Igniter
 Ford Spark Plug Wire