FordParts
My Garage
My Account
Cart
OEM Ford Escape Rack And Pinion
Steering Gear- Select Vehicle by Model
- Select Vehicle by VIN
Select Vehicle by Model
orMake
Model
Year
Select Vehicle by VIN
For the most accurate results, select vehicle by your VIN (Vehicle Identification Number).
12 Rack And Pinions found

Ford Escape Steering Gear Part Number: HV6Z-3504-FF
$1414.10 MSRP: $2305.45You Save: $891.35 (39%)
Ford Escape Gear Assembly Part Number: LX6Z-3504-CA
$411.28 MSRP: $689.09You Save: $277.81 (41%)Ships in 1-2 Business Days

Ford Escape Steering Gear Part Number: AL8Z-3504-BRM
$332.52 MSRP: $538.18You Save: $205.66 (39%)Ships in 1-2 Business Days
Ford Escape Steering Gear Part Number: 8L8Z-3504-C
$332.52 MSRP: $538.18You Save: $205.66 (39%)Ships in 1-2 Business DaysFord Escape Gear Assembly Part Number: LX6Z-3504-BA
$423.41 MSRP: $689.09You Save: $265.68 (39%)Ships in 1-2 Business Days
Ford Escape Steering Gear Part Number: 3L8Z-3504-DARM
$291.24 MSRP: $476.62You Save: $185.38 (39%)Ships in 1-3 Business Days
Ford Escape Steering Gear Part Number: 7L8Z-3504-DRM
$350.75 MSRP: $574.55You Save: $223.80 (39%)Ships in 1-3 Business Days
Ford Escape Gear - Rack And Pinion Steering Part Number: LX6Z-3504-X
$425.81 MSRP: $674.55You Save: $248.74 (37%)Ships in 1-2 Business DaysFord Escape Gear Assembly Part Number: 7L8Z-3504-CRM
$363.39 MSRP: $574.55You Save: $211.16 (37%)
Ford Escape Steering Gear Part Number: 6M6Z-3504-AA
Ford Escape Steering Gear Part Number: 3L8Z-3504-CARM

Ford Escape Steering Gear Part Number: AM6Z-3504-BRM
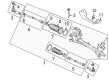
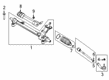
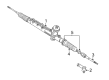
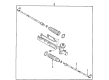
Ford Escape Rack And Pinion
OEM Rack And Pinion boasts unmatched quality. Each part goes through full quality checks. They adhere to Ford's official factory standards. These steps remove flaws and inconsistencies. So you can get Rack And Pinion with long life and a perfect fit. Come to our website and find genuine Ford Escape parts. We keep a wide inventory of OEM Escape parts at the highly affordable prices. It's easy to search, compare, and pick what you need. You'll love the clear info and simple checkout. We offer top-rated customer service, and we reply fast. We also ship promptly to ensure your order arrives on time.
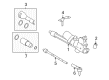
The Rack And Pinion in Ford Escape cars is a very vital part which converts the circular movement of the steering wheels into the lateral movement of the car wheels. This is called the rack and pinion mechanism which is a pinion that is attached to the steering column, a rack which is housed in a metal tube and then connects to the wheels by means of tie-rods. Most contemporary Ford Escapes employ power Rack And Pinions acting through power-assisted rack and pinion systems which operational ease through hydraulic or electrical methods. Formerly, a great number of manual racks was used, but nowadays, these are not popular because of the advantages connected with the use of power assistance. The design usually employs straight gears because they are more efficient compared to others and they operate at lower temperatures; but it employs helical gears with some disadvantages such as increased wear of the teeth. Problems that might be associated with the Steering Rack are the leaks, wear and tear of the gears and spoilage of seals which cause stiff or loose feeling in the steering wheel. Its importance to maintain this pivotal steering part calls for strong recommendations for frequent maintenance.
Ford Escape Rack And Pinion Parts and Q&A
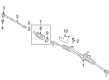
- Q: How to Service and Repair the Front Rack and Pinion Steering Gear on Ford Escape?A:The first step to perform rack and pinion servicing or repairs should start by removing front wheels with their tires, next turning off the ignition key followed by removing it completely. The Clock Spring is at risk for damage if the Steering Wheel spins during intermediate shaft detachment. Rotate the shaft only if necessary because Clock Spring removal and centering become mandatory when the shaft has moved. You should start by removing the steering column coupling-to-rack and pinion bolt followed by coupler disconnection from the rack and pinion before installing a new bolt and tightening it to 55 Nm (41 lb-ft). After entering the engine compartment, loosen the two bolts that hold the rack and pinion. Additionally, remove all pin-type retainers that may be present and the rack and pinion shield. New nuts should replace the discarded inner tie-rod end nuts, which require tightening to 80 Nm (59 lb-ft). A Ball Joint Separator will separate tie-rod ends from wheel knuckles through a non-hammer method to prevent wheel knuckle damage. When servicing All-Wheel Drive vehicles except Hybrid models (even though the subject refers to the Hybrid model group), you must remove and reinstall the rear transaxle insulator through bolt starting at 90 Nm (66 lb-ft). The repair process requires Front Wheel Drive (FWD) vehicles with a 2.5L automatic transaxle to remove the transmission damper along with its 3 bolts as well as tighten new bolts to 40 Nm (30 lb-ft). Discard the old rack and pinion bolts while you should install new ones at 125 Nm (92 lb-ft). When working on AWD vehicles besides Hybrids, you should grip the driveshaft by hand before applying a gentle downward force to free up space for rack and pinion removal. This allows you to rotate the rack and pinion clockwise by 90 degrees for left-hand side extraction. To finish this process, first follow the installation process backward, then check and adjust the front end alignment as required.

Related Ford Escape Parts
 Ford Escape Steering Wheel
 Ford Escape Tie Rod
 Ford Escape Power Steering Pump
 Ford Escape Ignition Lock Cylinder
 Ford Escape Power Steering Reservoir
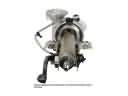 Ford Escape Steering Column
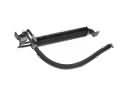 Ford Escape Power Steering Cooler
 Ford Escape Rack & Pinion Bushing
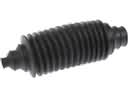 Ford Escape Rack and Pinion Boot
 Ford Escape Steering Column Seal
 Ford Escape Steering Shaft
 Ford Escape Tie Rod End