FordParts
My Garage
My Account
Cart
OEM Ford Expedition Fan Shroud
Radiator Fan Shroud- Select Vehicle by Model
- Select Vehicle by VIN
Select Vehicle by Model
orMake
Model
Year
Select Vehicle by VIN
For the most accurate results, select vehicle by your VIN (Vehicle Identification Number).
8 Fan Shrouds found


Ford Expedition Fan Shroud, Front Part Number: 9L3Z-8146-BA
$238.53 MSRP: $350.27You Save: $111.74 (32%)Ships in 1-2 Business Days


Ford Expedition Fan Shroud, Lower Part Number: 4L1Z-8146-AA
$29.60 MSRP: $41.98You Save: $12.38 (30%)Ships in 1-3 Business Days

Ford Expedition Fan Shroud Part Number: F65Z8146BE


Ford Expedition Fan Shroud, Upper Part Number: 4L1Z-8146-BA
Ford Expedition Fan Shroud Part Number: F85Z-8146-BA

Ford Expedition Lower Shroud Part Number: 7L1Z-8146-A

Ford Expedition Fan Shroud, Lower Part Number: 2L1Z-8146-BB
Ford Expedition Fan Shroud, Upper Part Number: 2L1Z-8146-AA
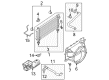
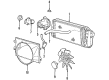
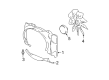
Ford Expedition Fan Shroud
OEM Fan Shroud boasts unmatched quality. Each part goes through full quality checks. They adhere to Ford's official factory standards. These steps remove flaws and inconsistencies. So you can get Fan Shroud with long life and a perfect fit. Come to our website and find genuine Ford Expedition parts. We keep a wide inventory of OEM Expedition parts at the highly affordable prices. It's easy to search, compare, and pick what you need. You'll love the clear info and simple checkout. We offer top-rated customer service, and we reply fast. We also ship promptly to ensure your order arrives on time.
The Fan Shroud is an essential component that plays a very vital role in boosting the efficiency and dependability of Ford Expedition's cooling system. Strictly intended for enhancing the circulation of air on the cooling fan, the Fan Shroud enclosed the fan blades, thus allowing the engine to have the optimum operating temperature consistently. This is especially so with regards to various Expedition models since the Fan Shroud is instrumental in shielding the cooling system from debris which are potential harms. The Ford Expedition is noted to be long lasting and built tough; the Fan Shroud is a feature that will facilitate for efficiency and safety adding to the models distinct edge in the automotive industry. The Ford Expedition has been introduced 1997, and is capable of providing marvelous performance every time, and the Fan Shroud helps in maintaining smooth performance of the engine irrespective of the situations. It is evident that the compatibility of the Fan Shroud with multiple Expedition models makes it considerable more important since it affords a dependable solution for sustaining the right temperature for the engine within the range. Also, it aims at designing the Fan Shroud to endure the daily use as well as contributing to the general safety of the vehicle. Therefore, Fan Shroud is one of the most vial organs of the cooling system that links reliability, performance, and the unique design to the ongoing evolution of Ford Expedition as a premium SU.
Ford Expedition Fan Shroud Parts and Q&A
- Q: How to service the cooling fan shroud on Ford Expedition?A:Service of the cooling fan shroud begins with parking the vehicle in neutral position on a hoist system. The first priority is disconnecting the battery ground cable while draining the engine cooling system. You must first remove the upper Air Deflector after uninstalling its 10 pushpin-type retainers and deflector fuselage. Unfasten the outlet pipe from the air cleaner before disconnecting the electrical cables and fastening them to 10 Nm (89 lb-in) while reinstalling the parts. CTest the wiring harness retainer and detach the upper Radiator hose from the radiator along with its position retainer from the cooling fan shroud. First remove the vacuum canister by taking out the electrical connector and wiring harness position retainer. Also detach the wiring harness position retainer from the vacuum reservoir and vacuum connectors and electrical connector on the LH side of the cooling fan shroud when equipped. First disconnect the wiring harness retainer located on the RH side of the radiator before removing the 2 cooling fan shroud bolts and wiring harness retainers and tightening them to 10 Nm (89 lb-in). Start the power distribution box (PDB) securing bolts by hand to protect the radiator support while you remove the 4 bolts before reattaching them tightly to 10 Nm (89 lb-in). Unhook both the mass air flow (MAF) sensor electrical harness position retainer alongside the power steering fluid hose position retainers from their positions on the cooling shroud and radiator support. The Power Steering Reservoir requires removal after its bolt is loose. Tighten the bolt to 11 Nm (8 lb-ft) before final installation. Users should detach the degas bottle hose from the radiator followed by releasing the lower position tab found on the cooling fan shroud. Next users should rotate the shroud upward until it locks into position at the tab. The lower radiator hose quick connect coupling requires removal from the radiator after the clip comes off and before the disconnecting step. The installation process should follow the exact steps in reverse order.

Related Ford Expedition Parts
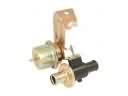 Ford Expedition Heater Control Valve
 Ford Expedition Thermostat
 Ford Expedition Water Pump
 Ford Expedition Coolant Reservoir Cap
 Ford Expedition Coolant Reservoir Hose
 Ford Expedition Cooling Hose
 Ford Expedition Fan Blade
 Ford Expedition Fan Clutch
 Ford Expedition Radiator Cap
 Ford Expedition Radiator Hose
 Ford Expedition Water Hose
 Ford Expedition Water Pump Gasket