FordParts
My Garage
My Account
Cart
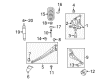
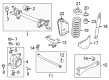
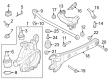
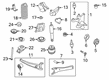
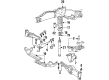
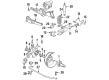
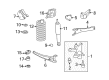
OEM Ford Radius Arm
Front Suspension Radius Arm- Select Vehicle by Model
- Select Vehicle by VIN
Select Vehicle by Model
orMake
Model
Year
Select Vehicle by VIN
For the most accurate results, select vehicle by your VIN (Vehicle Identification Number).
30 Radius Arms found


Ford Radius Arm, Front Driver Side Part Number: BC2Z-3A360-A
$49.46 MSRP: $78.55You Save: $29.09 (38%)Ships in 1-2 Business DaysProduct Specifications- Other Name: Arm - Adjustment; Radius Arm, Front Left
- Position: Driver Side
- Replaces: 8C2Z-3A292-BL


Ford Radius Arm, Front Passenger Side Part Number: BC2Z-3A360-B
$63.66 MSRP: $92.67You Save: $29.01 (32%)Ships in 1-2 Business DaysProduct Specifications- Other Name: Arm - Adjustment; Radius Arm, Front Right
- Position: Passenger Side
- Replaces: 8C2Z-3A360-BR


Ford Radius Arm, Front Passenger Side Part Number: GC3Z-3A360-B
$180.91 MSRP: $263.33You Save: $82.42 (32%)Ships in 1-2 Business DaysProduct Specifications- Other Name: Arm - Adjustment; Radius Arm, Front Right
- Position: Passenger Side
- Replaces: 9C3Z-3A360-D, 6C3Z-3A360-AC, 9C3Z-3A360-B


Ford Radius Arm Part Number: F57Z-3A360-A
$95.85 MSRP: $132.59You Save: $36.74 (28%)Ships in 1-2 Business DaysProduct Specifications- Other Name: Arm - Adjustment; Suspension Control Arm; Control Arm
- Manufacturer Note: RH & LH, 4x2
- Replaces: FOTZ-3A360-A

Ford Radius Arm, Driver Side Part Number: PC3Z-3A360-B
$294.56 MSRP: $489.09You Save: $194.53 (40%)Ships in 1-2 Business DaysProduct Specifications- Other Name: Arm - Adjustment
- Position: Driver Side

Ford Radius Arm, Front Driver Side Part Number: 7C3Z-3A360-C
$259.52 MSRP: $430.91You Save: $171.39 (40%)Ships in 1-3 Business DaysProduct Specifications- Other Name: Arm - Adjustment; Radius Arm, Front Left
- Position: Driver Side

Ford Radius Arm, Front Driver Side Part Number: HC3Z-3A360-D
$190.03 MSRP: $309.09You Save: $119.06 (39%)Ships in 1-2 Business DaysProduct Specifications- Other Name: Arm - Adjustment; Radius Arm, Front Left
- Position: Driver Side
- Replaces: HC3Z-3A360-A

Ford Radius Arm, Driver Side Part Number: PC3Z-3A360-D
$396.39 MSRP: $658.18You Save: $261.79 (40%)Ships in 1-2 Business DaysProduct Specifications- Other Name: Arm - Adjustment
- Position: Driver Side

Ford Radius Arm, Passenger Side Part Number: 6C3Z-3A360-A
$6.46 MSRP: $10.00You Save: $3.54 (36%)Ships in 1-3 Business DaysProduct Specifications- Other Name: Arm - Adjustment
- Position: Passenger Side
- Replaced by: 6C3Z-2C183-AB
Ford Radius Arm, Front Passenger Side Part Number: HC3Z-3A360-C
$160.46 MSRP: $236.67You Save: $76.21 (33%)Ships in 1-2 Business DaysProduct Specifications- Other Name: Arm - Adjustment; Radius Arm, Front Right
- Position: Passenger Side
- Replaces: HC3Z-3A360-B
Ford Radius Arm, Passenger Side Part Number: PC3Z-3A360-BA
$307.59 MSRP: $451.67You Save: $144.08 (32%)Product Specifications- Other Name: Arm - Adjustment
- Position: Passenger Side
Ford Radius Arm, Front Passenger Side Part Number: 7C3Z-3A360-D
$334.83 MSRP: $491.67You Save: $156.84 (32%)Ships in 1-3 Business DaysProduct Specifications- Other Name: Arm - Adjustment; Radius Arm, Front Right
- Position: Passenger Side
- Replaces: 7C3Z-3A360-AB, 7C3Z-3A360-B


Ford Radius Arm, Front Driver Side Part Number: XC2Z-3A360-AA
Product Specifications- Other Name: Rod; Radius Arm, Front, Front Left
- Position: Front Driver Side
- Replaces: F6UZ-3A360-CC


Ford Radius Arm, Front Passenger Side Part Number: F6UZ-3A360-BA
Product Specifications- Other Name: Arm Assembly - Front Suspension; Radius Arm, Front Right
- Position: Passenger Side
- Replaces: F2UZ-3A360-B

Ford Radius Arm, Front Passenger Side Part Number: F6UZ-3A360-AA
$213.38 MSRP: $313.33You Save: $99.95 (32%)Product Specifications- Other Name: Arm - Adjustment; Radius Arm, Front Right
- Position: Passenger Side
- Replaces: F2UZ-3A360-A


Ford Radius Arm Part Number: F57Z-3A360-B
Product Specifications- Other Name: Arm - Adjustment


Ford Radius Arm Part Number: F3TZ-3A360-C
Product Specifications- Other Name: Arm - Adjustment


Ford Radius Arm, Passenger Side Part Number: E9TZ-3A360-D
Product Specifications- Other Name: Arm - Adjustment
- Position: Passenger Side


Ford Radius Arm Part Number: E8TZ-3A292-A
Product Specifications- Other Name: Rod
- Position: Driver Side


Ford Radius Arm, Front Driver Side Part Number: 7C3Z-3A360-AC
Product Specifications- Other Name: Arm - Adjustment; Radius Arm, Front Left
- Position: Driver Side
- Replaces: 7C3Z-3A360-A
| Page 1 of 2 |Next >
1-20 of 30 Results
Ford Radius Arm
If you own Ford and want to keep it in top shape, choosing OEM Radius Arm is a smart move. They are precisely engineered and follow strict factory standards. They are made in advanced facilities that use cutting edge technology. Each part goes through thorough testing to confirm strength and safety, so you can trust it. FordPartsDeal.com gives you genuine Ford Radius Arm at some of the affordable online prices without cutting quality. Every OEM Ford part includes the manufacturer's warranty, easy returns, and super-fast delivery. So why wait? Shop now and get your vehicle back to peak condition.
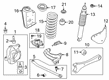
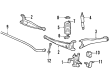
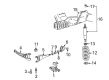
Ford Radius Arm prevents axle movement and provides trucks with a level, confident ride. Ford was started as a bold concept in 1903 and expanded by perfecting the moving assembly line, reducing the time of construction and making cheap cars affordable to common drivers. Now, Ford combines gasoline muscle and EcoBoost economics to the extent that families are towing trailers but still find themselves passing more gas pumps. Ford SYNC allows passengers to request playlists or a detour with a simple voice command, where they are not looking at the screen and are not bored. Ford equips each cabin with Co-Pilot360 features that engage the brakes in an event when traffic is at a standstill and roll the wheel in case the lanes lose their lines. Radius Arm connects the axle to the frame with stout stamped steel or lighter aluminum, which prevents fore-aft wobble and increases the weight to the chassis by only a little, enhancing the ride in general. Radius Arm combats brake divergence in order to keep the nose level when completely stopped, then drops immediately when the green appears. Radius Arm also maintains the trail of the wheels straight on rough trails so that the shocks can take their own course without tires straining out of step. Radius Arm, which uses bushings uniformly, will pay off in the form of straight tracking, silence in steering, and reassurance in cornering every mile to the driver.
Ford Radius Arm Parts and Q&A
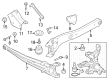
- Q: How to service the radius arm on Ford E-150 Econoline?A:The service of radius arms starts with spring coil and spring insulator removal from the front portion. Commence the service by eliminating the radius arm-to-axle bolt and its retaining nut. Then separate the spring retainer together with the insulator. Start by detaching the radius arm by disconnecting its nut then its washer and rear insulator. Remove the radius arm from the bracket then take out its spacer together with the insulator and washer. Evaluate rubber components before installation to ensure their quality. Worn or broken parts must be replaced. After removal the entire operation should be undone to reinstall the parts.
- Q: How to service the radius arm on Ford E-150?A:Service of the radius arm starts by taking off the front spring from the vehicle. The service starts with removing the shock absorber lower nut before disconnecting the absorber from the radius arm while installing a new nut then tightening it to 80 Nm (59 lb-ft). The service requires removing the radius arm rearward nut and flag bolt before installing the new components while torquing the nut to 350 Nm (258 lb-ft). You should first remove the radius arm-to-axle nut and bolt combined with the spring retainer and insulator before discarding those parts. You should tighten the new nut to 400 Nm when reattaching it (295 lb-ft). Proper inspection of the spring units and radius arm insulators must be followed by necessary replacements. The installation process should end by performing the reverse steps of removal but maintaining strict adherence to torque values for adequate retention of the components.


Related Ford Parts
 Ford Track Bar
 Ford Axle Shaft
 Ford Control Arm
 Ford Radius Arm Bushing
 Ford Spindle
 Ford Sway Bar Link
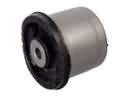 Ford Axle Beam Mount
 Ford Axle Vent
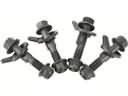 Ford Camber and Alignment Kit
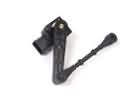 Ford Ride Height Sensor
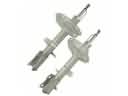 Ford Strut Housing
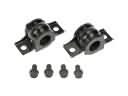 Ford Sway Bar Bracket