FordParts
My Garage
My Account
Cart
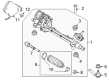
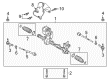
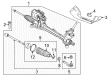
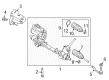
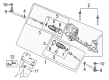
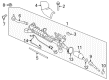
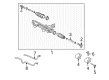
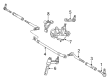
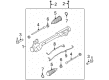
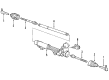
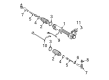
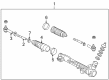
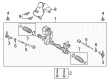
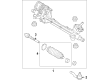
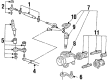
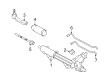
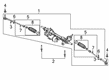
OEM Lincoln Rack And Pinion
Steering Gear- Select Vehicle by Model
- Select Vehicle by VIN
Select Vehicle by Model
orMake
Model
Year
Select Vehicle by VIN
For the most accurate results, select vehicle by your VIN (Vehicle Identification Number).
73 Rack And Pinions found


Lincoln Steering Gear Part Number: CA5Z-3504-C
$1345.05 MSRP: $2314.55You Save: $969.50 (42%)Ships in 1-2 Business DaysProduct Specifications- Other Name: Gear Assembly - Steering; Rack and Pinion Assembly; Steering Gearbox; Gear Assembly
- Replaces: AA5Z-3504-ME, AA5Z-3504-LE, AA5Z-3504-PE, AA5Z-3504-F, CA5Z-3504-CE, CA5Z-3504-A, CA5Z-3504-EE, STE-19, STE-2, STE-265, STE-273, STE-35, STE-215, STE-44

Lincoln Steering Gear Part Number: EG1Z-3504-H
$1601.63 MSRP: $2645.45You Save: $1043.82 (40%)Ships in 1-2 Business DaysProduct Specifications- Other Name: Gear Assembly - Steering; Rack and Pinion Assembly; Steering Gearbox; Gear Assembly
- Replaces: DG1Z-3504-LE, EG1Z-3504-E, EG1Z-3504-FE, EG1Z-3504-GE, EG1Z-3504-A, STE-155, STE-205, STE-131, STE-234, STE-259

Lincoln Steering Gear Part Number: HJ7Z-3504-G
$2489.55 MSRP: $4296.36You Save: $1806.81 (43%)Ships in 1-3 Business DaysProduct Specifications- Other Name: Gear Assembly - Steering; Gear Assembly
- Replaces: GJ7Z-3504-D, GJ7Z-3504-AE, HJ7Z-3504-C, HJ7Z-3504-E, HJ7Z-3504-A, STE-352, STE-550

Lincoln Steering Gear Part Number: H2GZ-3504-H
$1200.86 MSRP: $1980.00You Save: $779.14 (40%)Ships in 1-2 Business DaysProduct Specifications- Other Name: Gear - Rack And Pinion Steering; Rack and Pinion Assembly; Steering Gearbox; Gear Assembly
- Replaces: CSTE-533, F2GZ-3504-GE, F2GZ-3504-B, H2GZ-3504-A, H2GZ-3504-G, H2GZ-3504-D, STE-275, STE-165


Lincoln Steering Gear, Front Part Number: FL1Z-3504-D
$1234.80 MSRP: $2123.64You Save: $888.84 (42%)Ships in 1-3 Business DaysProduct Specifications- Other Name: Gear Assembly - Steering; Rack And Pinion Rack Gear, Front; Steering Gearbox; Gear Assembly
- Position: Front
- Replaces: FL1Z-3504-A, FL1Z-3504-B, STE-147

Lincoln Steering Gear Part Number: KP5Z3504B
$1641.15 MSRP: $2827.27You Save: $1186.12 (42%)Ships in 1-3 Business DaysProduct Specifications- Other Name: Gear Assembly - Steering; Steering Gearbox
- Replaces: EP5Z-3504-AE, EP5Z-3504-A, DP5Z-3504-BE, FP5Z-3504-CE, FP5Z-3504-DE, FP5Z-3504-B, HP5Z-3504-C, HP5Z-3504-B, HP5Z-3504-AE, STE-278, STE-141, STE-297, STE-119, STE-152

Lincoln Steering Gear Part Number: BT4Z-3504-C
$389.53 MSRP: $658.18You Save: $268.65 (41%)Ships in 1-2 Business DaysProduct Specifications- Other Name: Gear Assembly - Steering; Rack and Pinion Assembly; Steering Gear Box; Steering Gearbox; Gear Box; Gear Assembly
- Replaces: 9T4Z-3504-CD, 9T4Z-3504-C, STG-379, STG-408

Lincoln Steering Gear Part Number: 6L7Z-3504-AARM
$317.25 MSRP: $534.55You Save: $217.30 (41%)Ships in 1 Business DayProduct Specifications- Other Name: Remanufactured Gear Assembly - Steering; Steering Gearbox; Gear Assembly
- Replaces: 6L7Z-3504-AA

Lincoln Gear Assembly, Front Part Number: YL1Z-3504-BBRM
$309.75 MSRP: $509.09You Save: $199.34 (40%)Product Specifications- Other Name: Remanufactured Gear Assembly - Steering; Steering Gear Box, Front; Steering Gearbox
- Position: Front


Lincoln Gear Assembly Part Number: F8OZ-3504-BCRM
$338.22 MSRP: $556.36You Save: $218.14 (40%)Ships in 1-3 Business DaysProduct Specifications- Other Name: Remanufactured Gear Assembly - Steering; Steering Gearbox; Steering Gear Assembly; Gear Assembly - Steering

Lincoln Steering Gear Part Number: 8A5Z-3504-GRM
$395.64 MSRP: $649.09You Save: $253.45 (40%)Ships in 1-2 Business DaysProduct Specifications- Other Name: Reman Kit - Steering Gear Repair; Steering Gearbox; Gear Assembly; Kit - Steering Gear Repair
- Manufacturer Note: Remanufactured
- Replaces: 8A5Z-3504-C, 8A5Z-3504-G, 8A5Z-3504-F, 8A5Z-3504-D, STG-361, STG-393, STG-441, STG-444

Lincoln Steering Gear Part Number: 1W4Z-3504-AARM
$459.72 MSRP: $756.36You Save: $296.64 (40%)Ships in 1-3 Business DaysProduct Specifications- Other Name: Remanufactured Gear Assembly - Steering; Steering Gearbox; Gear Assembly - Steering

Lincoln Steering Gear Part Number: 8W7Z-3504-ARM
$461.87 MSRP: $758.18You Save: $296.31 (40%)Ships in 1-3 Business DaysProduct Specifications- Other Name: Remanufactured Gear Assembly - Steering; Rack and Pinion Assembly; Steering Gearbox
- Replaces: 8W7Z-3504-A, STG-304

Lincoln Gear Assembly Part Number: 8L3Z-3504-ARM
$578.51 MSRP: $952.73You Save: $374.22 (40%)Ships in 1-2 Business DaysProduct Specifications- Other Name: Remanufactured Gear Assembly - Steering; Rack and Pinion Assembly; Steering Gearbox
- Replaces: 6L3Z-3504-AA, 8L3Z-3504-A, 7L3Z-3504-A
Lincoln Steering Gear Part Number: M2GZ-3504-F
$1380.44 MSRP: $2278.18You Save: $897.74 (40%)Ships in 1-2 Business DaysProduct Specifications- Other Name: Gear - Rack And Pinion Steering; Gear Assembly; Rack
- Replaces: M2GZ-3504-D, STE-779

Lincoln Steering Gear Part Number: GG1Z-3504-F
$1692.51 MSRP: $2796.36You Save: $1103.85 (40%)Ships in 1-2 Business DaysProduct Specifications- Other Name: Gear - Rack And Pinion Steering; Rack and Pinion Assembly; Steering Gearbox; Gear Assembly
- Replaces: GG1Z-3504-B, GG1Z-3504-C, GG1Z-3504-E, GG1Z-3504-D, STE-376

Lincoln Steering Gear Part Number: EE9Z-3504-AJ
$2153.51 MSRP: $3561.82You Save: $1408.31 (40%)Ships in 1-3 Business DaysProduct Specifications- Other Name: Gear Assembly - Steering
- Replaces: DE9Z-3504-DE, EE9Z-3504-A, EE9Z-3504-D, EE9Z-3504-E, EE9Z-3504-B, EE9Z-3504-C, EE9Z-3504-F, STE-154, STE-128, STE-495, STE-318, STE-230, STE-211


Lincoln Steering Gear Part Number: F7AZ-3504-FDRM
Product Specifications- Other Name: Remanufactured Gear Assembly - Steering; Steering Gearbox


Lincoln Steering Gear Part Number: 5W4Z-3504-A
Product Specifications- Other Name: Gear Assembly - Steering; Steering Gearbox; Gear Assembly
- Manufacturer Note: Original Equipment Manufacturer
- Replaces: 4W4Z-3504-AA

Lincoln Gear - Rack And Pinion Steering Part Number: P1MZ-3504-H
$1312.28 MSRP: $2107.27You Save: $794.99 (38%)Product Specifications- Other Name: GEAR - RACK AND PINION STEERIN
- Replaces: M1MZ-3504-AA, M1MZ-3504-F, STE-890, STE-768
| Page 1 of 4 |Next >
1-20 of 73 Results
Lincoln Rack And Pinion
If you own Lincoln and want to keep it in top shape, choosing OEM Rack And Pinion is a smart move. They are precisely engineered and follow strict factory standards. They are made in advanced facilities that use cutting edge technology. Each part goes through thorough testing to confirm strength and safety, so you can trust it. FordPartsDeal.com gives you genuine Lincoln Rack And Pinion at some of the affordable online prices without cutting quality. Every OEM Lincoln part includes the manufacturer's warranty, easy returns, and super-fast delivery. So why wait? Shop now and get your vehicle back to peak condition.
Lincoln Rack And Pinion converts the rotations of the steering wheel to sharp movements of the wheels making all the drive accurate. Lincoln takes its Quiet Flight psychology to the next level by filling cabins with two layers of insulation, two-pane glass, active noise cancelling headphones, and vibration damping seat frames, enabling playlists to run at a low volume level on the outside and conversation to take place as the outside noise is muted. Lincoln also includes Co-Pilot360 assistants, including lane centering, blind-spot warnings, and autonomous parking to allow teenagers or older adults to press a single button, sit back and see the SUV slide into the parking space without even having to touch their knuckles. Lincoln does updates via the air, publishes huge updates once a year, responds to surveys of owners within a week, and assures them that the next update will always be available before the old code goes sour, which proves that high-end need not be starchy and polished or even so speeches in the showroom. Lincoln combines its power steering pump with a Rack And Pinion system which slides a toothed rack along an inertial tube, terminates at each end on tie rods, and allows hydraulic pressure to eliminate arm fatigue and convert even the small movements of the wheel to precise tire angles on dry or wet road. Seals may leak resulting in the Rack And Pinion becoming stiff or wandering hence warning drivers to check out before a road trip. Constant fluid monitoring, clean boots and fast replacement of parts is what ensures the Rack And Pinion is kept smooth such that steering feel is maintained sharp mile after mile.
Lincoln Rack And Pinion Parts and Q&A
- Q: How to Service and Repair the Front Rack and Pinion Steering Gear on Lincoln Navigator?A:Service and repair operations for the rack and pinion require positioning front wheels directly ahead followed by turning off the ignition. Scrutinize the air suspension switch near the rear passenger compartment jack storage as failure to do so will cause the air springs to experience accidental inflation or deflation when carrying out hoisting or jacking or towing. Position the vehicle on a hoist while placing it in the neutral gear. The hex holding feature should stop the stud from rotating when removing nuts to detach tie-rods from wheel knuckles. The second step requires the removal of bolts and oil drip shield before removing lines from the clip. When the intermediate shaft remains disconnected from the rack and pinion it should not rotate because this can harm the clock spring. In this case, the technician will need to remove the clock spring to recenter it. First, detach the intermediate shaft from the rack and pinion using the gear bolt removal and second disconnect the power steering lines with the bolts before setting them away. The electrical connector on Navigator vehicles needs disconnection by turning the actuator to expose the connector housing toward the rack and pinion input shaft. Detach the power steering lines from the rack and pinion while disposing of the nuts and verify that the removal path of the rack and pinion possesses clear access to the lines to prevent any damage. Remove the nuts, bolts, brackets along with the rack and pinion without keeping the nuts. Before tightening bolts on 4x4 vehicles ensure that all wheel end vacuum lines are positioned away from the rack and pinion mounting fasteners to avoid damage. The M14 bracket-to-rack and pinion bolts must be tightened first to prevent damage to the rack and pinion yet M12 bracket-to-crossmember bolts need to be applied second. The completion of the process involves following the removal steps in reverse order while performing system filling and purging with leak testing.
- Q: How to Service and Repair the Front Rack and Pinion Steering Gear on Lincoln Town Car?A:Begin rack and pinion servicing by hoisting the vehicle with the transmission gear in neutral position. Position the steering wheel at right angles to the wheel axis using proper holding equipment. The steering column shaft must stay still when separate from the rack and pinion or it can harm the clock spring and necessary recentering of the clock spring will be necessary. Through the engine compartment, users should remove the steering column shaft-to-rack and pinion coupling bolt then release the shaft from the rack by tightening that bolt to 30 Nm (22 lb-ft) when reinstalling it. Use a hex holding feature to protect the stud from turning during outer tie-rod end mounting procedures when you need to loosen the nuts which connect ends to wheel knuckles and their final torque should be 80 Nm (59 lb-ft). New O-ring seals must replace the existing ones each time you disconnect steering lines from the rack unit to stop fluid leakage. The installation requires replacement of O-ring seals and 21 Nm (15 lb-ft) torque during installation of the new lines while also discarding discarded O-ring seals during disconnection of pressure and return lines. After removing the rack and pinion nuts, install them with a torque setting of 103 Nm (76 lb-ft). Install new studs on the rack and pinion which should be torqued to 20 Nm (15 lb-ft) while mounting the rack and pinion unit. You must install a new O-ring seal during the fitting connection process. The last step includes reversing removal procedures and filling the power steering equipment.


Related Lincoln Parts
 Lincoln Steering Wheel
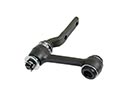 Lincoln Idler Arm
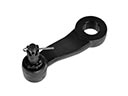 Lincoln Pitman Arm
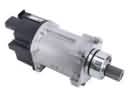 Lincoln Power Steering Assist Motor
 Lincoln Power Steering Control Valve
 Lincoln Power Steering Hose
 Lincoln Rack and Pinion Boot
 Lincoln Shift Interlock Solenoid
 Lincoln Steering Column Seal
 Lincoln Steering Gear Box
 Lincoln Tie Rod End
 Lincoln Upper Steering Column Bearing