FordParts
My Garage
My Account
Cart
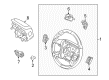
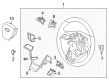
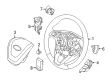
OEM Lincoln Steering Wheel
Navigation Steering Wheel- Select Vehicle by Model
- Select Vehicle by VIN
Select Vehicle by Model
orMake
Model
Year
Select Vehicle by VIN
For the most accurate results, select vehicle by your VIN (Vehicle Identification Number).
433 Steering Wheels found


Lincoln Steering Wheel Part Number: 5L7Z-3600-AAA
$637.88 MSRP: $945.00You Save: $307.12 (33%)Ships in 1-3 Business DaysProduct Specifications- Other Name: Wheel Assembly - Steering

Lincoln Steering Wheel, Charcoal Black Part Number: FP5Z-3600-PA
$528.91 MSRP: $776.67You Save: $247.76 (32%)Product Specifications- Other Name: Kit - Steering Wheel
Lincoln Steering Wheel Part Number: FP5Z-3600-PC
$363.09 MSRP: $502.30You Save: $139.21 (28%)Ships in 1-2 Business DaysProduct Specifications- Other Name: Kit - Steering Wheel
Lincoln Steering Wheel Part Number: FP5Z-3600-LB
$402.96 MSRP: $669.09You Save: $266.13 (40%)Ships in 1-3 Business DaysProduct Specifications- Other Name: Kit - Steering Wheel
- Replaces: DP5Z-3D758-LB
Lincoln Steering Wheel Part Number: FP5Z-3600-PB
$510.27 MSRP: $847.27You Save: $337.00 (40%)Product Specifications- Other Name: Kit - Steering Wheel
Lincoln Steering Wheel Part Number: FP5Z-3600-MB
$526.70 MSRP: $874.55You Save: $347.85 (40%)Ships in 1-3 Business DaysProduct Specifications- Other Name: Kit - Steering Wheel
- Replaces: DP5Z-3D758-MB

Lincoln Steering Wheel Part Number: EJ7Z-3600-BF
$716.13 MSRP: $1189.09You Save: $472.96 (40%)Ships in 1-3 Business DaysProduct Specifications- Other Name: Kit - Steering Wheel
- Replaces: EJ7Z-3600-BC

Lincoln Steering Wheel Part Number: FP5Z-3600-MC
$505.05 MSRP: $801.67You Save: $296.62 (37%)Ships in 1-3 Business DaysProduct Specifications- Other Name: Kit - Steering Wheel

Lincoln Steering Wheel Part Number: DA5Z-3600-FA
$640.50 MSRP: $1016.67You Save: $376.17 (37%)Ships in 1-2 Business DaysProduct Specifications- Other Name: Wheel Assembly - Steering
- Manufacturer Note: (-D*)

Lincoln Steering Wheel Part Number: JL7Z-3600-AK
$903.21 MSRP: $1433.67You Save: $530.46 (37%)Ships in 1-3 Business DaysProduct Specifications- Other Name: Wheel Assembly - Steering
- Replaces: JL7Z-3600-PA


Lincoln Steering Wheel Part Number: LJ7Z-3600-DE
$924.00 MSRP: $1466.67You Save: $542.67 (37%)Ships in 1-2 Business DaysProduct Specifications- Other Name: Wheel Assembly - Steering

Lincoln Steering Wheel Part Number: FL7Z-3600-BC
$1147.65 MSRP: $1821.67You Save: $674.02 (37%)Ships in 1-2 Business DaysProduct Specifications- Other Name: Wheel Assembly - Steering
- Manufacturer Note: Dark Stone
- Replaces: FL7Z-3600-BB

Lincoln Steering Wheel Part Number: G2GZ-3600-AD
$1745.10 MSRP: $2770.00You Save: $1024.90 (37%)Ships in 1-3 Business DaysProduct Specifications- Other Name: Wheel Assembly - Steering
- Replaces: F2GZ-3600-AJ
Lincoln Steering Wheel, Charcoal Black Part Number: FP5Z-3600-RA
$385.87 MSRP: $605.00You Save: $219.13 (37%)Ships in 1-3 Business DaysProduct Specifications- Other Name: Kit - Steering Wheel
- Replaces: DP5Z-3D758-RA


Lincoln Steering Wheel, Black/Blue Part Number: 8T4Z-3600-BE
Product Specifications- Other Name: Wheel Assembly - Steering
- Manufacturer Note: (-W*)

Lincoln Steering Wheel, Black/Blue Part Number: 8T4Z-3600-FE
Product Specifications- Other Name: Wheel Assembly - Steering
- Manufacturer Note: (-W*)


Lincoln Steering Wheel, Camel Part Number: 8L7Z-3600-CC
Product Specifications- Other Name: Wheel Assembly - Steering


Lincoln Steering Wheel, Charcoal Black Part Number: 7W1Z-3600-CC
Product Specifications- Other Name: Wheel Assembly - Steering
- Replaces: 5W1Z-3600-EAF


Lincoln Steering Wheel, Black Part Number: 7L3Z-3600-DA
Product Specifications- Other Name: Wheel Assembly - Steering
- Replaces: 6L3Z-3600-DAA


Lincoln Steering Wheel, Black Part Number: 7L3Z-3600-CC
Product Specifications- Other Name: Wheel Assembly - Steering
- Replaces: 4L3Z-3600-KAA, 6L3Z-3600-BAB, 7L3Z-3600-BB
| Page 1 of 22 |Next >
1-20 of 433 Results
Lincoln Steering Wheel
If you own Lincoln and want to keep it in top shape, choosing OEM Steering Wheel is a smart move. They are precisely engineered and follow strict factory standards. They are made in advanced facilities that use cutting edge technology. Each part goes through thorough testing to confirm strength and safety, so you can trust it. FordPartsDeal.com gives you genuine Lincoln Steering Wheel at some of the affordable online prices without cutting quality. Every OEM Lincoln part includes the manufacturer's warranty, easy returns, and super-fast delivery. So why wait? Shop now and get your vehicle back to peak condition.
Lincoln Steering Wheel provides rapidity and precision in handling control, thus the luxury cars are steered easily by its users. Lincoln seeks Quiet Flight standards that cover cabins with hush-muffled wind wailing and engine rumbling and the Steering Wheel position in front of clear screens that complement Co-Pilot360 assistant lane control signals, blind-spot warning, automatic high-beam, and parking easel features, making it easy to have conversations with family and to focus on the road ahead. Lincoln also combines plush materials that are continually being updated and owner feedback into an ambience that is inviting, and the Steering Wheel becomes the hand that is applied consistently in this strategy. ActiveGlide stretches and staff know how to make journeys smooth with all the humid summer nights and other times in between. Lincoln injects the same calm into the Steering Wheel by forming a rim to be grasped by the majority of hands, incorporating thumb-reach audio and drive control buttons and weight in the tuning so insignificant that a straight path is plotted with minimal arm fatigue on narrow streets or wide highways. Lincoln also crafts the Steering Wheel with hard materials and finely tuned electronics that lovingly speak with electric power steering racks that translate to crispy feedback and a long life expectancy due to the solid surface that does not give up even after years of everyday travel and long weekend excursions.
Lincoln Steering Wheel Parts and Q&A
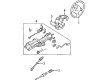
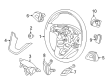
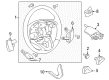
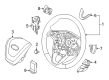
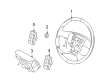
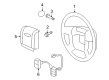
- Q: How to service the steering wheel on Lincoln Navigator?A:Removing the driver air bag module constitutes the first step for servicing the steering wheel. Put the wheel at a straight-ahead position before removing and discarding the steering wheel bolt. The new installation requires a bolt which should reach a torque of 40 Nm (30 lb-ft). First detach the steering wheel switches electrical connector connected to the Clock Spring. After that remove the steering wheel moving the wires through it with caution. The installation of tape around the outer housing prevents the Clock Spring center rotor from rotating. Put the steering wheel into place by executing the opposite steps used in removal.
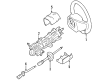
- Q: How to service the steering wheel on Lincoln Town Car?A:The service of the steering wheel begins with disconnecting the battery ground cable and positioning the wheels at straight-ahead while waiting one minute before starting any work. Enable the process of supplemental restraint system (SRS) deactivation through correct warnings and instructions execution. Detach the driver side air bag before cutting the Clock Spring electrical connector loose. Then remove and discard the steering wheel bolt by using a suitable puller method instead of damaging column bearings through wheel removal. Follow the specified steering wheel removal process to keep wires from the Clock Spring properly nested within the wheel. To install proceed by reversing the reversal process while following all safety and SRS system activation warnings.


Related Lincoln Parts
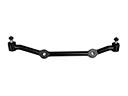 Lincoln Center Link
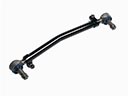 Lincoln Drag Link
 Lincoln Ignition Lock Cylinder
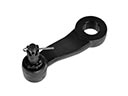 Lincoln Pitman Arm
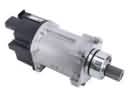 Lincoln Power Steering Assist Motor
 Lincoln Power Steering Pump
 Lincoln Rack & Pinion Bushing
 Lincoln Rack And Pinion
 Lincoln Shift Interlock Solenoid
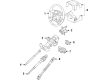
 Lincoln Steering Column
 Lincoln Steering Shaft
 Lincoln Tie Rod