FordParts
My Garage
My Account
Cart
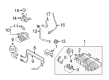
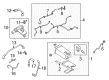
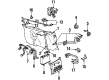
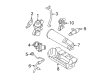
OEM Lincoln Vapor Canister
Fuel Vapor Canister- Select Vehicle by Model
- Select Vehicle by VIN
Select Vehicle by Model
orMake
Model
Year
Select Vehicle by VIN
For the most accurate results, select vehicle by your VIN (Vehicle Identification Number).
43 Vapor Canisters found


Lincoln Vapor Canister Part Number: 9E5Z-9D653-C
$291.77 MSRP: $525.45You Save: $233.68 (45%)Ships in 1-2 Business DaysProduct Specifications- Other Name: Cannister - Fuel Vapour Storage; Vapor Canister Purge Solenoid; Canister; Cannister - Fuel Vapour Store
- Replaces: 8E5Z-9D653-A, 7E5Z-9D653-E, 7E5Z-9D653-B, 9E5Z-9D653-B, CX-2151


Lincoln Vapor Canister Part Number: AG1Z-9D653-D
$169.07 MSRP: $278.18You Save: $109.11 (40%)Ships in 1-2 Business DaysProduct Specifications- Other Name: Cannister - Fuel Vapour Storage; Vapor Canister Bracket; Vapor Canister Purge Solenoid
- Replaces: AG1Z-9D653-B, CX-2512, CX-2492, CX-2343, CX-2363, AG1Z-9D653-C, 8G1Z-9D653-K


Lincoln Vapor Canister Part Number: F6DZ-9D653-BA
$163.54 MSRP: $269.09You Save: $105.55 (40%)Ships in 1-2 Business DaysProduct Specifications- Other Name: Reservoir Assembly; Vapor Canister Purge Solenoid


Lincoln Vapor Canister Part Number: F75Z-9D653-AC
$125.97 MSRP: $207.27You Save: $81.30 (40%)Ships in 1-2 Business DaysProduct Specifications- Other Name: Reservoir Assembly; Vapor Canister Purge Solenoid


Lincoln Vapor Canister Part Number: 7T4Z-9D653-B
$244.19 MSRP: $405.45You Save: $161.26 (40%)Ships in 1-2 Business DaysProduct Specifications- Other Name: Cannister - Fuel Vapour Storage; Vapor Canister Purge Solenoid; Cannister - Fuel Vapour Store


Lincoln Vapor Canister Part Number: BL1Z-9D653-A
$293.46 MSRP: $487.27You Save: $193.81 (40%)Ships in 1-2 Business DaysProduct Specifications- Other Name: Cannister - Fuel Vapour Storage; Vapor Canister Purge Solenoid; Cannister - Fuel Vapour Store
- Replaces: 7L1Z-9D653-E, 8L1Z-9D653-C, 9L1Z-9D653-D, 9L1Z-9D653-B, 9L1Z-9D653-C, CX-2353, CX-2196


Lincoln Vapor Canister Part Number: 6W1Z-9D653-AA
$477.42 MSRP: $792.73You Save: $315.31 (40%)Ships in 1-2 Business DaysProduct Specifications- Other Name: Cannister - Fuel Vapour Storage; Vapor Canister Purge Solenoid; Cannister - Fuel Vapour Store
- Manufacturer Note: Complete asy., canister, vent valve, bracket and hoses.
- Replaces: 5W1Z-9D653-AF

Lincoln Vapor Canister Part Number: F2GZ-9D653-C
$168.95 MSRP: $278.00You Save: $109.05 (40%)Ships in 1-2 Business DaysProduct Specifications- Other Name: Cannister - Fuel Vapour Storage; Canister
- Replaces: CX-2500, CX-2713, F2GZ-9D653-B, F2GZ-9D653-A

Lincoln Vapor Canister Part Number: GU5Z-9D653-H
$179.55 MSRP: $312.73You Save: $133.18 (43%)Ships in 1-3 Business DaysProduct Specifications- Other Name: Reservoir Assembly; Canister
- Replaced by: GU5Z-9D653-KA

Lincoln Reservoir Assembly Part Number: GU5Z-9D653-L
$207.15 MSRP: $352.00You Save: $144.85 (42%)Ships in 1-2 Business DaysProduct Specifications- Other Name: RESERVOIR ASY
- Replaces: CU5Z-9D653-F, CX-2439

Lincoln Vapor Canister Part Number: L1MZ-9D653-F
$235.43 MSRP: $390.91You Save: $155.48 (40%)Ships in 1-3 Business DaysProduct Specifications- Other Name: Cannister - Fuel Vapour Storage; Vapor Canister Purge Solenoid
- Replaces: CX-2645, L1MZ-9D653-A

Lincoln Vapor Canister Part Number: AE5Z-9D653-G
$276.81 MSRP: $481.82You Save: $205.01 (43%)Ships in 1-2 Business DaysProduct Specifications- Other Name: Cannister - Fuel Vapour Storage; Vapor Canister Purge Solenoid; Cannister - Fuel Vapour Store
- Replaces: AE5Z-9D653-B, CX-2222

Lincoln Vapor Canister Part Number: L1MZ-9D653-E
$439.64 MSRP: $718.18You Save: $278.54 (39%)Ships in 1-3 Business DaysProduct Specifications- Other Name: Cannister - Fuel Vapour Storage; Vapor Canister Purge Solenoid
- Replaces: CX-2653, L1MZ-9D653-B

Lincoln Vapor Canister Part Number: LX6Z-9D653-W
$479.61 MSRP: $796.36You Save: $316.75 (40%)Ships in 1-2 Business DaysProduct Specifications- Other Name: Cannister - Fuel Vapour Storage; Vapor Canister Purge Solenoid

Lincoln Cannister - Fuel Vapour Storage Part Number: NL3Z-9D653-G
$606.63 MSRP: $1007.27You Save: $400.64 (40%)Ships in 1-2 Business DaysProduct Specifications- Other Name: CANNISTER - FUEL VAPOUR STORE
- Replaces: CX-2570, JL3Z-9D653-A, NL3Z-9D653-A

Lincoln Vapor Canister Part Number: F5AZ-9D653-A
$89.84 MSRP: $147.82You Save: $57.98 (40%)Ships in 1-2 Business DaysProduct Specifications- Other Name: Reservoir Assembly; Vapor Canister Purge Solenoid
- Manufacturer Note: Canister only

Lincoln Vapor Canister Part Number: FG9Z-9D653-P
$148.76 MSRP: $240.00You Save: $91.24 (39%)Ships in 1-2 Business DaysProduct Specifications- Other Name: Cannister - Fuel Vapour Storage; Canister
- Replaces: CX-2574, CX-2418, CX-2510, CX-2464, DG9Z-9D653-H, DG9Z-9D653-A, FG9Z-9D653-C, FG9Z-9D653-M, FG9Z-9D653-G, CX-2683


Lincoln Vapor Canister Part Number: F5OZ-9D653-AA
Product Specifications- Other Name: Reservoir Assembly; Vapor Canister Purge Solenoid


Lincoln Vapor Canister Part Number: E2ZZ-9D653-A
Product Specifications- Other Name: Reservoir Assembly; Vapor Canister Purge Solenoid; Air Control Valve


Lincoln Vapor Canister Part Number: 6L1Z-9D653-A
Product Specifications- Other Name: Cannister - Fuel Vapour Storage; Vapor Canister Purge Solenoid; Cannister - Fuel Vapour Store
- Manufacturer Note: Complete Asy - Bracket, Canister And Hoses
- Replaces: 5L1Z-9D653-AB, 5L1Z-9D653-BA
| Page 1 of 3 |Next >
1-20 of 43 Results
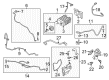
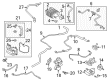
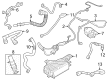
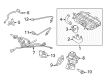
Lincoln Vapor Canister
If you own Lincoln and want to keep it in top shape, choosing OEM Vapor Canister is a smart move. They are precisely engineered and follow strict factory standards. They are made in advanced facilities that use cutting edge technology. Each part goes through thorough testing to confirm strength and safety, so you can trust it. FordPartsDeal.com gives you genuine Lincoln Vapor Canister at some of the affordable online prices without cutting quality. Every OEM Lincoln part includes the manufacturer's warranty, easy returns, and super-fast delivery. So why wait? Shop now and get your vehicle back to peak condition.
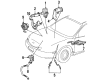
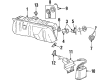
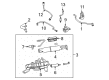
Lincoln Vapor Canister captures the gases of fuel vapor and then burns them rather than letting them escape into the atmosphere. Lincoln values hush more than hustle and forms cabins that silence the road and still busy minds. Lincoln began in 1917 and under Ford hastened, with its own predilection towards smooth touring. Lincoln stretches Quiet Flight philosophy, cleaning vibration and wind away, keeping voices clear and music ringing. Lincoln can be fitted with Co-Pilot360, which tracks lanes, switches high beams, detects blind spots, and parks the car on any model. Another feature that owners have is optional ActiveGlide that allows the car to drive itself down charted highways as you simply observe. Every single model year, the cabin is freshened up with soft leathers and wide touch screens. The company takes into account the comments of drivers and trains employees on how to appeal against inconveniences before they become viral. Vapor Canister enters the EVAP system that is filled with activated charcoal that absorbs fumes of gasoline when the engine is not running. The engine takes that fresh air through the charcoal when you start and then blows the stored vapors into the intake and burns them to gain additional energy rather than allowing them to escape into the atmosphere. There is also a vent solenoid in Vapor Canister, which opens based on the computer command to self-diagnose and control purge. Vapor Canister operating with a pressure sensor, therefore, ensures that the car identifies leaks quickly and alerts in advance of the escalating emissions. Frequent changing of Vapor Canister filter ensures the adsorption is strong and assists the EVAP system to comply with stricter air regulations.
Lincoln Vapor Canister Parts and Q&A
- Q: What is the function of the evaporative emissions control system and Vapor Canister for Lincoln Continental?A:The evaporative emissions control system sucks in fuel vapors from the gas tank, stores them, and sends them to the intake manifold. Also, a strong fuel odor in the engine compartment often means a fault in this system. Inspect the charcoal canister, located in the engine compartment or under the vehicle, for damage.

Related Lincoln Parts
 Lincoln Catalytic Converter
 Lincoln EGR Valve
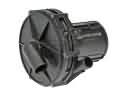 Lincoln Air Injection Pump
 Lincoln Canister Purge Valve
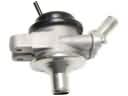 Lincoln Diverter Valve
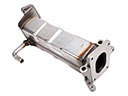 Lincoln EGR Cooler
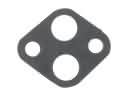 Lincoln EGR Valve Gasket
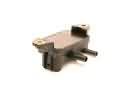 Lincoln EGR Valve Position Sensor
 Lincoln PCV Valve
 Lincoln PCV Valve Elbow
 Lincoln Secondary Air Injection Check Valve
 Lincoln Vapor Pressure Sensor