FordParts
My Garage
My Account
Cart
OEM Ford Seat Cover
Car Seat Protector Cover- Select Vehicle by Model
- Select Vehicle by VIN
Select Vehicle by Model
orMake
Model
Year
Select Vehicle by VIN
For the most accurate results, select vehicle by your VIN (Vehicle Identification Number).
9964 Seat Covers found

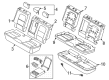
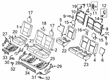
Ford Seat Back Cover, Rear Passenger Side Part Number: M1PZ-7866600-JB
$413.56 MSRP: $648.42You Save: $234.86 (37%)Ships in 1-2 Business DaysProduct Specifications- Other Name: Cover Assembly - Rear Seat Back; Seat Back Cushion Cover, Rear Right
- Position: Rear Passenger Side
- Replaced by: M1PZ-7866600-JD

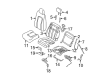
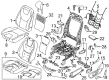
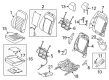
Ford Seat Back Cover, Front Driver Side Part Number: FL1Z-7864417-DC
$1016.22 MSRP: $1405.85You Save: $389.63 (28%)Product Specifications- Other Name: Cover Assembly - Seat Back; Seat Back Cushion Cover, Front Left
- Position: Front Driver Side
- Replaces: FL1Z-7864417-DA

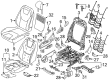
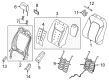
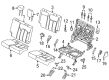
Ford Seat Back Cover, Front Passenger Side Part Number: FT4Z-5864416-CF
$715.56 MSRP: $1135.82You Save: $420.26 (37%)Ships in 1-2 Business DaysProduct Specifications- Other Name: Cover Assembly - Seat Back; Seat Back Cushion Cover, Front Right
- Position: Front Passenger Side

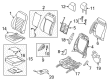
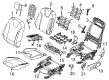
Ford Seat Back Cover, Front Passenger Side Part Number: HS7Z-5464416-XA
$441.18 MSRP: $605.30You Save: $164.12 (28%)Product Specifications- Other Name: Cover Assembly - Seat Back; Seat Back Cushion Cover, Front Right
- Manufacturer Note: (QC)
- Position: Front Passenger Side

Ford Seat Back Cover, Front Driver Side Part Number: FT4Z-5864417-CH
$806.70 MSRP: $1280.48You Save: $473.78 (37%)Ships in 1-2 Business DaysProduct Specifications- Other Name: Cover Assembly - Seat Back; Seat Back Cushion Cover, Front Left
- Position: Front Driver Side
- Replaces: FT4Z-5864417-CG

Ford Cushion Cover, Camel, Front Driver Side Part Number: CL1Z-7862901-CK
$635.25 MSRP: $1008.33You Save: $373.08 (37%)Ships in 1-2 Business DaysProduct Specifications- Other Name: Cover Assembly - Seat Cushion; Seat Cover, Front Left
- Manufacturer Note: (4C)
- Position: Front Driver Side
- Replaces: 9L1Z-7862901-CD, 9L1Z-7862901-CK

Ford Seat Back Cover, Front Passenger Side Part Number: JL1Z-7864416-AD
$633.06 MSRP: $1004.85You Save: $371.79 (37%)Ships in 1-2 Business DaysProduct Specifications- Other Name: Cover Assembly - Seat Back; Seat Back Cushion Cover, Front Right
- Position: Front Passenger Side
- Replaces: JL1Z-7864416-AB

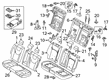
Ford Seat Back Cover, Rear Driver Side Part Number: HS7Z-5466601-PA
$241.91 MSRP: $376.80You Save: $134.89 (36%)Product Specifications- Other Name: Cover Assembly - Rear Seat Back; Seat Back Cushion Cover, Rear Left
- Manufacturer Note: (DT)
- Position: Rear Driver Side

Ford Seat Back Cover, Charcoal, Rear Driver Side Part Number: GJ5Z-7866601-BA
$207.74 MSRP: $305.05You Save: $97.31 (32%)Ships in 1-2 Business DaysProduct Specifications- Other Name: Cover Assembly - Rear Seat Back; Seat Back Cushion Cover, Rear Left
- Manufacturer Note: (KB)
- Position: Rear Driver Side

Ford Seat Back Cover, Gray, Rear Driver Side Part Number: KL3Z-1866601-AD
$212.56 MSRP: $331.08You Save: $118.52 (36%)Ships in 1-2 Business DaysProduct Specifications- Other Name: Cover Assembly - Rear Seat Back; Seat Back Cushion Cover, Rear Left
- Position: Rear Driver Side
- Replaces: KL3Z-1866601-AA


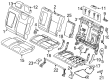
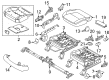
Ford Cushion Cover, Rear Driver Side Part Number: JL3Z-1663805-UA
$251.31 MSRP: $391.45You Save: $140.14 (36%)Ships in 1-2 Business DaysProduct Specifications- Other Name: Cover Assembly - Rear Seat Cushion; Seat Cushion Cover, Rear Left
- Position: Rear Driver Side
- Replaces: FL3Z-1663805-DA, FL3Z-1663805-DB

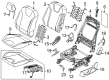
Ford Seat Cover, Front Driver Side Part Number: HS7Z-5462901-EC
$314.13 MSRP: $489.30You Save: $175.17 (36%)Product Specifications- Other Name: Cover Assembly - Seat Cushion; Seat Cushion Cover, Front Left
- Position: Front Driver Side
- Replaces: HS7Z-5462901-EA

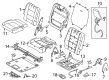
Ford Seat Back Cover, Rear Driver Side Part Number: JL1Z-7866601-KA
$296.85 MSRP: $462.38You Save: $165.53 (36%)Ships in 1-2 Business DaysProduct Specifications- Other Name: Cover Assembly - Rear Seat Back; Seat Back Cushion Cover, Rear Left
- Manufacturer Note: (EH)
- Position: Rear Driver Side


Ford Seat Back Cover, Gray, Rear Passenger Side Part Number: KL3Z-1666600-CA
$289.84 MSRP: $451.47You Save: $161.63 (36%)Ships in 1-2 Business DaysProduct Specifications- Other Name: Cover Assembly - Rear Seat Back; Seat Back Cushion Cover, Rear Right
- Position: Rear Passenger Side

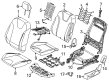
Ford Seat Back Cover, Black, Front Driver Side Part Number: H1EZ-5864417-BA
$241.19 MSRP: $375.68You Save: $134.49 (36%)Product Specifications- Other Name: Cover Assembly - Seat Back; Seat Back Cushion Cover, Front Left
- Manufacturer Note: (YW)
- Position: Front Driver Side
- Replaces: F1EZ-5864417-JB

Ford Seat Back Cover, Front Driver Side Part Number: HS7Z-5464417-PA
Product Specifications- Other Name: Cover Assembly - Seat Back; Seat Back Cushion Cover, Front Left
- Manufacturer Note: (KM)
- Position: Front Driver Side

Ford Seat Cover, Camel, Front Passenger Side Part Number: FB5Z-7862900-TB
$319.74 MSRP: $469.52You Save: $149.78 (32%)Product Specifications- Other Name: Cover Assembly - Seat Cushion; Seat Cushion Cover, Front Right
- Position: Front Passenger Side

 Product Specifications
- Other Name: Cover Assembly - Rear Seat Back; Seat Back Cushion Cover, Rear Right
- Manufacturer Note: (8W)
- Position: Rear Passenger Side
- Replaces: FB5Z-7866600-CC

Ford Cushion Cover, Front Passenger Side Part Number: H1EZ-5862900-EA
Product Specifications- Other Name: Cover Assembly - Seat Cushion; Seat Cushion Cover, Front Right; Seat Cover, Front Right
- Manufacturer Note: (3U)
- Position: Front Passenger Side
- Replaces: F1EZ-5862900-LA

 Product Specifications
- Other Name: Cover Assembly - Seat Cushion; Seat Cushion Cover, Front Right; Seat Cover, Front Right
- Manufacturer Note: (YW)
- Position: Front Passenger Side
- Replaces: F1EZ-5862900-GB
| Page 1 of 499 |Next >
1-20 of 9964 Results
Ford Seat Cover
If you own Ford and want to keep it in top shape, choosing OEM Seat Cover is a smart move. They are precisely engineered and follow strict factory standards. They are made in advanced facilities that use cutting edge technology. Each part goes through thorough testing to confirm strength and safety, so you can trust it. FordPartsDeal.com gives you genuine Ford Seat Cover at some of the affordable online prices without cutting quality. Every OEM Ford part includes the manufacturer's warranty, easy returns, and super-fast delivery. So why wait? Shop now and get your vehicle back to peak condition.
Ford Seat Cover maintains the cleanliness, toughness, and attractiveness of the seats during the daily commute and the mud during the weekends. Ford rewrote the production process with the conveyor belt assembly line, then crammed EcoBoost engines into anything so teenagers can feel the power and initial cost and installed Co-Pilot360 assistive features to steer clear before misfortune hits, all linked to SYNC voice recognition so young people can change playlists with their eyes on the road. Ford is now supporting battery trucks such as F-150 Lightning that can tow silently and still cheaply drag family equipment. The common denominator is that Ford makes things that ordinary drivers can afford, uses turbo power to lower their gas expenses, and connects their dashboards in a way that makes voice features take the place of button-hunt, making every single mile on the highway a smoother and more economical place. A Seat Cover is a protective top that keeps off claws, UV fades, and soda disasters, sits very well during sharp turns, and the straps are easily connected compared to tying sneakers. Various Seat Covers, including slip-on mesh to stitched faux leather, change in and out without requiring a tool and allow first-time customers to change the vibe of their cabin just as easily as they change playlists. Since a Seat Cover saves the value, not to mention keeping factory cloths un-ripped early, it leaves cash intact in pockets long after the initial expenditure. A Ford Seat Cover can also enhance the overall aesthetic of the vehicle's interior.
Ford Seat Cover Parts and Q&A
- Q: How to Service and Repair the Front Seat Backrest Seat Cover on Ford Ranger?A:Commence front seat backrest cover servicing by taking out the front seat along with its backrest. Safely detach the J-clip at the backrest before flipping the backrest trim cover in a way that prevents ripping any hook-and-loop strips from attaching to the seat back foam. The detachment of the backrest foam pad starts with the removal of all hog rings. The installation process requires following the opposite steps of removal to install the front seat backrest and seat. Execute the Occupant Classification Sensor (OCS) system reset only after the front passenger seat repair achieves total completion of correct component assembly and installation. Begin the reset process only when the Occupant Classification System Module (OCSM) voltage falls within 8 to 18 volts range and the temperature spans 6°C to 36°C and no items rest on the passenger seat. Begin the OCS system reset process no sooner than 8 seconds after turning the ignition ON. Begin the OCS reset process again only after checking the OCS system connector wiring as well as the pressure sensor hose and seat-related wiring for any signs of damage. The installation of a new OCS system service kit is required when the initial reset attempts fail. A vital step to check the Supplemental Restraint System (SRS) involves turning the ignition key from ON to OFF and waiting 10 seconds before returning the key to ON while observing the air bag warning indicator. The SRS system warning indicator should turn on for 6 seconds before it shuts off. Faulty Supplemental Restraint System operations require analysis and repair of any detected faults when either the air bag warning indicator fails to ignite or stays lit or glows at 5Hz frequency. A scan tool should be used to erase any continuous Restraints Control Module (RCM) DTCs and OCSM errors before moving to the next step.
- Q: How to service the front seat backrest seat cover on Ford Mustang?A:The service process for the front seat backrest cover begins by detaching the front seat followed by the removal of the front seat backrest. To expose the head restraint guide enter an appropriate tool through the hole on the inboard side while keeping the head restraint raised to avoid re-engagement. You can take out the head restraint after releasing the guide from the side which is opposite. Begin the procedure by taking out the pin-type retainers which hold the backrest trim cover to the inboard and outboard recliners before unfastening the backrest recliner release bezel screw. The backrest recliner release bezel handle needs to be slid down while pulling until it is free from its mounting. Detach the harness wires from the backrest cover after you release the outer J-strip at the bottom of the backrest trim cover. Extract the backrest trim and its pin-type retainer from the backrest frame. Correct retention of the seat side air bag module and avoidance of serious death risks depend on the installation of two hog rings during backrest trim cover wire attachment to listing wires in foam pad windows. Tearing the seat cushion foam should be prevented by exercising careful separation of the seat cushion trim cover from the hook-and-loop strip. You should first separate the hook-and-loop strips in each window and remove two hog rings before inverting the backrest trim cover. The same step needs to be followed again for the second set of hog rings in the second row. Reverse the backrest trim cover to position it on the top of the backrest before removing the two guides that should be remembered for non-interchangeability. Reinstall the front seat backrest along with its seat while powering up the SRS until it demonstrates no faults before the vehicle is made ready for release.


Related Ford Parts
 Ford Door Handle
 Ford Cigarette Lighter
 Ford Armrest
 Ford Ashtray
 Ford Car Speakers
 Ford Center Console Latch
 Ford Cup Holder
 Ford Door Seal
 Ford Glove Box
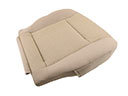 Ford Seat Cushion
 Ford Seat Heater
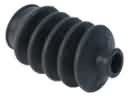 Ford Shift Linkage Boot
Browse Ford Seat Cover by Models
Ranger Bronco Mustang Explorer Focus Fusion F-150 Maverick Escape Edge Excursion Expedition Fiesta Taurus Thunderbird Flex Transit Connect Bronco Sport Explorer Sport Trac Crown Victoria EcoSport Escort F-250 Aspire C-Max Explorer Sport Five Hundred Freestar Freestyle Mustang Mach-E Police Interceptor Utility Taurus X Windstar F-350 Super Duty Police Interceptor Sedan E-150 E-250 E-350 Super Duty E-Transit F-150 Heritage F-150 Lightning F-250 Super Duty Police Responder Hybrid Special Service Police Sedan SSV Plug-In Hybrid Transit-150 Transit-250 Transit-350 Transit-350 HD