FordParts
My Garage
My Account
Cart
OEM Lincoln Air Suspension Compressor
Suspension Levelling Compressor- Select Vehicle by Model
- Select Vehicle by VIN
Select Vehicle by Model
orMake
Model
Year
Select Vehicle by VIN
For the most accurate results, select vehicle by your VIN (Vehicle Identification Number).
14 Air Suspension Compressors found


Lincoln Compressor Part Number: 6L1Z-5319-AA
$301.91 MSRP: $443.33You Save: $141.42 (32%)Ships in 1-3 Business DaysProduct Specifications- Other Name: Compressor - Suspension Leveling; Air Suspension Compressor; Air Compressor; Compressor - Suspension Levelling
- Replaces: 5L1Z-5319-AA

Lincoln Compressor - Suspension Leveling Part Number: RC5Z-5319-A
$585.00 MSRP: $866.67You Save: $281.67 (33%)Ships in 1-2 Business DaysProduct Specifications- Other Name: COMPRESSOR - SUSPENSION LEVELL


Lincoln Compressor Assembly Part Number: 8W1Z-5319-A
Product Specifications- Other Name: Compressor - Suspension Leveling; Air Suspension Compressor; Air Compressor; Compressor; Compressor - Suspension Levelling
- Replaces: 6W1Z-5319-AA


Lincoln Air Compressor Part Number: 7L1Z-5319-AE
Product Specifications- Other Name: Compressor - Suspension Leveling; Air Suspension Compressor; Compressor; Compressor - Suspension Levelling
- Replaces: 7L1Z-5319-A


Lincoln Compressor Part Number: 1L1Z-5319-BA
Product Specifications- Other Name: Compressor - Suspension Leveling; Air Suspension Compressor; Air Compressor; Compressor - Suspension Levelling
- Manufacturer Note: Mounting kit is 4L1Z-5Z205-AA, 4x2 - less rear load leveling, FROM 2/2/02

Lincoln Leveling Motor Part Number: LC5Z-5319-C
$558.00 MSRP: $826.67You Save: $268.67 (33%)Product Specifications- Other Name: Compressor - Suspension Leveling; Air Suspension Compressor; Compressor
Lincoln Electronic Control Part Number: FOLY-5319-A
Product Specifications- Other Name: Compressor - Suspension; Air Suspension Compressor; Compressor; Compressor - Suspension Levelling
- Manufacturer Note: BEFORE 10/90
Lincoln Compressor Part Number: F8VZ-5319-AA
Product Specifications- Other Name: Compressor - Suspension Leveling; Air Suspension Compressor; Air Compressor; Compressor - Suspension Levelling
- Manufacturer Note: Compressor, drier & bracket


Lincoln Compressor Assembly Part Number: F7OY-5319-B
Product Specifications- Other Name: Compressor - Suspension Leveling; Air Suspension Compressor; Air Compressor; Compressor; Compressor - Suspension Levelling
- Manufacturer Note: Compressor & drier (one port)

Lincoln Compressor Assembly Part Number: F7LZ-5319-AA
Product Specifications- Other Name: Compressor - Suspension; Air Suspension Compressor; Compressor; Compressor - Suspension Levelling
Lincoln Compressor Part Number: F6AZ-5319-AA
Product Specifications- Other Name: Compressor - Suspension Leveling; Air Suspension Compressor; Air Compressor; Compressor - Suspension Levelling

Lincoln Compressor Assembly Part Number: F5OY-5319-A
Product Specifications- Other Name: Compressor - Suspension; Air Suspension Compressor; Air Compressor; Compressor; Compressor - Suspension Levelling
- Manufacturer Note: Compressor & drier (two ports)
Lincoln Air Compressor Part Number: E8OY-5319-B
Product Specifications- Other Name: Compressor - Suspension; Air Suspension Compressor; Compressor - Suspension Levelling
- Manufacturer Note: Includes the 5347 retainer, 5A694 bracket and 5346 cannister.
Lincoln Compressor Part Number: 1L1Z-5319-AA
Product Specifications- Other Name: Compressor - Suspension Leveling; Air Suspension Compressor; Air Compressor; Compressor - Suspension Levelling
- Replaces: F75Z-5319-AB
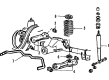
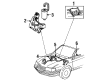
Lincoln Air Suspension Compressor
If you own Lincoln and want to keep it in top shape, choosing OEM Air Suspension Compressor is a smart move. They are precisely engineered and follow strict factory standards. They are made in advanced facilities that use cutting edge technology. Each part goes through thorough testing to confirm strength and safety, so you can trust it. FordPartsDeal.com gives you genuine Lincoln Air Suspension Compressor at some of the affordable online prices without cutting quality. Every OEM Lincoln part includes the manufacturer's warranty, easy returns, and super-fast delivery. So why wait? Shop now and get your vehicle back to peak condition.
Lincoln Air Suspension Compressor maintains the ride level by injecting air to make changes as it happens. Whisper-quiet cabins are valued by Lincoln and therefore its Quiet Flight philosophy comes with acoustic glass, dual-wall dashboards, and door seals that silenced wind and road rumble throughout every cruise. Lincoln equips every model with Co-Pilot360 technology, which includes lane-keeping, blind-spot warning, auto high beam, rear cross-traffic warning, and self-parking which allows drivers to relax without the feeling of being disconnected. Lincoln also includes optional ActiveGlide when there are complete highway stretches which are truly hands-free and are mapped and radar-guided such that the wheel can self-direct as the driver keeps the eyes forward giving long trips a relaxing feel. Lincoln interiors are furnished with supple leather, open-pore wood, metal details, and screens that are bright and lag-free and can be updated remotely, which proves the brand to be responsive and fast in responding to owner feedback. Air Suspension Compressor sucks in air, presses it, and inflatable bags that connect the chassis to a predetermined height when you are carrying camping gear or just groceries. Air Suspension Compressor relies on load sensors to discharge only when pressure falls to save on energy consumption and keep the unit cool through untold miles of broken asphalt. Air Suspension Compressor is able to respond to potholes or rough speed bumps in seconds, eliminating bouncing to keep tires stuck and steering accurate. Air Suspension Compressor is also a preventative measure doubling as a bag-pressure cap and dash warning lights that are activated early to prevent unexpected sag and ensure every journey is safe and sure.
Lincoln Air Suspension Compressor Parts and Q&A
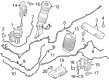
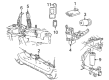
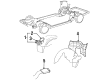
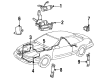
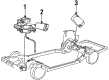
- Q: How to service and repair the air suspension compressor on Lincoln Navigator?A:The service and repair process for the air suspension compressor starts with unfastening the air suspension relay from its bracket and continuing with the windshield washer pump and reservoir extraction. Start by pushing the orange lock ring of the quick-connect toward the compressor then extract the outlet from the air drier. First disconnect the air compressor electrical connector before removing its bracket bolts to withdraw the air compressor/drier assembly. It is possible to discard the bracket after air compressor detachment by first removing screws and washers and three rubber isolators alongside the bracket screws. Detach the silencer by taking out all its securing screws. To achieve correct installation of the air lines always fully insert the white air line into its fitting. Double-check bracket installation by making sure no objects are underneath it or resting on it and verify the air compressor has safe spacing with nearby parts to reduce noise creation while making sure the compressor operates without resistance in the rubber isolators. The bracket installation should include verification that it does not have any deformities which could force rubber isolators to interfere with one another. Install new fasteners obtained in the kit when using new brackets.
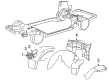
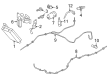
- Q: What steps should be taken before servicing the air suspension compressor to ensure safety and proper procedure on Lincoln Town Car?A:See Note X before starting your work on the air suspension compressor because turning off power to the air suspension system blocks unexpected air spring inflation or deflation thus preventing vehicle shift while hoisting, jacking or towing. Start by switching off the air suspension control and follow with the disassembly of the engine air cleaner together with the air compressor drier cover through pushpin removal. Proceed by removing both the pushpin for the snorkel then removing the snorkel itself. The air compressor disconnect proces starts with compressing the quick connect locking ring while pulling out the air line followed by taking off the electrical connector. The vehicle needs lifting while you detach the nuts before lowering it to extract the air compressor. The installation of air lines into compressor driers needs proper insertion where 3 mm (1/8 inch) of visible white air line must be visible from each fitting. The reverse of the removal steps will finish the process.


Related Lincoln Parts
 Lincoln Speedometer
 Lincoln Brake Light Switch
 Lincoln Crankshaft Position Sensor
 Lincoln Daytime Running Light Relay
 Lincoln Ignition Relay
 Lincoln Instrument Cluster
 Lincoln Intake Manifold Temperature Sensor
 Lincoln Mirror Switch
 Lincoln Oil Pressure Gauge
 Lincoln PCV Hose
 Lincoln PCV Valve Hose
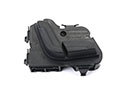 Lincoln Seat Switch