FordParts
My Garage
My Account
Cart
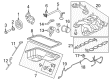
OEM Mercury Grand Marquis Intake Manifold
Engine Intake Manifold- Select Vehicle by Model
- Select Vehicle by VIN
Select Vehicle by Model
orMake
Model
Year
Select Vehicle by VIN
For the most accurate results, select vehicle by your VIN (Vehicle Identification Number).
5 Intake Manifolds found


Mercury Grand Marquis Intake Manifold Part Number: 9W7Z-9424-A
$334.83 MSRP: $491.67You Save: $156.84 (32%)Mercury Grand Marquis Manifold Assembly - Inlet Part Number: PU7Z-9424-A
$334.83 MSRP: $491.67You Save: $156.84 (32%)
Mercury Grand Marquis Intake Manifold 0 Part Number: 6W7Z-9424-AA

Mercury Grand Marquis Intake Manifold, Lower Part Number: YR3Z-9424-BA

Mercury Grand Marquis Intake Manifold Part Number: 3W3Z-9424-BB
Mercury Grand Marquis Intake Manifold
OEM Intake Manifold boasts unmatched quality. Each part goes through full quality checks. They adhere to Mercury's official factory standards. These steps remove flaws and inconsistencies. So you can get Intake Manifold with long life and a perfect fit. Come to our website and find genuine Mercury Grand Marquis parts. We keep a wide inventory of OEM Grand Marquis parts at the highly affordable prices. It's easy to search, compare, and pick what you need. You'll love the clear info and simple checkout. We offer top-rated customer service, and we reply fast. We also ship promptly to ensure your order arrives on time.
The Intake Manifold of Mercury Grand Marquis cars is quite important as it is accountable for supply of air or air/fuel blend to the cylinders of the vehicle's engine in the premier manner possible to bring out the power. Usually, it is made of plastic because it makes it lighter and due to which it can dissipate heat well; the intake manifold ensures a proper distribution of the airflow in the engine. Among the options could be found coolant passages and sensors for better work of the engine, as well as types that increase HP and Torque through the premier dispersion of air and fuel. Variable length intake manifolds (VLIM) add to this flexibility of the airflow speed and pressure according to the load requirements of the engine. Being a part of the Mercury Grand Marquis vehicle series, the Intake Manifold demonstrates the usage of contemporary materials as well as various design aspects coordinated with the booster of ideal combustion and corresponding operation of the engine.
Mercury Grand Marquis Intake Manifold Parts and Q&A
- Q: How to install the intake manifold on natural gas engines on Mercury Grand Marquis?A:Start installing the intake manifold on natural gas engines by placing new intake manifold gaskets before inserting the intake manifold. Fasten the manifold through its bolts while following the given tightening sequence. To proceed attach the water Thermostat while installing an O-ring and secure the water outlet adapter by properly tightening its bolts. Secure the generator support bracket then tighten all its bolts. Secure the eight Ignition Coils through proper bolting methods before connecting the upper radiator hose into the water outlet adapter. Secure the heater water hose to the intake manifold before placing all Fuel Injectors and the fuel injection supply manifold as one unit then bolt it down using four bolts. The next step involves tightening the isolation valve bolts followed by EGR tube attachment to EGR Valve components while connecting vacuum hoses between EGR vacuum regulator solenoid and throttle body adapter. The crankcase ventilation tube that needs installation can be connected at two points before both vacuum hoses connect to the throttle body adapter and EGR valve. The hoses should be installed on both the differential pressure feedback EGR system and fuel lines. Place the fuel charging wiring and tighten bolts before arranging all cables with their bracket and securing them using bolts. Sequence the brake installation procedure by first connecting Throttle Cables to the throttle body and speed control actuator cables then adding the idle air control valve, differential pressure feedback EGR system electrical connector, EGR vacuum regulator solenoid, radio ignition interference capacitor, Throttle Position Sensor, generator, Camshaft Position Sensor, cylinder head temperature sensor jumper, and A/C pressure transducer to the fuel charging wiring. The fuel charging wiring electrical connectors need to be fastened securely on the inner fender splash shield after which you should reposition and tighten the wiring on the stud. Finish the installation of the power distribution box access cover while connecting the generator Battery Cable and tightening its nut. Complete the wiring process by connecting the isolation valve jumper to the fuel charging wiring electrical connector and then add the engine Coolant Temperature Sensor and fuel temperature sensor and Fuel Pressure Sensor in both order of connection. The Wiper Arm installation requires appropriate fuel charging wiring electrical connector attachment to eight ignition coils and eight fuel injectors while you should also install the pivot shaft and air cleaner outlet tube.
- Q: How to remove the intake manifold from gasoline engines on Mercury Grand Marquis?A:The gasoline engine intake manifold requires starting the process by disconnecting the battery ground cable and emptying the engine cooling system. Start by taking off the air cleaner unit with the outlet pipe and disconnect the fuel spring lock coupling. The sequence of removal starts with the accessory Drive Belt followed by the wiper mounting arm and pivot shaft. Journey the vehicle onto a hoist then block the Crankshaft Position (CKP) sensor electrical connection and detach the pin-type retainer from the A/C compressor bracket. The technician disconnects three electrical interfaces: Power Steering Pressure (PSP) switch, the A/C compressor clutch and oil pressure sensor connections. The power steering electrical connector needs to be disconnected in advance when lowering the vehicle. Unplug all fuel charging wiring connectors that link to Ignition Coils as well as Fuel Injectors. The Accelerator Cable together with speed control actuator cable and throttle return spring need removal while the retaining bolts should be removed too. Once the cables move clear of the Exhaust Gas Recirculation (EGR) tube heat shield continue to position them away. The bolt removal and EGR tube heat shield should be completed first before disconnecting the electrical connector and vacuum hose and the EVAP canister purge valve vacuum hose. The generator requires cable and electrical connector removal from their locations including the harness retainer before the bracket bolts can be detached. The maintenance process requires detachment of the upper radiator hose as well as the Idle Air Control (IAC) valve and the Throttle Position (TP) sensor electrical connectors along with separation of the heater water hose. The EGR system module requires tube nut disconnection from the module while the pin-type fuel charging wiring should be separated from the crash bracket allowing cable removal from the bracket. A rubber band or tie strap prevents the cylinder head from being hit by the crash bracket bolt before pulling out the stud. Stop and then detach the vacuum hoses and vacuum harness after removing the generator harness position retainer from the LH front stud as well as the fuel charging wiring pin-type retainer from the manifold rear. Remove the ground wire connector from both the RH rear stud along with the Coolant Temperature Sensor electrical connector. After removing the eight ignition coils along with their bolts you should take out the water outlet adapter with its bolts and detach the water Thermostat (disposing the O-ring) and detach the intake manifold bolts to discard the intake manifold gaskets and clean both sealing surfaces.


Related Mercury Grand Marquis Parts
 Mercury Grand Marquis Air Duct
 Mercury Grand Marquis Air Filter
 Mercury Grand Marquis Air Filter Box
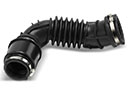 Mercury Grand Marquis Air Intake Hose
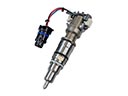 Mercury Grand Marquis Fuel Injector
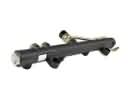 Mercury Grand Marquis Fuel Rail
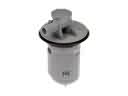 Mercury Grand Marquis Fuel Tank Vent Valve
 Mercury Grand Marquis Gas Cap
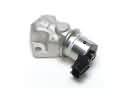 Mercury Grand Marquis Idle Control Valve
 Mercury Grand Marquis Intake Manifold Gasket
 Mercury Grand Marquis Mass Air Flow Sensor
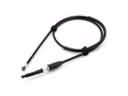 Mercury Grand Marquis Throttle Cable