FordParts
My Garage
My Account
Cart
OEM Mercury Spindle
Axle Spindle- Select Vehicle by Model
- Select Vehicle by VIN
Select Vehicle by Model
orMake
Model
Year
Select Vehicle by VIN
For the most accurate results, select vehicle by your VIN (Vehicle Identification Number).
29 Spindles found


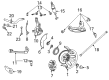
Mercury Knuckle, Front Passenger Side Part Number: 5L5Z-3105-BA
$382.50 MSRP: $561.67You Save: $179.17 (32%)Product Specifications- Other Name: Spindle; Steering Knuckle, Front Right
- Position: Passenger Side
- Replaces: 1L5Z-3105-CA
Mercury Knuckle, Front Driver Side Part Number: 5L5Z-3106-BA
$363.20 MSRP: $533.33You Save: $170.13 (32%)Product Specifications- Other Name: Spindle; Steering Knuckle, Front Left
- Position: Driver Side
- Replaces: 1L5Z-3106-CA

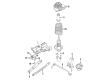
Mercury Knuckle, Driver Side Part Number: F5RZ-4A013-B
$44.97 MSRP: $62.21You Save: $17.24 (28%)Ships in 1-2 Business DaysProduct Specifications- Other Name: Spindle
- Manufacturer Note: L.H., , with rear drum
- Position: Driver Side

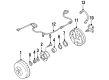
Mercury Spindle, Driver Side Part Number: FOCZ4A013B
$249.18 MSRP: $341.89You Save: $92.71 (28%)Product Specifications- Other Name: Shaft - Rear Spindle, Driver Side; Knuckle; Shaft
- Position: Driver Side

Mercury Spindle, Passenger Side Part Number: XF1Z-4A013-AB
Product Specifications- Other Name: Knuckle
- Position: Passenger Side
Mercury Spindle, Driver Side Part Number: XF1Z-4A013-AA
Product Specifications- Other Name: Knuckle
- Position: Driver Side

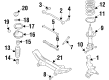
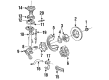
Mercury Knuckle, Driver Side Part Number: F7CZ-4A013-DB
Product Specifications- Other Name: Shaft
- Manufacturer Note: L.H., Front disc, rear drum, w/anti-lock brakes
- Position: Driver Side

Mercury Knuckle, Passenger Side Part Number: F7CZ-4A013-DA
Product Specifications- Other Name: Spindle
- Manufacturer Note: R.H., Front disc, rear drum, w/anti-lock brakes
- Position: Passenger Side
Mercury Knuckle, Driver Side Part Number: F7CZ-4A013-CE
Product Specifications- Other Name: Shaft
- Manufacturer Note: L.H., 4 wheel disc
- Position: Driver Side
Mercury Knuckle, Passenger Side Part Number: F7CZ-4A013-CD
Product Specifications- Other Name: Spindle
- Manufacturer Note: R.H., 4 wheel disc
- Position: Passenger Side
Mercury Knuckle, Driver Side Part Number: F7CZ-4A013-AB
Product Specifications- Other Name: Spindle
- Manufacturer Note: L.H., Front disc, rear drum, w/o anti-lock brakes
- Position: Driver Side
Mercury Knuckle, Passenger Side Part Number: F7CZ-4A013-AA
Product Specifications- Other Name: Spindle
- Manufacturer Note: R.H., Front disc, rear drum, w/o anti-lock brakes
- Position: Passenger Side
Mercury Knuckle, Driver Side Part Number: F5RZ-4A013-D
Product Specifications- Other Name: Spindle
- Manufacturer Note: L.H., , with rear disc
- Position: Driver Side
Mercury Knuckle, Passenger Side Part Number: F5RZ-4A013-C
Product Specifications- Other Name: Spindle
- Manufacturer Note: R.H., , with rear disc
- Position: Passenger Side
Mercury Knuckle, Passenger Side Part Number: F5RZ-4A013-A
Product Specifications- Other Name: Spindle
- Manufacturer Note: R.H., with rear drum
- Position: Passenger Side

Mercury Knuckle, Driver Side Part Number: F5AZ-3106-A
Product Specifications- Other Name: Spindle
- Position: Driver Side
Mercury Knuckle, Passenger Side Part Number: F5AZ-3105-A
Product Specifications- Other Name: Spindle
- Position: Passenger Side

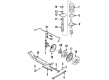
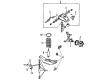
Mercury Spindle, Rear Part Number: F3XY4A053A
Product Specifications- Other Name: Spindle Assembly - Rear Wheel; Kit - Spindle Pin Repair
- Position: Rear
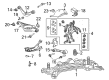
Mercury Knuckle, Passenger Side Part Number: F1VY3105A
Product Specifications- Other Name: Spindle
- Position: Passenger Side

 Product Specifications
- Other Name: Spindle; Suspension Knuckle Assembly, Rear Right
- Position: Passenger Side
| Page 1 of 2 |Next >
1-20 of 29 Results
Mercury Spindle
If you own Mercury and want to keep it in top shape, choosing OEM Spindle is a smart move. They are precisely engineered and follow strict factory standards. They are made in advanced facilities that use cutting edge technology. Each part goes through thorough testing to confirm strength and safety, so you can trust it. FordPartsDeal.com gives you genuine Mercury Spindle at some of the affordable online prices without cutting quality. Every OEM Mercury part includes the manufacturer's warranty, easy returns, and super-fast delivery. So why wait? Shop now and get your vehicle back to peak condition.
Mercury Spindle with wheels fixed and allowing the suspension to flex provides everyday handling that is smooth and error-free. Mercury made its stripes, combining a less jarring ride with jagged edges, creating a a middle ground between plain transportation and luxury, allowing families to enjoy long journeys without bouncing bones or screaming engines, since plush seats, tuned springs, heavier and thicker panels absorb grit and hard-driving roads making the brand-new fashions of its coupe and roadsters, and broad dashboards keep the controls clear, and therefore those who looked at a price and wanted value without the scratches and dents of the plain stuff or the budget-car look of some Spindle is made of the suspension knuckle where the wheels pass over potholes and turn on sharp corners, and Mercury forms this forged steel core so that it can accommodate rear, front, or all-wheel drive hubs with no additional brackets, keeping the alignment in place, keeping the water out, the torque transfer clean and the vibration minimal even during asphalt crumbles. Durability of the Spindle is important since the owners of Mercury bang curbs and speed bumps, and heat-treated metal and sealed bearings withstand the misuse. Spindle visibility can assist Mercury drivers to see the wear early, replace parts quickly and maintain the relaxed handling that they purchased the brand with.
Mercury Spindle Parts and Q&A
- Q: How to service and repair the spindle on Mercury Cougar?A:The service operation starts with removing the hub. Owners should detach the ABS sensor and remove its wiring retaining clip during brake service when anti-lock brakes are present in the vehicle. The procedure to detach the backing plate starts with clamping and separating the brake tube union followed by backing plate disconnect before securing one side of the backing plate while preventing the parking brake cable's damage. The backing plate seal should be carefully separated next. Drivers should take off the splash shield when working on vehicles that have rear disc brakes. All vehicles require a stabilizer bar link and bushing removal from the front arm before proceeding to detach the tie-bar and disconnect the front lateral arm and then separate the rear arm from the wheel spindle. First step is to remove the wheel spindle to strut and spring assembly pinch bolt before removing the wheel spindle. After placing the wheel spindle correctly on the strut and spring assembly it needs to be fixed in position. Proceed with installing the rear arm first followed by the front arm and then the tie-bar to the wheel spindle and then connect the stabilizer bar link along with its bushing to the front arm. Install the splash shield when rear disc brakes exist but follow it with backing plate seal and backing plate installation when vehicles possess rear drum brakes. Bleeding the brake system begins after you connect the brake tube and its brake tube union followed by brake hose clamp removal. To complete the installation process install the hub and then add the ABS sensor and wiring cables with proper attachment of the clip and ABS sensor.
- Q: How to service and repair the spindle on a four-door on Mercury Sable?A:Spindle service and maintenance will start with removing either the hub cap or wheel cover on four-door vehicles. Use a measurement tool to find the center hub distance until the fender lip when your vehicle rests on level ground. To begin the process uninstall the wheel hub and bearing before unfastening the brake hose bolt. Also detach the rear brake anti-lock sensor by unthreading its bolt if installed. The brake backing plate needs support from mechanic's wire after bolt removal since it should not depend on the brake hose for support. Discard the nuts together with the washers and flag bolts before their removal. First remove the nut, washer and bushing and discard the pinch bolt to take out the rear wheel spindle by using a large screwdriver to spread the pinch joint if required. Position the wheel spindle then put in a brand-new pinch bolt without applying any torque at this time. The washer installation requires the cupped side facing away from the bushing while you place the tension strut followed by bushing addition with washer and new nut before skipping the tightening step. Mount the lower control arms while installing fresh flag bolts as well as washers and nuts but do not secure them yet. When the suspension reaches the desired height with a jack stand in place you should tighten all the nuts and bolt. After unscrewing the jack stand you should lower the suspension. The installation requires placing a brand-new gasket followed by lining up the rear backing plate while using new bolts for installation. Clear all dirt and rust from the ABS sensor mounting hole before installing both brake anti-lock sensor components with their bolt. Before closing the process put the wheel hub in place and check if wheel misalignment requirements need adjustments.


Related Mercury Parts
 Mercury Axle Support Bushings
 Mercury Bump Stop
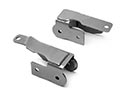 Mercury Control Arm Bracket
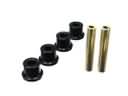 Mercury Crossmember Bushing
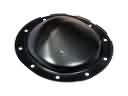 Mercury Differential Cover
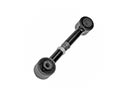 Mercury Lateral Link
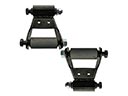 Mercury Leaf Spring Shackle
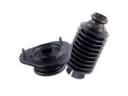 Mercury Shock and Strut Boot
 Mercury Strut Housing
 Mercury Sway Bar Link
 Mercury Sway Bar Link Bushing
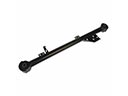 Mercury Trailing Arm