FordParts
My Garage
My Account
Cart
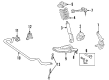
OEM Ford Expedition Control Arm
Suspension Arm- Select Vehicle by Model
- Select Vehicle by VIN
Select Vehicle by Model
orMake
Model
Year
Select Vehicle by VIN
For the most accurate results, select vehicle by your VIN (Vehicle Identification Number).
55 Control Arms found


Ford Expedition Upper Control Arm, Front Passenger Side Part Number: 5L3Z-3084-B
$128.18 MSRP: $210.91You Save: $82.73 (40%)Ships in 1-2 Business Days

Ford Expedition Upper Control Arm, Front Passenger Side Part Number: 6L1Z-3084-AA
$113.82 MSRP: $187.27You Save: $73.45 (40%)Ships in 1-2 Business Days


Ford Expedition Upper Control Arm, Rear Part Number: HL1Z-5A972-A
$104.53 MSRP: $172.00You Save: $67.47 (40%)Ships in 1-2 Business Days

Ford Expedition Upper Control Arm, Front Driver Side Part Number: EL3Z-3085-B
$123.76 MSRP: $203.64You Save: $79.88 (40%)Ships in 1 Business Day


Ford Expedition Upper Control Arm, Front Passenger Side Part Number: EL3Z-3084-B
$123.76 MSRP: $203.64You Save: $79.88 (40%)Ships in 1 Business Day
Ford Expedition Upper Control Arm, Front Driver Side Part Number: 5L3Z-3085-B
$123.76 MSRP: $203.64You Save: $79.88 (40%)Ships in 1 Business Day

Ford Expedition Lower Control Arm, Front Passenger Side Part Number: 9L3Z-3078-A
$179.01 MSRP: $294.55You Save: $115.54 (40%)Ships in 1-2 Business Days
Ford Expedition Lower Control Arm, Front Driver Side Part Number: 9L3Z-3079-A
$172.38 MSRP: $283.64You Save: $111.26 (40%)Ships in 1 Business Day

Ford Expedition Lower Control Arm, Front Driver Side Part Number: JL1Z-3079-B
$375.59 MSRP: $623.64You Save: $248.05 (40%)Ships in 1-2 Business Days

Ford Expedition Upper Control Arm, Front Passenger Side Part Number: 2L1Z-3084-CA
$81.53 MSRP: $112.79You Save: $31.26 (28%)Ships in 1-2 Business Days


Ford Expedition Lower Control Arm, Front Passenger Side Part Number: 6L1Z-3078-AA
$297.39 MSRP: $411.42You Save: $114.03 (28%)Ships in 1-2 Business Days
Ford Expedition Lower Control Arm, Front Driver Side Part Number: 6L1Z-3079-AA
$408.56 MSRP: $565.20You Save: $156.64 (28%)Ships in 1-2 Business Days

Ford Expedition Lower Control Arm, Rear Part Number: F85Z-5A649-BA
$101.98 MSRP: $138.78You Save: $36.80 (27%)

Ford Expedition Upper Control Arm, Front Part Number: 5L3Z-3085-C


Ford Expedition Upper Control Arm, Front Part Number: 5L3Z-3084-C


| Page 1 of 3 |Next >
1-20 of 55 Results
Ford Expedition Control Arm
OEM Control Arm boasts unmatched quality. Each part goes through full quality checks. They adhere to Ford's official factory standards. These steps remove flaws and inconsistencies. So you can get Control Arm with long life and a perfect fit. Come to our website and find genuine Ford Expedition parts. We keep a wide inventory of OEM Expedition parts at the highly affordable prices. It's easy to search, compare, and pick what you need. You'll love the clear info and simple checkout. We offer top-rated customer service, and we reply fast. We also ship promptly to ensure your order arrives on time.
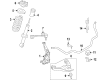
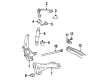
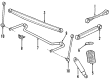
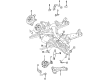
The Control Arm in Ford Expedition simply translates the movement of the frame to the wheels and houses other spare parts including; shocks and springs. These arms turn in relation to the road's surface and help the wheels to rotate in a vertical motion. Ford Expedition Control Arms come in different designs and forging materials; the types that are found in more advanced models are cast iron or aluminum. However, common chasis wear items such as bushings and ball joints may sometimes have to be replaced as they are relatively durable. Aluminum and high-strength steel performance control arms are also offered for the for high-speed application or for modified car models. Further, control arm bushings, and hardware are available; that can be either used to replace OE arms or adjust the mounting position for improved alignment.
Ford Expedition Control Arm Parts and Q&A
- Q: What steps should be taken before removing and installing the lower control arm on Ford Expedition?A:The safe removal process for the lower control arm starts by turning off the Air Suspension switch in the LH rear quarter trim panel because this disables power to prevent undesired air spring movements during maintenance work. Begin by taking off the combination of wheel assembly and tire. Utilize the hex holding function to stop the stud from rotating when you extract and dispose the nut. Excessive pressure at the stud end can free the stud from knuckle attachment so you should tap it for separation before discarding the nut. The process requires you to first remove the bolt together with the nut and throw away the discarded nut afterward followed by extraction of another nut and bolt before discarding the nut. The procedure ends with discarding the nut when you remove the bolt and lower arm together. The installer should put pivot nuts and bolts together for the lower arm installation but must postpone all tightening steps until the replacement process finishes under the vehicle's wheel and tire assembly weight. After the installation process check and perform alignment adjustments on the front end if necessary.
- Q: How to service and repair the lower control arm on Ford Expedition?A:The service and repair process for lower control arms requires disabling the Air Suspension electrical power through the RH kick panel switch to stop unpredictable air spring inflation or deflation. Rise and stabilize the vehicle before you take away the tire and wheel assembly even though you must not employ heat to break free stuck wheel nuts because this method may damage both the wheel and bearings. To begin repairs start by taking off the brake disc shield followed by removing the upper Shock Absorber nut and washer and front shock absorber by untightening its two nuts. First detach the brake hose bracket screw together with its bracket at the front suspension lower arm. Next remove the front stabilizer bar link nut. Deploy the Coil Spring Compressor to compress the front coil spring until you can get rid of the lower Ball Joint castle nut after removing the attached cotter pin. The Pitman Arm Puller helps eliminate the lower ball joint from its connection to the front wheel Spindle after repositioning the front suspension lower arm nut for future installation. To remove the front suspension lower arm together with the front coil spring start by removing the two lower arm nuts and bolts. When placing the front coil spring on the front suspension lower arm it should be positioned to show the first hole while revealing the second hole. Nut installation of the front suspension lower arm should be done to original specifications while keeping in mind that production adjustment of the caster split adjuster remains forbidden. Install the castle nut onto the lower ball joint first and add the new cotter pin while maintaining curb position ride height on the control arms. Then tighten the forward front suspension lower arm nut before putting the front stabilizer bar link nut onto its place. Begin by taking out the Coil Spring Compressor as you implement the front shock absorber with its respective lower nuts. The installation process requires attachment of the upper shock absorber nut and washer preceding the installation of the brake hose bracket screw and brake disc shield. Wheel hub assembly recipients require cleaning for achieving appropriate metal-lock contact because foreign debris and corrosion spaced between the hub and wheel can loosen nuts in ways that risk control instability. Before putting on the tire and wheel assembly the air suspension should be turned on if it exists in the vehicle. The last step entails both inspection and adjustment of the front end alignment.


Related Ford Expedition Parts
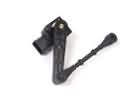 Ford Expedition Ride Height Sensor
 Ford Expedition Steering Knuckle
 Ford Expedition Sway Bar Link
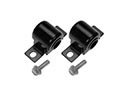 Ford Expedition Sway Bar Bushing
 Ford Expedition Bump Stop
 Ford Expedition Coil Springs
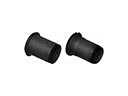 Ford Expedition Control Arm Bushing
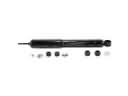 Ford Expedition Shock Absorber
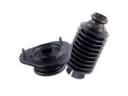 Ford Expedition Shock and Strut Boot
 Ford Expedition Spindle
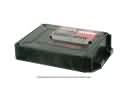 Ford Expedition Suspension Control Module
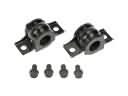 Ford Expedition Sway Bar Bracket
Browse Ford Expedition Control Arm by Years
2025
2024
2023
2022
2021
2020
2019
2018
2017
2016
2015
2014
2013
2012
2011
2010
2009
2008
2007
2006
2005
2004
2003
2002
2001
2000
1999
1998
1997