FordParts
My Garage
My Account
Cart
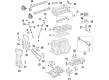
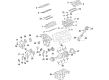
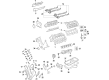
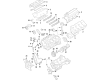
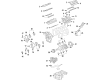
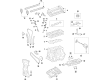
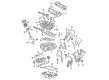
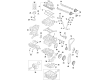
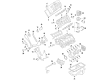
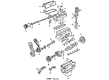
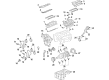
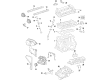
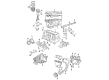
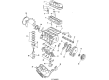
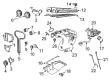
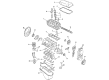
OEM Ford Timing Belt
Engine Timing Belt- Select Vehicle by Model
- Select Vehicle by VIN
Select Vehicle by Model
orMake
Model
Year
Select Vehicle by VIN
For the most accurate results, select vehicle by your VIN (Vehicle Identification Number).
33 Timing Belts found


Ford Timing Chain Part Number: CJ5Z-6268-A
$59.89 MSRP: $90.33You Save: $30.44 (34%)Ships in 1-2 Business DaysProduct Specifications- Other Name: Belt/Chain - Timing; Engine Timing Chain


Ford Timing Chain Part Number: JT4Z-6268-A
$63.58 MSRP: $97.67You Save: $34.09 (35%)Ships in 1-2 Business DaysProduct Specifications- Other Name: Belt/Chain - Timing; Engine Timing Chain
- Manufacturer Note: Service Engines Built After 21-Nov-2018 Will Use L1MZ-6268-A
- Replaces: FT4Z-6268-A


Ford Timing Chain Part Number: FR3Z-6268-A
$47.86 MSRP: $69.67You Save: $21.81 (32%)Ships in 1 Business DayProduct Specifications- Other Name: Belt/Chain - Timing
- Manufacturer Note: Primary


Ford Timing Chain Part Number: AT4Z-6268-C
$92.63 MSRP: $137.00You Save: $44.37 (33%)Product Specifications- Other Name: Belt/Chain - Timing
- Manufacturer Note: Primary
- Replaces: AT4Z-6268-B, BL3Z-6268-A


Ford Timing Chain Part Number: BR3Z-6268-A
$23.59 MSRP: $34.33You Save: $10.74 (32%)Ships in 1 Business DayProduct Specifications- Other Name: Chain - Timing; Secondary Chain
- Manufacturer Note: Secondary


Ford Timing Chain Part Number: HL3Z-6268-A
$35.50 MSRP: $51.67You Save: $16.17 (32%)Product Specifications- Other Name: Belt/Chain - Timing


Ford Timing Chain Part Number: CP9Z-6268-A
$65.15 MSRP: $94.83You Save: $29.68 (32%)Product Specifications- Other Name: Belt/Chain - Timing


Ford Timing Chain Part Number: 9L8Z-6268-B
$68.26 MSRP: $99.37You Save: $31.11 (32%)Ships in 1 Business DayProduct Specifications- Other Name: Belt - Timing


Ford Timing Belt Part Number: CM5Z-6268-A
$77.08 MSRP: $112.20You Save: $35.12 (32%)Ships in 1-2 Business DaysProduct Specifications- Other Name: Belt - Timing; Engine Timing Belt; Timing Belt Kit


Ford Timing Chain Part Number: BR3Z-6268-B
$47.77 MSRP: $68.33You Save: $20.56 (31%)Ships in 1 Business DayProduct Specifications- Other Name: Chain - Timing; Belt - Timing
- Manufacturer Note: Primary


Ford Timing Belt Part Number: F1ZZ-6268-A
$20.22 MSRP: $27.52You Save: $7.30 (27%)Product Specifications- Other Name: Belt - Timing; Engine Timing Belt; Timing Belt Kit

Ford Timing Chain Part Number: L1MZ-6268-A
$56.75 MSRP: $87.17You Save: $30.42 (35%)Ships in 1-2 Business DaysProduct Specifications- Other Name: Belt/Chain - Timing


Ford Timing Belt Part Number: BE8Z-6268-C
$48.70 MSRP: $69.67You Save: $20.97 (31%)Product Specifications- Other Name: Belt - Timing; Engine Timing Belt; Timing Belt Kit
- Replaces: BE8Z-6268-B


Ford Timing Chain Part Number: AT4Z-6268-A
$39.49 MSRP: $56.50You Save: $17.01 (31%)Product Specifications- Other Name: Belt - Timing
- Manufacturer Note: Secondary

Ford Timing Belt Part Number: F57Z-6268-A
$48.11 MSRP: $68.83You Save: $20.72 (31%)Product Specifications- Other Name: Belt - Timing; Engine Timing Belt; Timing Chain
- Manufacturer Note: Rubber belt


Ford Timing Belt Part Number: F8CZ-6268-AA
Product Specifications- Other Name: Belt - Timing; Engine Timing Belt; Timing Belt Kit


Ford Timing Chain Part Number: E43Z-6268-A
Product Specifications- Other Name: Belt - Timing
- Manufacturer Note: HSC

Ford Timing Belt Part Number: 988Z-6268-B2A
Product Specifications- Other Name: Belt - Timing; Engine Timing Belt; Timing Belt Kit
- Replaces: 3S4Z-6268-AA


Ford Timing Belt Part Number: 2M5Z-6268-AA
Product Specifications- Other Name: Belt - Timing; Engine Timing Belt; Timing Belt Kit; Timing Chain
- Replaces: F7CZ-6268-AA

Ford Timing Chain Part Number: K2GZ-6268-A
$60.23 MSRP: $87.67You Save: $27.44 (32%)Product Specifications- Other Name: Belt/Chain - Timing
| Page 1 of 2 |Next >
1-20 of 33 Results
Ford Timing Belt
If you own Ford and want to keep it in top shape, choosing OEM Timing Belt is a smart move. They are precisely engineered and follow strict factory standards. They are made in advanced facilities that use cutting edge technology. Each part goes through thorough testing to confirm strength and safety, so you can trust it. FordPartsDeal.com gives you genuine Ford Timing Belt at some of the affordable online prices without cutting quality. Every OEM Ford part includes the manufacturer's warranty, easy returns, and super-fast delivery. So why wait? Shop now and get your vehicle back to peak condition.
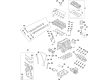
Ford Timing Belt ensures all engine pistons and valves remain in step to deliver power without damage. In 1913, Ford would become the first to use the moving assembly line, a technology that not only reduced the time spent building a vehicle but also made cars affordable to ordinary families and prefigured the modern era of technology-filled models such as EcoBoost power, SYNC voice control, Co-Pilot360 smart braking, and battery-electric muscle that the F-150 Lightning offers. Ford competes with power-saving and uses the small blocks, exhausting the turbocharged performance out of it to allow a commuter to pass the traffic and then make fewer stops at the gas pump. Ford also equips cabins with user-friendly screens and cloud updates that ensure that road trips are not outdated. Ford is baking lane keeping and auto braking directly into many trims and safety is riding shotgun with performance. To ensure that the piston and the valve do not collide, Timing Belt teeth are applied to clamp the crankshaft sprocket and the component of the cam gear to allow the two to turn in flawless synchrony, breaking up an engine in a few seconds. Timing Belt designers cut the teeth in a soft curve to reduce whining and produce one that lives longer than flat-tooth rivets. Timing Belt maintenance should be done at the mileages that are spaced in the manual since rubber is old, heat hardens it, and when a belt suddenly snaps, it is time to tow and not drive. Timing Belt swaps are applied to restore quiet timing accuracy, maintaining combustion events on time and fuel economy on target.
Ford Timing Belt Parts and Q&A
- Q: What are the steps and precautions for removing and installing a timing belt in 2.0L zetec-e engine on Ford Focus?A:For this to be done, a new timing belt (where necessary), a new valve cover gasket, and some special tools will be needed. Due to the fact that timing system is intricate, mistakes as in this case lead to severe engine damage; thus, it is advisable to undertake this procedure by expert professionals and it is advisable to double check all works before starting the engine. This can be done by removing the right-hand front wheel nut and using a spanner to loosen the nut of the negative battery cable, engaging the parking brake, raising the vehicle by the right-hand front wheel and putting on an axle stand. Open the right-hand front fender well liner for access to the auxiliary drivebelt and crankshaft pulley if necessary; remove the fasteners and pull the liner out of the way Take out the lower cover bolts and extract the auxiliary drivebelt lower cover, if required. The three water pump pulley bolts can be loosened without removing the drivebelt; the crankshaft pulley, timing belt lower cover and the water pump pulley can be removed thereafter. Following this, if desired the car can be dropped and the timing belt upper and middle covers and lastly the valve cover may be taken off. Put the engine back at TDC with the timing pin on the Number 1 cylinder, and use clean rags to block the spark plug holes. It will be necessary to point out that a special tool of the manufacturer is required to set camshafts at TDC while if this is not available a very neat shaped piece of metal can be bent to do the same job. If the timing belt is to be reused, put some paint on the belt so that when reinstalling the belt will be fitted in the correct direction. Free the tensioner bolt and move the tensioner counter clockwise, remove the bolt and detach the tensioner from inner shield. It is crucial for the sprockets to be rotated as little as possible; slide the timing belt off sprockets and pulleys. Should the old belt be to be reused one has to inspect it for signs of wear or damage and if the new belt is to be fitted, one has to look for signs of oil or coolant leaking and repair them if any and clean the area. There is always doubt when it comes to belt replacement, but normally a replacement is necessary if the belt looks worn or damaged in any way, the same applies to the belt tensioner and sprockets. Prior to cranking the engine, grab the crankshaft and turn the same at least two times in the clockwise and anti-clockwise direction and ensure there is no undue drag. Do not rotate the crankshaft through more than a few degrees and make sure the engine is again at TDC on the Number 1 cylinder. The next step is to position the TDC of the camshafts and this implies loosening of the camshaft sprocket bolts but when this is done the sprockets are not to rotate. After camshafts have been placed at TDC, the timing belt is to be fitted with tensioner not placed until the belt has been evenly fitted. All the excess should be left on the side of the tensioner, and when the belt is tight enough, the tensioner can be bolted and tighted. Torque both the camshaft sprocket bolt to the required torque, pull out the aligning tool and timing pin and secure the crankshaft pulley temporarily. Make sure the crankshaft is rotated through two full turns in order to relieve tension on the timing belt and ensure that it is tensioned properly to where the timing pin can be properly inserted and cannot go in any further. In the case of any camshaft is wrong, align it to the correct position as you ensure the belt slack has been removed by the tensioner. The rest of the reassembly process involves just the reverse of the removal process, with due attention being paid to the performance of all fasteners to the recommended torque values.
- Q: How to remove and install Timing Belt on 1993-2011 Ford Ranger?A:There are many inputs and outputs involved in the timing system or rather the cycle and if wrongly timed, the engine will be severely damaged. The procedure should only be done by experienced practitioners and when there is doubt about skills, the subject should seek the services of a professional. Check all the operations twice in order to make certain that everything is in order before starting the engine. First, there is primary loosening of the connections, this involves removing the negative terminal of the car battery, followed by the removal of the spark plugs and placing the number one piston on the top dead center on the compression stroke, while avoiding turning the crankshaft till the timing belt is replaced. With the engine off and cooling fan disengaged, siphon out the coolant through the radiator drain plug, then remove the drivebelts and the fan shroud and fan, and unbolt the water pump pulley, and finally replace the upper hose with the thermostat housing Big caution, here The upper part of the cooling system is extremely compact and getting at some of these items for removal might be tough. Do not however remove the hoses; you'll remove the air conditioning compressor by undoing the bolts then setting the compressor to one side, then next undo the bolts holding the bracket around the engine and set aside the power steering pump and its bracket assembly. The outer timing belt cover is popped off by removing four bolts and one screw; the crankshaft drivebelt pulley and the belt guide are taken off. Loosen the belt tensioner adjustment and pivot bolt and then using a belt tension releasing tool to ease of the tension in the belt and then tight the tension adjusting bolt to compactly fit the tensioner on the belt. Take out the timing belt and lubricate it and look for any signs of wearing and serious damage, if any then replace it. Inspection of the sprockets should be conducted for such attributes as wear, cracks, burrs, etc., and in case of damage; they should be replaced at the right instance to avoid further issues; it is also important to check on the mounting bolts to ensure that they are tightened to the correct torque. Except when cranking the engine for starting, the engine should always be rocked gently through at least two complete revolutions to check for any resistance which is likely to manifest in valve interference with pistons. It is advisable here for the pointer on the inner timing belt cover to line up with the timing mark on the camshaft sprocket when the crankshaft sprocket is still at TDC. some special model may require certain alignment process of the auxiliary shaft sprocket and the oil pump pulley. Position the timing belt on the crankshaft sprocket, followed by the auxiliary shaft/oil pump sprocket and then pull the belt away from the engine so that slack is removed, before placing the belt over the crankshaft sprocket in an anti-clockwise manner. Loosen the tensioner adjustment bolt to make it free to move against the belt and if the spring is not tight enough use the pry bar to force the roller against the belt. In the normal turning direction, turn the crank shaft two revolutions full to allow the belt snug and also for possible contact of the valves with the pistons without forcing the crank shaft if it binds. In 30-33 ft-lbs turn the tensioner assembly against the belt; tighten the tensioner adjustment and pivot bolts to the required torque and check the line-up of the timing marks. The timing belt cover and mounting bolts should be remounted and tightened to the prescribed torque and then all the rest of the operations done in both conventional and anti-clockwise manner with exception to the crankshaft pulley/sprocket bolt that should also be tightened to the recommended torque. Last of all, verify the alignment of the timing mark before finally screwing the belt cover access plugs.


Related Ford Parts
 Ford Timing Chain
 Ford Dipstick
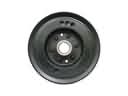 Ford Harmonic Balancer
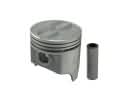 Ford Piston
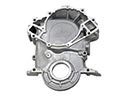 Ford Timing Cover
 Ford Balance Shaft Gear
 Ford Oil Pan Baffle
 Ford Rod Bearing
 Ford Side Cover Gasket
 Ford Transfer Case Cover
 Ford Underbody Splash Shield
 Ford Valve Stem Seal
Browse Ford Timing Belt by Models
Ranger Bronco Mustang Explorer Focus Fusion F-150 Maverick EXP Escape Edge Expedition Fiesta Taurus Thunderbird Flex Transit Connect Bronco Sport Probe Bronco II EcoSport Escort F-250 Aerostar Contour E-150 Econoline F-350 Freestar LTD Police Interceptor Utility Tempo Windstar Police Interceptor Sedan E-150 E-150 Econoline Club Wagon E-250 E-250 Econoline E-350 Econoline E-350 Econoline Club Wagon F-150 Heritage Special Service Police Sedan Transit-150 Transit-250 Transit-350 Transit-350 HD