FordParts
My Garage
My Account
Cart
OEM Mercury Dimmer Switch
Light Dimmer Switch- Select Vehicle by Model
- Select Vehicle by VIN
Select Vehicle by Model
orMake
Model
Year
Select Vehicle by VIN
For the most accurate results, select vehicle by your VIN (Vehicle Identification Number).
13 Dimmer Switches found


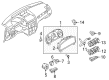
Mercury Dimmer Switch Part Number: 7L1Z-11691-BA
$29.38 MSRP: $41.67You Save: $12.29 (30%)Ships in 1-3 Business DaysProduct Specifications- Other Name: Resistor Assembly; Instrument Panel Dimmer Switch; Headlight Dimmer Switch; Instrument Light Rheostat; Rheostat
- Manufacturer Note: BLACK


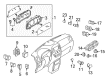
Mercury Instrument Light Rheostat Part Number: F3DZ-11691-A
$57.61 MSRP: $79.70You Save: $22.09 (28%)Ships in 1-2 Business DaysProduct Specifications- Other Name: Resistor Assembly
- Manufacturer Note: Rotary thumb wheel switch - instr. pnl lighting - #FODB-AB, F2DB-AA, F3DB-AA, PMF2DB-AA,
- Replaces: F2DZ-5404338-H, F2DZ-5404338-J, F2DZ-5404338-L, F2DZ-5404338-D, F2DZ-5404338-C, F2DZ-11691-A, F2DZ-5404338-G, F2DZ-5404338-B, F2DZ-5404338-E, F2DZ-5404338-F, F2DZ-5404338-K

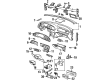
Mercury Headlamp Switch Part Number: BE5Z-11654-DA
$45.80 MSRP: $72.73You Save: $26.93 (38%)Ships in 1-2 Business DaysProduct Specifications- Other Name: Switch Assembly - Headlamps; Headlight Switch; Multi Purpose Switch
- Manufacturer Note: BLACK
- Replaces: 8A8Z-11654-DA, SW-6617


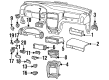
Mercury Dimmer Switch Part Number: 6E5Z-11691-AA
Product Specifications- Other Name: Resistor Assembly; Headlight Dimmer Switch; Instrument Light Rheostat
- Manufacturer Note: Switch - Dimmer


Mercury Dimmer Switch Part Number: 3W1Z-11691-AA
Product Specifications- Other Name: Resistor Assembly; Headlight Dimmer Switch; Instrument Light Rheostat
- Manufacturer Note: Thumbwheel design


Mercury Headlamp Switch Part Number: 9R3Z-11654-CA
$62.75 MSRP: $99.64You Save: $36.89 (38%)Product Specifications- Other Name: Switch Assembly - Headlamps; Headlight Switch; Multi Purpose Switch
- Manufacturer Note: BLACK


Mercury Dimmer Switch Part Number: 9E5Z-11691-AA
Product Specifications- Other Name: Resistor Assembly; Instrument Light Rheostat

Mercury Dimmer Switch Part Number: YL8Z-11691-AA
Product Specifications- Other Name: Resistor Assembly; Instrument Panel Dimmer Switch; Instrument Light Rheostat

Mercury Resistor Part Number: XS2Z-11691-AA
Product Specifications- Other Name: Switch Assembly
- Manufacturer Note: Rotary thumb wheel switch-instr. pnl lighting

Mercury Instrument Light Rheostat Part Number: F6XZ-11691-BA
Product Specifications- Other Name: Resistor Assembly
- Manufacturer Note: Dimmer switch & thumbwheel unit; serviced in "F6XZ 11654-AAA" asy., w/ auto lamp

Mercury Instrument Light Rheostat Part Number: F3XY11691A
Product Specifications- Other Name: Resistor Assembly

Mercury Headlamp Dimmer Switch Part Number: 5U2Z-11654-A
Product Specifications- Other Name: Switch Assembly - Lighting; Headlight Dimmer Switch; Multi Purpose Switch

Mercury Dimmer Switch Part Number: 3F2Z-11691-AAA
Product Specifications- Other Name: Resistor Assembly; Headlight Dimmer Switch; Instrument Light Rheostat
- Manufacturer Note: Switch - Dimmer
Mercury Dimmer Switch
If you own Mercury and want to keep it in top shape, choosing OEM Dimmer Switch is a smart move. They are precisely engineered and follow strict factory standards. They are made in advanced facilities that use cutting edge technology. Each part goes through thorough testing to confirm strength and safety, so you can trust it. FordPartsDeal.com gives you genuine Mercury Dimmer Switch at some of the affordable online prices without cutting quality. Every OEM Mercury part includes the manufacturer's warranty, easy returns, and super-fast delivery. So why wait? Shop now and get your vehicle back to peak condition.
Mercury Dimmer Switch makes night driving a sane activity with the ability to switch beams to cabin light in one snap. Since 1938, Mercury had accepted the name of the Roman messenger, snatched it, and pursued a middle ground between the sensations of ride and the wallet. It introduced vehicles with soft suspension, hard edges, and cabins that dampened road noise during long trips. Showrooms promoted the middle-size options that appeared spacious but agile to provide families with a quick escape out of everyday stalemates. Mercury piled reputations on top of cougar thrills and Grand Marquis comfort, and decade after decade, new gadgets came with it. Mercury had maintained that position right up to its last year without abandoning the pledge of plain control. The drivers trusted the label as every mile seemed to be less of work and rather of constant communication with the road. The Dimmer Switch switches the power to low or high beam and dims the dash brightness with a power flick of a stalk, eliminating distraction. Dimmer Switch wiring is ridden on the lighting circuit such that a flick of the switch alters exterior reach and interior atmosphere, enhancing visibility and reducing eye strain. The Dimmer Switch is designed to fit directly into factory connectors, providing resistance against rattling, against changes in temperature, and leaving contacts clean throughout years of clicky confidence. At that dependability, Mercury owners devote more time on rolling and less time on worrying about the sudden dark spots. In case of necessity, a new Dimmer Switch can be installed in minutes with the help of simple tools, and drivers will be able to have all lights under their control again without any drama.
Mercury Dimmer Switch Parts and Q&A
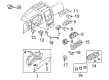
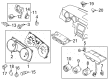
- Q: How to service and repair the instrument panel dimmer switch on Mercury Grand Marquis?A:The first step of service and repair work requires disconnecting electrical connectors from the headlamp switch before removing it. You should liberate the retaining tabs before taking out the instrument panel dimmer switch. The new switch installation requires use of the reversed removal steps.
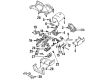
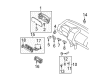
- Q: How to service and repair the headlamp dimmer switch on Mercury Mariner?A:The service and maintenance of the headlamp dimmer switch should start by removing the trim surrounding the steering column opening. Start by uninstalling the three screws from the lower steering column shrouds before removing the upper and lower shrouds. Disconnect the electric multi-function switch connector by removing its screws then disconnecting the electrical connector to extract the switch. The installation process should follow the reverse steps of the removal method.


Related Mercury Parts
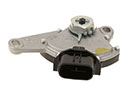 Mercury Neutral Safety Switch
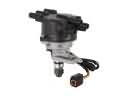 Mercury Distributor
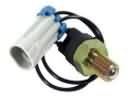 Mercury Back Up Light Switch
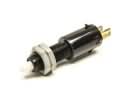 Mercury Brake Light Switch
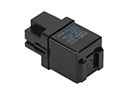 Mercury Flasher Relay
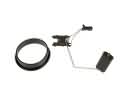 Mercury Fuel Level Sensor
 Mercury Headlight Switch
 Mercury Ignition Lock Cylinder
 Mercury Instrument Cluster
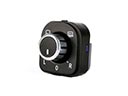 Mercury Mirror Switch
 Mercury Parking Assist Sensor
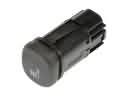 Mercury Seat Heater Switch