FordParts
My Garage
My Account
Cart
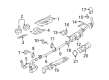
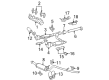
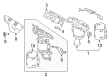
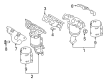
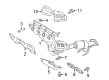
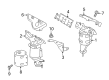
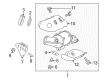
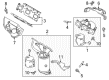
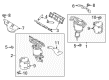
OEM Lincoln Exhaust Manifold
Engine Exhaust Manifold- Select Vehicle by Model
- Select Vehicle by VIN
Select Vehicle by Model
orMake
Model
Year
Select Vehicle by VIN
For the most accurate results, select vehicle by your VIN (Vehicle Identification Number).
75 Exhaust Manifolds found


Lincoln Exhaust Manifold, Passenger Side Part Number: XL3Z-9430-GA
$82.55 MSRP: $120.17You Save: $37.62 (32%)Product Specifications- Other Name: Manifold Assembly - Exhaust; Exhaust Manifold, Right; Manifold
- Position: Passenger Side


Lincoln Exhaust Manifold, Driver Side Part Number: BT4Z-5G232-C
$745.50 MSRP: $940.00You Save: $194.50 (21%)Product Specifications- Other Name: Exhaust Manifold And Catalyst; Catalytic Converter with Integrated Exhaust Manifold, Left; Manifold Converter
- Position: Driver Side
- Replaces: BT4Z-5G232-B


Lincoln Exhaust Manifold, Driver Side Part Number: DA5Z-9431-A
$155.52 MSRP: $240.00You Save: $84.48 (36%)Ships in 1-3 Business DaysProduct Specifications- Other Name: Manifold Assembly - Exhaust; Exhaust Manifold, Left
- Position: Driver Side


Lincoln Exhaust Manifold, Passenger Side Part Number: 7T4Z-9430-C
$64.01 MSRP: $93.17You Save: $29.16 (32%)Ships in 1-3 Business DaysProduct Specifications- Other Name: Manifold Assembly - Exhaust; Exhaust Manifold, Right; Manifold
- Position: Passenger Side


Lincoln Exhaust Manifold, Passenger Side Part Number: 2L1Z-9430-BA
$104.77 MSRP: $152.50You Save: $47.73 (32%)Ships in 1-2 Business DaysProduct Specifications- Other Name: Manifold Assembly - Exhaust; Exhaust Manifold, Right; Manifold
- Position: Passenger Side


Lincoln Exhaust Manifold, Passenger Side Part Number: DA5Z-9430-A
$138.55 MSRP: $201.67You Save: $63.12 (32%)Ships in 1-3 Business DaysProduct Specifications- Other Name: Manifold Assembly - Exhaust; Exhaust Manifold, Right
- Position: Passenger Side
- Replaces: AA5Z-9430-A


Lincoln Exhaust Manifold, Passenger Side Part Number: 9L3Z-9K494-A
$140.84 MSRP: $205.00You Save: $64.16 (32%)Product Specifications- Other Name: Kit - Manifold And Gaskets; Exhaust Manifold, Right; Manifold
- Position: Passenger Side
- Replaces: 9L3Z-9430-D


Lincoln Exhaust Manifold, Driver Side Part Number: 7L1Z-9431-A
$179.77 MSRP: $261.67You Save: $81.90 (32%)Product Specifications- Other Name: Manifold Assembly - Exhaust; Exhaust Manifold, Left, Right; Manifold
- Position: Driver Side


Lincoln Exhaust Manifold, Front Driver Side Part Number: DG9Z-5G232-D
$696.15 MSRP: $940.00You Save: $243.85 (26%)Ships in 1-3 Business DaysProduct Specifications- Other Name: Exhaust Manifold And Catalyst; Catalytic Converter
- Position: Driver Side


Lincoln Exhaust Manifold, Front Part Number: DE9Z-5G232-A
$664.23 MSRP: $896.57You Save: $232.34 (26%)Product Specifications- Other Name: Exhaust Manifold And Catalyst; Exhaust Manifold And Catalyst Assembly
- Position: Front


Lincoln Exhaust Manifold Part Number: DS7Z-5G232-C
$1418.96 MSRP: $1795.19You Save: $376.23 (21%)Product Specifications- Other Name: Exhaust Manifold And Catalyst; Catalytic Converter


Lincoln Catalytic Converter, Passenger Side Part Number: F2GZ-5G232-B
$1186.77 MSRP: $1500.34You Save: $313.57 (21%)Product Specifications- Other Name: Converter Assembly; Catalytic Converter with Integrated Exhaust Manifold, Right; Exhaust Manifold; Manifold W/Converter
- Manufacturer Note: Rear
- Position: Passenger Side


Lincoln Catalytic Converter, Rear Part Number: BB5Z-5E212-D
$1338.34 MSRP: $1686.14You Save: $347.80 (21%)Product Specifications- Other Name: Converter Assembly; Catalytic Converter, Rear; Manifold W/Converter
- Position: Rear


Lincoln Catalytic Converter, Front Driver Side Part Number: F2GZ-5G232-C
$1501.50 MSRP: $1900.00You Save: $398.50 (21%)Product Specifications- Other Name: Exhaust Manifold And Catalyst; Catalytic Converter with Integrated Exhaust Manifold, Left
- Position: Driver Side

Lincoln Catalytic Converter Part Number: EB5Z-5E212-A
$1135.56 MSRP: $1428.64You Save: $293.08 (21%)Ships in 1-3 Business DaysProduct Specifications- Other Name: Converter Assembly; Manifold W/Converter


Lincoln Catalytic Converter, Passenger Side Part Number: DA8Z-5G232-D
$1187.54 MSRP: $1501.31You Save: $313.77 (21%)Product Specifications- Other Name: Converter Assembly; Catalytic Converter with Integrated Exhaust Manifold, Right; Manifold Converter
- Manufacturer Note: Rear
- Position: Passenger Side


Lincoln Catalytic Converter, Front Driver Side Part Number: DA8Z-5G232-C
$811.73 MSRP: $1024.10You Save: $212.37 (21%)Product Specifications- Other Name: Exhaust Manifold And Catalyst; Catalytic Converter with Integrated Exhaust Manifold, Left; Manifold Converter
- Position: Driver Side


Lincoln Exhaust Manifold, Front Driver Side Part Number: FB5Z-5G232-A
$862.84 MSRP: $1089.00You Save: $226.16 (21%)Product Specifications- Other Name: Exhaust Manifold And Catalyst; Catalytic Converter with Integrated Exhaust Manifold, Left; Manifold Converter
- Position: Driver Side

Lincoln Exhaust Manifold, Passenger Side Part Number: FB5Z-5G232-B
$1051.78 MSRP: $1328.93You Save: $277.15 (21%)Product Specifications- Other Name: Converter Assembly; Catalytic Converter with Integrated Exhaust Manifold, Right; Manifold Converter
- Manufacturer Note: Rear
- Position: Passenger Side


Lincoln Exhaust Manifold, Driver Side Part Number: F75Z-9431-DB
Product Specifications- Other Name: Manifold Assembly - Exhaust; Exhaust Manifold, Left; Manifold
- Manufacturer Note: LH-includes connector F75Z-9F485-AA.
- Position: Driver Side
| Page 1 of 4 |Next >
1-20 of 75 Results
Lincoln Exhaust Manifold
If you own Lincoln and want to keep it in top shape, choosing OEM Exhaust Manifold is a smart move. They are precisely engineered and follow strict factory standards. They are made in advanced facilities that use cutting edge technology. Each part goes through thorough testing to confirm strength and safety, so you can trust it. FordPartsDeal.com gives you genuine Lincoln Exhaust Manifold at some of the affordable online prices without cutting quality. Every OEM Lincoln part includes the manufacturer's warranty, easy returns, and super-fast delivery. So why wait? Shop now and get your vehicle back to peak condition.
Lincoln Exhaust Manifold forces exhaust engine fumes away fast and enhances power while reducing noise. Lincoln seeks a Quiet Flight concept that silences cabins, making conversation feel natural at any speed. Lincoln began in 1917 and, on joining Ford in 1922, acquired the strength to climb up to production. Lincoln is loaded with soft touch materials, big digital gauges, and controls that are not crowded to cause distraction. The Co-Pilot360 includes lane keeping, blind-spot, and parking assist to alleviate the pressure on drivers during the daily commute. ActiveGlide also allows long distance travelers to ride on the highway hands-free as they enjoy the system guarding them. Lincoln still takes into account the feedback of the owners and introduces new technological changes annually, rather than once every time the model is completely redesigned. The Exhaust Manifold is bolted to the cylinder head and is made of cast iron or stainless steel to shake off the unrelenting heat. Its profile runners inhale gases into the exhaust stream at a high rate that trims back pressure, resulting in sharper throttle response with smoother revs. Performance headers are applied as high performance high-flow Exhaust Manifold, which increases velocity and allows the engine to breathe freely. Dynamic back-pressure tuning makes the Exhaust Manifold an active partner that varies the flow for low-end pull and top-end punch. As temperatures run high, the rugged Exhaust Manifold will resist cracking, and the engine life will last without much ado.
Lincoln Exhaust Manifold Parts and Q&A
- Q: How to remove and install the exhaust manifold in V6 engine on Lincoln Navigator?A:To remove the exhaust manifold, first disconnect the negative battery cable and securely raise the vehicle on jackstands, ensuring to turn off the air suspension switch if applicable. Disconnect the oxygen sensor electrical connector and apply penetrating oil to the exhaust Y-pipe-to-manifold studs and nuts, which may be rusty. Remove the nuts securing the exhaust Y-pipe to the exhaust manifolds, using heat if necessary to loosen them. For the right manifold, disconnect the EGR tube, and for the left manifold, remove the nut holding the oil dipstick tube support and pull the dipstick tube out. Next, remove the mounting bolts to separate the exhaust manifold(s) from the cylinder head, noting the locations of the bolts and studs while removing old gaskets. Before installation, check the exhaust manifold for cracks and ensure the bolt threads are clean and undamaged, cleaning the mating surfaces thoroughly. If replacing the manifold, remove the oxygen sensor, clean its threads, and apply high-temperature anti-seize compound before transferring it to the new manifold. Position the new manifold and gasket on the cylinder head, installing the mounting bolts and studs, and if warpage is present, install pilot bolts first and elongate holes if necessary. When tightening the bolts, start with the center pair, followed by the front and rear pairs, using a torque wrench to ensure proper tightness in three equal steps. Finally, the remaining steps follow the reverse order of removal, and after installation, start the engine to check for exhaust leaks.
- Q: How to remove and reinstall an exhaust manifold on Lincoln Town Car Overhead cam (OHC) engine?A:Disconnect the cable from the negative battery terminal. Raise the vehicle and support it securely on jackstands. Working under the vehicle, apply penetrating oil to the exhaust pipe-to-manifold studs and nuts as they're usually corroded or rusty. Remove the nuts holding the exhaust pipe(s) to the manifold(s). On the right side exhaust manifold, disconnect the EGR pipe and remove the two manifold-to-exhaust pipe nuts. On the left side, only the two exhaust manifold-to-exhaust pipe nuts need to be removed. In extreme cases, you may have to heat them with a propane or acetylene torch in order to loosen them. Disconnect the EGR tube connector from the right side manifold. Remove the through bolts for the engine mounts. Slowly raise the engine with a floor jack, using a piece of wood between the jack and the oil pan, until the fan just touches the fan shroud. Be careful that nothing is being pulled or stretched too tightly. Remove the left side engine mount from the block, if necessary, to get to all the manifold bolts. It isn't necessary to remove the right side engine mount. Remove the exhaust manifold(s)-to-cylinder head bolts and separate the manifold(s) from the cylinder head(s). Check the manifold for cracks and make sure the bolt threads are clean and undamaged. The manifold and cylinder head mating surfaces must be clean before the manifolds are reinstalled. Position the manifold on the head and install the mounting bolts. When tightening the mounting bolts, work from the center to the ends and be sure to use a torque wrench. Tighten the bolts in three equal steps to the torque. The remaining installation steps are the reverse of removal. Start the engine and check for exhaust leaks.


Related Lincoln Parts
 Lincoln Catalytic Converter
 Lincoln Muffler
 Lincoln Catalytic Converter Gasket
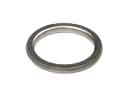 Lincoln Exhaust Flange Gasket
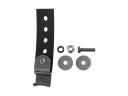 Lincoln Exhaust Hanger
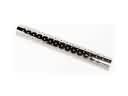 Lincoln Exhaust Heat Shield
 Lincoln Exhaust Manifold Clamp
 Lincoln Exhaust Manifold Gasket
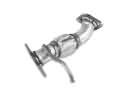 Lincoln Exhaust Pipe
 Lincoln Exhaust Tip
 Lincoln Muffler Strap
 Lincoln Tail Pipe