FordParts
My Garage
My Account
Cart
OEM Ford Fuel Level Sensor
Gas Gauge Sensor- Select Vehicle by Model
- Select Vehicle by VIN
Select Vehicle by Model
orMake
Model
Year
Select Vehicle by VIN
For the most accurate results, select vehicle by your VIN (Vehicle Identification Number).
400 Fuel Level Sensors found


Ford Fuel Pump Part Number: 7R3Z-9275-C
$236.52 MSRP: $392.73You Save: $156.21 (40%)Ships in 1-2 Business DaysProduct Specifications- Other Name: Sender Assembly - Fuel Tank; Fuel Sender & Hanger Assembly; Fuel Level Sensor; Sending Unit; Fuel Sender Unit
- Manufacturer Note: Jet Pump
- Replaces: 6R3Z-9275-AA


Ford Fuel Pump Part Number: BC3Z-9275-B
$309.89 MSRP: $514.55You Save: $204.66 (40%)Ships in 1 Business DayProduct Specifications- Other Name: Sender Assembly - Fuel Tank; Electric Fuel Pump; Fuel Pump Module; Sending Unit; Strainers & Misc Parts.


Ford Fuel Gauge Sending Unit Part Number: F81Z-9275-DB
$903.38 MSRP: $1500.00You Save: $596.62 (40%)Ships in 1-2 Business DaysProduct Specifications- Other Name: Sender Assembly - Fuel Tank; Fuel Tank Sending Unit; Fuel Level Sensor; Fuel Sending Unit; Sending Unit
- Manufacturer Note: Includes gasket XC3U-9276-AB(part of the assembly), Diesel 7.3L - Midship - 141", 162",165",176",189",200",201" WB
- Replaces: F81Z-9275-DA


Ford Fuel Gauge Sending Unit Part Number: AL8Z-9A299-B
$58.37 MSRP: $97.82You Save: $39.45 (41%)Ships in 1-3 Business DaysProduct Specifications- Other Name: Sender Assembly - Fuel Tank; Fuel Tank Sending Unit; Fuel Level Sensor; Fuel Sending Unit; Fuel Sender Unit


Ford Fuel Gauge Sending Unit Part Number: BC3Z-9A299-H
$63.46 MSRP: $106.55You Save: $43.09 (41%)Ships in 1 Business DayProduct Specifications- Other Name: Sender Assembly - Fuel Tank; Fuel Sender and Hanger; Fuel Pump Module; Fuel Level Sensor; Sending Unit.; Fuel Sender Unit
- Replaces: BC3Z-9A299-E


Ford Fuel Gauge Sending Unit Part Number: BC3Z-9A299-A
$141.48 MSRP: $238.18You Save: $96.70 (41%)Ships in 1-2 Business DaysProduct Specifications- Other Name: Sender Assembly - Fuel Tank; Fuel Sender and Hanger Assembly; Fuel Level Sensor; Fuel Sending Unit; Fuel Sender Unit


Ford Fuel Gauge Sending Unit Part Number: AM6Z-9A299-A
$52.27 MSRP: $86.00You Save: $33.73 (40%)Ships in 1-3 Business DaysProduct Specifications- Other Name: Sender Assembly - Fuel Tank; Fuel Pump Module; Fuel Level Sensor; Sending Unit; Fuel Sender Unit


Ford Fuel Gauge Sending Unit Part Number: 9L1Z-9A299-C
$55.69 MSRP: $91.64You Save: $35.95 (40%)Ships in 1-3 Business DaysProduct Specifications- Other Name: Sender Assembly - Fuel Tank; Fuel Sender and Hanger; Fuel Pump Module; Fuel Level Sensor; Sending Unit.; Fuel Sender Unit; Sending Unit


Ford Fuel Gauge Sending Unit Part Number: 9M6Z-9A299-A
$56.91 MSRP: $93.64You Save: $36.73 (40%)Ships in 1-3 Business DaysProduct Specifications- Other Name: Sender Assembly - Fuel Tank; Fuel Sender and Hanger Assembly; Fuel Level Sensor; Fuel Sending Unit; Fuel Sender Unit


Ford Fuel Gauge Sending Unit Part Number: BC2Z-9A299-A
$57.24 MSRP: $94.18You Save: $36.94 (40%)Ships in 1-2 Business DaysProduct Specifications- Other Name: Sender Assembly - Fuel Tank; Fuel Sender and Hanger Assembly; Fuel Level Sensor; Fuel Sending Unit; Fuel Sender Unit
- Replaced by: BC2Z-9A299-B


Ford Fuel Gauge Sending Unit Part Number: AL8Z-9A299-A
$58.23 MSRP: $95.82You Save: $37.59 (40%)Ships in 1-2 Business DaysProduct Specifications- Other Name: Sender Assembly - Fuel Tank; Fuel Tank Sending Unit; Fuel Level Sensor; Fuel Sending Unit; Fuel Sender Unit


Ford Fuel Gauge Sending Unit Part Number: 9C2Z-9A299-B
$58.34 MSRP: $96.00You Save: $37.66 (40%)Ships in 1 Business DayProduct Specifications- Other Name: Sender Assembly - Fuel Tank; Fuel Sender and Hanger Assembly; Fuel Level Sensor; Fuel Sending Unit; Fuel Sender Unit


Ford Fuel Gauge Sending Unit Part Number: 6W1Z-9A299-A
$62.65 MSRP: $103.09You Save: $40.44 (40%)Ships in 1-2 Business DaysProduct Specifications- Other Name: Sender Assembly - Fuel Tank; Fuel Sender and Hanger Assembly; Fuel Level Sensor; Fuel Sending Unit; Fuel Sender Unit; Sending Unit


Ford Fuel Gauge Sending Unit Part Number: BV6Z-9A299-A
$83.87 MSRP: $138.00You Save: $54.13 (40%)Ships in 1-3 Business DaysProduct Specifications- Other Name: Sender Assembly - Fuel Tank; Fuel Tank Sending Unit; Fuel Pump Module Assembly; Fuel Level Sensor; Fuel Sending Unit; Level Sensor


Ford Fuel Gauge Sending Unit Part Number: 7R3Z-9A299-C
$91.60 MSRP: $150.73You Save: $59.13 (40%)Ships in 1-2 Business DaysProduct Specifications- Other Name: Sender Assembly - Fuel Tank; Fuel Sender and Hanger Assembly; Fuel Level Sensor; Fuel Sending Unit; Sending Unit
- Replaces: 4R3Z-9275-AA, 6R3Z-9275-A


Ford Fuel Pump Part Number: BR3Z-9275-B
$91.60 MSRP: $150.73You Save: $59.13 (40%)Ships in 1-2 Business DaysProduct Specifications- Other Name: Sender Assembly - Fuel Tank; Fuel Sender and Hanger; Fuel Level Sensor; Sending Unit; Fuel Sender Unit
- Replaces: BR3Z-9275-A, PS-412


Ford Fuel Gauge Sending Unit Part Number: F81Z-9A299-FA
$105.38 MSRP: $173.40You Save: $68.02 (40%)Product Specifications- Other Name: Sender Assembly; Fuel Tank Sending Unit; Fuel Level Sensor; Fuel Sending Unit; Fuel Sender Unit
- Manufacturer Note: Use with 29 gallon plastic tank; includes (1) F75Z 9417-BB., gas midship tank, 142" & 156" W/B


Ford Fuel Gauge Sending Unit Part Number: 7L2Z-9A299-A
$131.50 MSRP: $216.36You Save: $84.86 (40%)Ships in 1-2 Business DaysProduct Specifications- Other Name: Sender Assembly - Fuel Tank; Fuel Sender & Hanger Assembly; Fuel Level Sensor; Fuel Sender Unit; Sending Unit
- Replaces: 6L2Z-9A299-A


Ford Fuel Pump, Driver Side Part Number: 8A4Z-9275-B
$228.86 MSRP: $380.00You Save: $151.14 (40%)Ships in 1-2 Business DaysProduct Specifications- Other Name: Sender Assembly - Fuel Tank; Fuel Sending Unit; Fuel Level Sensor; Hanger Assembly.; Fuel Pump Assembly; Fuel Sender Unit
- Position: Driver Side


Ford Fuel Gauge Sending Unit Part Number: FOTZ-9A299-BA
$153.43 MSRP: $243.64You Save: $90.21 (38%)Product Specifications- Other Name: Gauge Assembly - Fuel; Fuel Pump and Sender Assembly; Fuel Level Sensor; Fuel Sending Unit; Sender Assembly; Fuel Pump; Fuel Pump Assembly; Fuel Sender Unit
| Page 1 of 20 |Next >
1-20 of 400 Results
Ford Fuel Level Sensor
If you own Ford and want to keep it in top shape, choosing OEM Fuel Level Sensor is a smart move. They are precisely engineered and follow strict factory standards. They are made in advanced facilities that use cutting edge technology. Each part goes through thorough testing to confirm strength and safety, so you can trust it. FordPartsDeal.com gives you genuine Ford Fuel Level Sensor at some of the affordable online prices without cutting quality. Every OEM Ford part includes the manufacturer's warranty, easy returns, and super-fast delivery. So why wait? Shop now and get your vehicle back to peak condition.
Ford Fuel Level Sensor makes drivers honest about the quantity of gas left in the car and avoids the shock on the roadside. It built its brand on a factory that was built in 1903 and spawned the 1913 moving assembly line, and the itchy push continues. EcoBoost engines are delivering both power and economy, SYNC is allowing voices to find music and directions, Co-Pilot360 is watching lanes and brakes when danger knocks at the door, and the all-electric version of the F-150 Lightning is laying down its torque without filling the air. The company is sweating to create technologies that keep the cabins connected. Whatever the Ford it is, the Fuel Level Sensor is in the tank itself, its float is suspended on a slender arm, and opposes current to convert the height of the liquid into an instant dash value. The Ford Fuel Level Sensor maintains accuracy with the crowded out fuel sloshes or variable temperatures; therefore, drivers rely on the figure and strategize halts. When a Ford gauge malfunctions by freezing, it is likely that the Fuel Level Sensor has lost contact on a damaged resistor or floating contact. Replace it before phony empty antics. A healthy Fuel Level Sensor reduces the element of guesswork and ensures that trips remain on the road.
Ford Fuel Level Sensor Parts and Q&A
- Q: What are the crucial safety precautions to observe when servicing the fuel level sensor on Ford Mustang?A:Service personnel should follow security measures when working with the fuel level sensor because they handle highly flammable mixtures. First step should be to reduce pressure from the fuel system then disconnect the battery cable. The proper unlocking method for the fuel tank filler cap requires a counterclockwise twist motion. The operator must insert the Fuel Draining Hose into the fuel tank filler pipe until the fitting reaches the safety valve opening thus enabling the Fuel Storage Tanker connection for fuel extraction that will lower the fuel level below the Fuel Pump (FP) module mounting flange. Administration of the vehicle requires rear seat cushion and FP module and fuel level sensor access cover removal. Secure the Fuel Pump sockets before cleaning its electrical connections. Afterwards, disconnect the electrical connector by placing absorbent pads to collect any fuel in the work area. With the Fuel Tank Sender Unit Socket the operator should disconnect the rear fuel tube from the FP module quick connect coupling before removing and discarding the FP module lock ring using the tool while maintaining float arm safety. The LH saddle of the fuel tank requires draining before inspecting the FP module flange alongside the O-ring seal contact areas to decide whether to replace the FP module or fuel tank due to damage. You should first remove the FP module O-ring seal which you will discard afterward. Following this step thoroughly wash all fuel level sensor connections before disconnecting the electrical connector. The Fuel Tank Sender Unit Socket should be used to separate and throw away the fuel level sensor lock ring while raising the sensor from the tank and breaking the internal fuel tube-to-sensor coupling connection. Irrigate the sensor of remaining fuel before examining all interfacing parts of sensor flanges and O-ring seals with replacement if needed. Clean engine oil must be used to lubricate the new O-ring seal as you put it into place. Follow this procedure to install the new FP module and fuel level sensor lock ring and O-ring seal by positioning their arrows correctly with the fuel tank before securing the lock rings at the stop tabs.
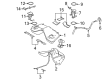
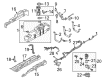
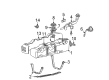
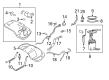
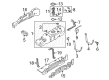
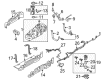
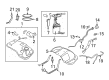
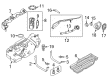
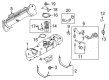
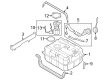
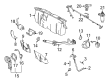
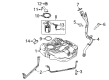
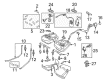
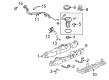
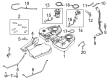
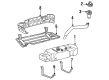
- Q: How to Use an Exploded View of the Fuel Tank and Filler Pipe to Service and Repair a Fuel Level Sensor on a Ford Ranger?A:Service and repair work for the fuel level sensor starts by referring to the exploded view of the fuel tank and filler pipe consisting of the fuel tank along with the fuel tank filler pipe. Check that the vehicle body needs removal for viewing clarity in this procedure. The necessary service steps can be found in detail through the supplied instructions.


Related Ford Parts
 Ford Fuel Pump
 Ford Air Filter
 Ford Mass Air Flow Sensor
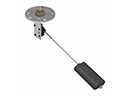 Ford Fuel Sending Unit
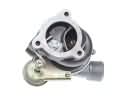 Ford Turbocharger
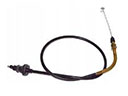 Ford Accelerator Cable
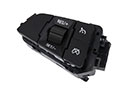 Ford Cruise Control Switch
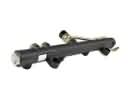 Ford Fuel Rail
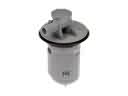 Ford Fuel Tank Vent Valve
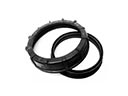 Ford Fuel Pump Seal
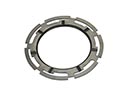 Ford Fuel Tank Lock Ring
 Ford Fuel Water Separator Filter
Browse Ford Fuel Level Sensor by Models
Ranger Bronco Mustang Explorer Focus Fusion F-150 Maverick EXP Escape Edge Excursion Expedition Fiesta Taurus Thunderbird Flex Transit Connect Bronco Sport Explorer Sport Trac Crown Victoria EcoSport Escort F-250 Aerostar C-Max Contour Country Squire E-150 Econoline Explorer Sport F-350 Freestar Freestyle LTD Police Interceptor Utility Taurus X Tempo Windstar F-350 Super Duty LTD Crown Victoria Police Interceptor Sedan E-150 E-150 Club Wagon E-150 Econoline Club Wagon E-250 E-250 Econoline E-250 Econoline Club Wagon E-350 Club Wagon E-350 Econoline E-350 Econoline Club Wagon E-350 Super Duty F-150 Heritage F-250 HD F-250 Super Duty Police Responder Hybrid Special Service Police Sedan SSV Plug-In Hybrid Transit-150 Transit-250 Transit-350 Transit-350 HD