FordParts
My Garage
My Account
Cart
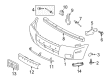
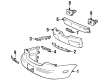
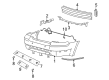
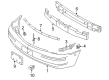
OEM Mercury Bumper
Bumper Fascia- Select Vehicle by Model
- Select Vehicle by VIN
Select Vehicle by Model
orMake
Model
Year
Select Vehicle by VIN
For the most accurate results, select vehicle by your VIN (Vehicle Identification Number).
Part Type
Select Part Type
89 Bumpers found


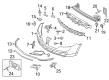
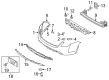
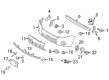
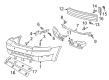
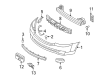
Mercury Bumper Cover, Front Part Number: 6L9Z-17D957-DAPTM
$194.21 MSRP: $282.70You Save: $88.49 (32%)Ships in 1-3 Business DaysProduct Specifications- Other Name: Cover; Bumper Cover, Front
- Position: Front


Mercury Impact Bar, Front Part Number: AE5Z-17757-A
$194.76 MSRP: $303.37You Save: $108.61 (36%)Ships in 1-2 Business DaysProduct Specifications- Other Name: Bumper Assembly - Front; Bumper Cover Reinforcement Beam, Front; Bumper Impact Bar, Front
- Manufacturer Note: Impact Bar - Steel
- Position: Front


Mercury Impact Bar, Front Part Number: 6L2Z-17757-AA
$68.49 MSRP: $99.70You Save: $31.21 (32%)Ships in 1-3 Business DaysProduct Specifications- Other Name: Bracket - Bumper Mounting; Bumper Cover Reinforcement, Front; Bumper Impact Bar, Front; Reinforcement
- Position: Front


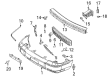
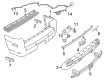
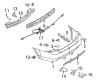
Mercury Impact Bar, Rear Part Number: AE5Z-17906-A
$148.08 MSRP: $215.55You Save: $67.47 (32%)Ships in 1-2 Business DaysProduct Specifications- Other Name: Bumper Assembly - Rear; Bumper Cover Reinforcement Beam, Rear; Bumper Impact Bar, Rear
- Manufacturer Note: Impact Bar - Steel
- Position: Rear


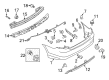
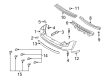
Mercury Bumper Cover, Rear Part Number: AN7Z-17K835-AAPTM
$228.55 MSRP: $313.58You Save: $85.03 (28%)Product Specifications- Other Name: Cover; Bumper Cover, Rear
- Position: Rear

Mercury Impact Bar, Front Part Number: 4W7Z-17757-A
$79.82 MSRP: $116.18You Save: $36.36 (32%)Ships in 1-2 Business DaysProduct Specifications- Other Name: Bumper Assembly - Front; Bumper Impact Bar, Front
- Manufacturer Note: Steel, FROM 12/1/03
- Position: Front

Mercury Bumper Cover, Front Part Number: 9W3Z-17D957-BAPTM
$204.49 MSRP: $300.28You Save: $95.79 (32%)Ships in 1-2 Business DaysProduct Specifications- Other Name: Cover; Bumper Cover, Front
- Position: Front

Mercury Bumper Cover Part Number: 6L9Z-17K835-CAPTM
$305.33 MSRP: $448.35You Save: $143.02 (32%)Ships in 1-2 Business DaysProduct Specifications- Other Name: Cover

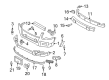
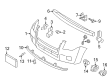
Mercury Bumper Cover, Front Part Number: AN7Z-17D957-AAPTM
$193.91 MSRP: $299.25You Save: $105.34 (36%)Product Specifications- Other Name: Bumper Assembly - Front; Bumper Cover, Front
- Position: Front

Mercury Reinforcement, Front Part Number: 9L8Z-17757-A
$79.45 MSRP: $115.65You Save: $36.20 (32%)Ships in 1-3 Business DaysProduct Specifications- Other Name: Bumper Assembly - Front; Bumper Cover Reinforcement Beam, Front; Bumper Cover Reinforcement, Front
- Position: Front
- Replaces: 5L8Z-17757-AA, YL8Z-17757-AA

Mercury Impact Bar, Rear Part Number: 8G1Z-17906-B
$132.65 MSRP: $193.08You Save: $60.43 (32%)Ships in 1-3 Business DaysProduct Specifications- Other Name: Bumper Assembly - Rear; Bumper Impact Bar, Rear
- Position: Rear
- Replaces: 6G1Z-17906-A

Mercury Impact Bar, Rear Part Number: 6E5Z-17906-AA
$204.83 MSRP: $298.15You Save: $93.32 (32%)Ships in 1-3 Business DaysProduct Specifications- Other Name: Bumper Assembly - Rear; Bumper Impact Bar, Rear
- Position: Rear

Mercury Bumper Cover Part Number: 8E6Z-17K835-APTM
$243.64 MSRP: $357.77You Save: $114.13 (32%)Product Specifications- Other Name: Cover

Mercury Impact Bar, Front Part Number: 6E5Z-17757-AA
$287.57 MSRP: $422.28You Save: $134.71 (32%)Ships in 1-2 Business DaysProduct Specifications- Other Name: Bumper Assembly - Front; Bumper Impact Bar, Front
- Manufacturer Note: Impact Bar - Steel
- Position: Front

Mercury Bumper Cover, Front Part Number: AE6Z-17D957-APTM
$324.34 MSRP: $476.27You Save: $151.93 (32%)Ships in 1-3 Business DaysProduct Specifications- Other Name: Cover; Bumper Cover, Front
- Position: Front
- Replaces: 8E6Z-17D957-APTM

Mercury Bumper Cover Part Number: 5E6Z-17D957-ABPTM
$372.53 MSRP: $547.03You Save: $174.50 (32%)Ships in 1-3 Business DaysProduct Specifications- Other Name: Cover

Mercury Impact Bar, Rear Part Number: 5L8Z-17D942-AA
$50.47 MSRP: $72.20You Save: $21.73 (31%)Ships in 1-2 Business DaysProduct Specifications- Other Name: Bumper Assembly - Rear; Bumper Cover Reinforcement Beam, Rear; Bumper Cover Reinforcement, Rear; Reinforcement
- Position: Rear

Mercury Impact Bar, Rear Part Number: YF1Z-17906-AB
$109.49 MSRP: $151.46You Save: $41.97 (28%)Ships in 1-2 Business DaysProduct Specifications- Other Name: Bumper Assembly - Rear; Bumper Impact Bar, Rear; Bar
- Manufacturer Note: Steel
- Position: Rear
- Replaces: XF1Z-17906-AA


Mercury Bumper Cover Part Number: 6T5Z-17K835-BBPTM
Product Specifications- Other Name: Cover
- Manufacturer Note: Paint to match
- Replaces: 5T5Z-17K835-BAA


Mercury Bumper Cover, Front Part Number: 5T5Z-17D957-AAB
Product Specifications- Other Name: Bumper Assembly - Front
- Position: Front
| Page 1 of 5 |Next >
1-20 of 89 Results
Mercury Bumper
If you own Mercury and want to keep it in top shape, choosing OEM Bumper is a smart move. They are precisely engineered and follow strict factory standards. They are made in advanced facilities that use cutting edge technology. Each part goes through thorough testing to confirm strength and safety, so you can trust it. FordPartsDeal.com gives you genuine Mercury Bumper at some of the affordable online prices without cutting quality. Every OEM Mercury part includes the manufacturer's warranty, easy returns, and super-fast delivery. So why wait? Shop now and get your vehicle back to peak condition.
Mercury Bumper cushions cushion bumps and the metal and passengers are safe during daily bumps and scrapes. Mercury was named after the fleet-footed Roman deity and since 1939 converted that imaginary speed to mid-size cars that rode over less bumpy, looked sleeker and provided drivers with roomy cabins to talk to family members without engine noise, pounding mile after mile. Over decades Mercury had struck the right balance between swagger and value, launching Cougars and Grand Marquis which did not feel comfortable being either fusty or detached. Showrooms boasted of Mercury suspension tuning which absorbed the pavement that was not smooth and the cars had quick steering which made them lively and hence the commuters were at ease but had full control on the long highways. Although the ride ceased operation in 2011, Mercury remained in the minds of many as the ride that dampened road noise without forcing the drivers to pay extra money to keep the ride quiet. Constructed of bonded aluminum, carbon or stainless steel over energy-absorbing bars the Bumper is dent resistant, reduces weight, and complies with the impact regulations and hugs the sheet metal such that the protection does not appear to have been tacked on. On city roads the Bumper is the first to suffer in any parking tap or low speed fender kiss, instead of hitting headlights, hoods, and expensive sensors that are only inches behind its hard core. Automotive speed of work drivers replace a bruised Bumper fast since modular mounts unbolt easily and the shaped skin receives paint like normal body parts, the amount of time and repair expenses is reduced.