FordParts
My Garage
My Account
Cart
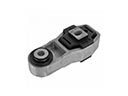
OEM Mercury Crankshaft Seal
- Select Vehicle by Model
- Select Vehicle by VIN
Select Vehicle by Model
orMake
Model
Year
Select Vehicle by VIN
For the most accurate results, select vehicle by your VIN (Vehicle Identification Number).
18 Crankshaft Seals found


Mercury Rear Main Seal Part Number: F1SZ-6701-A
$18.57 MSRP: $26.33You Save: $7.76 (30%)Ships in 1-2 Business DaysProduct Specifications- Other Name: Seal Assembly - Crankshaft Oil; Engine Crankshaft Seal, Rear; Timing Cover Gasket; Timing Cover Seal
- Position: Rear


Mercury Rear Main Seal Part Number: 1S7Z-6A321-B
$79.12 MSRP: $115.17You Save: $36.05 (32%)Product Specifications- Other Name: Seal Assembly - Crankshaft Oil; Engine Crankshaft Seal, Rear; Crankshaft Seal; Rear Seal; Rear Main Seal Retainer
- Position: Rear
- Replaces: 1S7Z-6D309-AA, 1S7Z-6K301-AA, 1S7Z-6K301-BA


Mercury Rear Main Seal Retainer Part Number: CG1Z-6335-B
$39.61 MSRP: $56.67You Save: $17.06 (31%)Ships in 1-2 Business DaysProduct Specifications- Other Name: Retainer - Crankshaft Oil Seal
- Position: Rear
- Replaces: AT4Z-6K301-B, CG1Z-6K301-A, 7T4Z-6K301-A


Mercury Rear Main Seal Part Number: 6L3Z-6K301-AA
$41.01 MSRP: $58.67You Save: $17.66 (31%)Ships in 1-3 Business DaysProduct Specifications- Other Name: Retainer - Crankshaft Oil Seal; Crankshaft Seal; Rear Main Seal Retainer
- Position: Rear
- Replaces: 3L3Z-6K301-BA


Mercury Rear Main Seal Retainer Part Number: 6C3Z-6K301-A
$46.26 MSRP: $66.18You Save: $19.92 (31%)Ships in 1-2 Business DaysProduct Specifications- Other Name: Retainer - Crankshaft Oil Seal; Oil Pan Rear Seal
- Manufacturer Note: Gasket Is RTV. Refer To Workshop Manual For Proper Specs
- Position: Rear
- Replaces: 3L3Z-6K301-CA, 3L3Z-6K301-AA


Mercury Oil Seal, Front Part Number: XW4Z-6700-AA
$11.43 MSRP: $16.22You Save: $4.79 (30%)Product Specifications- Other Name: Seal Assembly - Crankshaft Oil - Front; Engine Crankshaft Seal, Front; Timing Cover Gasket; Timing Cover Seal
- Position: Front
- Replaces: XW4Z-6700-A


Mercury Rear Main Seal Part Number: F37Z-6701-A
$24.56 MSRP: $34.83You Save: $10.27 (30%)Ships in 1-3 Business DaysProduct Specifications- Other Name: Seal Assembly - Crankshaft Oil; Engine Crankshaft Seal, Rear
- Position: Rear
- Replaces: E8DZ-6701-A


Mercury Rear Main Seal Retainer Part Number: F5RZ-6K318-A
$27.85 MSRP: $39.50You Save: $11.65 (30%)Ships in 1-3 Business DaysProduct Specifications- Other Name: Retainer - Crankshaft Oil Seal; Crankshaft Seal Retainer
- Manufacturer Note: INCL. 6701 SEAL
- Position: Rear


Mercury Rear Main Seal Part Number: AT4Z-6701-A
$31.73 MSRP: $45.00You Save: $13.27 (30%)Ships in 1 Business DayProduct Specifications- Other Name: Seal Assembly - Crankshaft Oil; Engine Crankshaft Seal, Rear; Crankshaft Seal; Rear Seal; Engine Crankshaft Seal
- Position: Rear
- Replaces: 7T4Z-6701-B, 7T4Z-6701-AA


Mercury Rear Main Seal Part Number: F4AZ-6701-A
$34.78 MSRP: $49.33You Save: $14.55 (30%)Ships in 1-2 Business DaysProduct Specifications- Other Name: Seal Assembly - Crankshaft Oil; Engine Crankshaft Seal, Rear; Timing Cover Gasket; Timing Cover Seal
- Position: Rear
- Replaces: F3AZ-6701-B
Mercury Rear Main Seal Part Number: E7FZ-6701-A
$24.73 MSRP: $36.00You Save: $11.27 (32%)Ships in 1-3 Business DaysProduct Specifications- Other Name: Seal Assembly - Crankshaft Oil; Engine Crankshaft Seal, Rear; Rear Seal; Engine Crankshaft Seal; Crankshaft Seal
- Manufacturer Note: #E7EE-A1A-USED W/ ASY. #FOEE-6K301-AA
- Position: Rear

Mercury Oil Seal, Front Part Number: CM5Z-6700-E
$12.34 MSRP: $17.50You Save: $5.16 (30%)Ships in 1-3 Business DaysProduct Specifications- Other Name: Seal Assembly - Crankshaft Oil - Front; Engine Crankshaft Seal; Timing Cover Gasket & Seal.
- Position: Front
- Replaces: CM5Z-6700-A, 1S7Z-6700-AA, 9E5Z-6700-A, CM5Z-6700-C

Mercury Rear Main Seal Part Number: F5RZ-6701-A
$15.44 MSRP: $21.00You Save: $5.56 (27%)Product Specifications- Other Name: Seal Assembly - Crankshaft Oil; Engine Crankshaft Seal; Crankshaft Seal
- Manufacturer Note: Crankshaft Rear
- Position: Rear

Mercury Rear Main Seal Part Number: F3XY6701B
$19.01 MSRP: $25.87You Save: $6.86 (27%)Product Specifications- Other Name: Seal Assembly - Crankshaft Oil; Engine Crankshaft Seal; Crankshaft Seal
- Position: Rear


Mercury Rear Main Seal Part Number: F5TZ-6701-A
$29.85 MSRP: $42.33You Save: $12.48 (30%)Product Specifications- Other Name: Seal Assembly - Crankshaft Oil; Engine Crankshaft Seal, Rear
- Position: Rear
- Replaces: F77Z-6701-BA, D7RZ-6701-A, F77Z-6701-AA

Mercury Rear Main Seal Part Number: E5ZZ-6701-A
Product Specifications- Other Name: Seal Assembly - Crankshaft Oil; Engine Crankshaft Seal; Crankshaft Seal
- Position: Rear
Mercury Rear Main Seal Part Number: XF5Z-6701-AA
Product Specifications- Other Name: Seal Assembly - Crankshaft; Engine Crankshaft Seal; Crankshaft Seal; Seal Assembly - Crankshaft Oil
- Position: Rear

Mercury Rear Main Seal Part Number: F1CZ6701B
Product Specifications- Other Name: Seal Assembly - Crankshaft Oil; Engine Crankshaft Seal; Timing Cover Gasket; Timing Cover Seal; Crankshaft Seal; Front Cover Seal
- Position: Rear
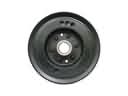
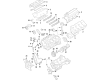
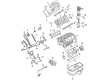
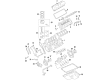
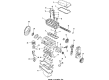
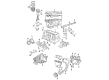
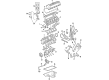
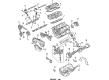
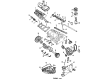
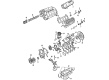
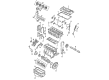
Mercury Crankshaft Seal
If you own Mercury and want to keep it in top shape, choosing OEM Crankshaft Seal is a smart move. They are precisely engineered and follow strict factory standards. They are made in advanced facilities that use cutting edge technology. Each part goes through thorough testing to confirm strength and safety, so you can trust it. FordPartsDeal.com gives you genuine Mercury Crankshaft Seal at some of the affordable online prices without cutting quality. Every OEM Mercury part includes the manufacturer's warranty, easy returns, and super-fast delivery. So why wait? Shop now and get your vehicle back to peak condition.
Mercury Crankshaft Seal prevents the leakage of oil and maintains the engine greased with unending dependability. Mercury has been in the middle of the bare transport/luxury since 1938 selling cars that rode smooth and looked sharp. The messenger picture of Romans was an allusion to the thin-slicing and the thin-sliding. Display rooms were shoved along with spacious cabins, muted interiors and instantly responsive steering in the congested streets. Drivers were fond of the soft suspension which actually absorbed bumps but did not kill road feel and proved that Mercury could be fun and comfortable. Value remained focus as Cougar and Grand Marquis moved forward without losing customary confidence. Although production was ceased in 2011 the Mercury badge continues to convey the indication of balanced design that has not forgotten the ease of everyday. The Crankshaft Seal (placed at the crank nose) prevents pressurized oil and the shaft turns thousands of times per minute keeping the bearings lubed and temperatures low. A damaged Crankshaft Seal may spray oil onto belts, cause pressure drop, and welcome the disaster of metal-on-metal grind. The metal-rubber compound contained within this Crankshaft Seal bends with increase in rpm and prevents sharp edges from cutting grooves in the crank. In both old and new Mercuries, Crankshaft Seal swaps are simply clamped into position and lubrication paths are immediately restored.
Mercury Crankshaft Seal Parts and Q&A
- Q: How to replace rear Crankshaft Seal on Mercury Lynx?A:Disconnect the battery negative cable, then remove the transaxle. Unbolt and take off the rear cover plate, followed by the removal of the flywheel/driveplate. Use a suitable hooked tool to pry out the oil seal from the cylinder block, taking care to avoid damaging the oil seal bore in the engine block. Grease the lips of the new seal and press it into position using a special tool or, if unavailable, tap it in squarely with a blunt punch and hammer, ensuring not to damage the seal or crankshaft. As the seal is installed, work the seal lip over the end of the crankshaft with the rounded end of a socket extension or a similar tool. The installation process is the reverse of removal, and after completing the installation, run the engine to check for oil leaks.
- Q: How to replace the rear Crankshaft Seal in a four cylinder engine on Mercury Capri?A:Remove the transmission and all other components necessary, such as the clutch and pressure plate, to access the oil seal in the back of the engine. Next, remove the flywheel. Use a small punch to create two holes on opposite sides of the seal and install small sheet metal screws in these holes. Pry on the screws with two large screwdrivers until the seal is removed from the engine, taking care to place small blocks of wood against the block to provide a fulcrum point for prying, while avoiding any scratches or damage to the crankshaft oil seal surface. Apply a thin film of engine oil to the outer edge of the new seal, the seal bore in the block, and the seal lips. Position the seal on a special tool, available at most auto parts stores, and then place the tool and seal at the rear of the engine, installing the seal with the spring side toward the engine and alternating the tightening of the bolts to seat the seal in the block. If a special seal installer is not available, work the seal into place and gently tap it into the bore with a soft-face hammer, using the drive end of a socket extension or another blunt, smooth object to ease the lip of the seal over the end of the crankshaft. The remainder of the installation follows the reverse of the removal procedure.