FordParts
My Garage
My Account
Cart
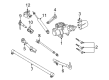
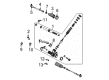
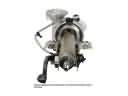
OEM Ford Drag Link
Center Link- Select Vehicle by Model
- Select Vehicle by VIN
Select Vehicle by Model
orMake
Model
Year
Select Vehicle by VIN
For the most accurate results, select vehicle by your VIN (Vehicle Identification Number).
48 Drag Links found


Ford Drag Link, Front Part Number: 8C2Z-3304-C
$140.34 MSRP: $230.91You Save: $90.57 (40%)Ships in 1 Business DayProduct Specifications- Other Name: Rod Assembly - Drag Link; Steering Center Link; Repair Kit; Tie Rod.; Center Link
- Position: Front


Ford Drag Link, Front Passenger Side Part Number: 8C2Z-3304-D
$99.56 MSRP: $163.82You Save: $64.26 (40%)Ships in 1 Business DayProduct Specifications- Other Name: Rod Assembly - Drag Link; Steering Center Link; Repair Kit; Inner Tie Rod End; Tie Rod End; Center Link
- Position: Passenger Side
- Replaces: 6C2Z-3304-B


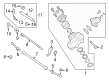
Ford Inner Tie Rod Part Number: D7UZ3A130A
$67.24 MSRP: $91.50You Save: $24.26 (27%)Product Specifications- Other Name: End; Inner Tie Rod End; Tie Rod End; End - Spindle Rod Connecting
- Position: Inner

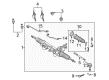
Ford Center Link Part Number: LC3Z-3304-G
$242.89 MSRP: $412.73You Save: $169.84 (42%)Ships in 1-2 Business DaysProduct Specifications- Other Name: Rod Assembly - Drag Link
- Position: Center
- Replaces: 8C3Z-3304-F, AC3Z-3304-E, MDOE-7, MDOE-40

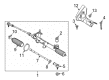
Ford Drag Link Part Number: LC3Z-3304-F
$249.31 MSRP: $423.64You Save: $174.33 (42%)Ships in 1-2 Business DaysProduct Specifications- Other Name: Rod Assembly - Drag Link; Center Link
- Replaces: 7C3Z-3304-N, 8C3Z-3304-H, AC3Z-3304-A, MDOE-29, MDOE-36

Ford Center Link, Passenger Side Part Number: LC3Z-3304-B
$169.56 MSRP: $285.45You Save: $115.89 (41%)Ships in 1-2 Business DaysProduct Specifications- Other Name: Rod Assembly - Drag Link
- Position: Passenger Side
- Replaces: 5C3Z-3304-CA, 7C3Z-3304-C, 6C3Z-3304-C, AC3Z-3304-C, MDOE-38, MDOE-4, MDOE-26


Ford Drag Link Part Number: PC3Z-3304-E
$170.64 MSRP: $287.27You Save: $116.63 (41%)Ships in 1-2 Business DaysProduct Specifications- Other Name: Rod Assembly - Drag Link; Center Link
- Replaces: MDF-31, PC3Z-3304-D

Ford Inner Tie Rod Part Number: BK2Z-3280-A
$48.73 MSRP: $80.18You Save: $31.45 (40%)Ships in 1 Business DayProduct Specifications- Other Name: Rod Assembly - Spindle Connecting; Inner Tie Rod End; Tie Rod End
- Position: Inner

Ford Outer Tie Rod, Front Part Number: GN1Z-3A130-A
$60.00 MSRP: $98.73You Save: $38.73 (40%)Ships in 1-3 Business DaysProduct Specifications- Other Name: End - Spindle Rod Connecting; Steering Tie Rod End, Front Left Outer
- Position: Driver Side

Ford Drag Link Part Number: LC3Z-3304-C
$73.15 MSRP: $120.36You Save: $47.21 (40%)Ships in 1-2 Business DaysProduct Specifications- Other Name: Rod Assembly - Drag Link; Center Link
- Replaces: 6C3Z-3304-D, 8C3Z-3304-G, AC3Z-3304-N, MDF-2, MDOE-8

Ford Drag Link Part Number: LC3Z-3304-A
$121.55 MSRP: $200.00You Save: $78.45 (40%)Product Specifications- Other Name: Rod Assembly - Drag Link; Center Link
- Replaces: AC3Z-3304-B, 6C3Z-3304-B, 7C3Z-3304-B, MDOE-37, MDOE-25, MDOE-3

Ford Sleeve Part Number: PC3Z-3281-B
$186.15 MSRP: $309.09You Save: $122.94 (40%)Ships in 1-2 Business DaysProduct Specifications- Other Name: Tube Assembly
- Position: Driver Side
- Replaces: 7C3Z-3281-B, 7C3Z-3281-EA, MEOE-52


Ford Outer Tie Rod Nut Part Number: -N800895-S52
$2.94 MSRP: $5.00You Save: $2.06 (42%)Product Specifications- Other Name: Nut; Steering Tie Rod Nut, Outer
- Position: Outer
- Replaces: -N800895-S427


Ford Inner Tie Rod Part Number: YS4Z-3280-AA
$60.11 MSRP: $95.45You Save: $35.34 (38%)Product Specifications- Other Name: Rod Assembly - Spindle Connecting; Steering Tie Rod End, Inner; Inner Tie Rod End; Tie Rod End
- Position: Inner


Ford Drag Link Part Number: HC3Z-3304-C
$168.32 MSRP: $267.27You Save: $98.95 (38%)Product Specifications- Other Name: Rod Assembly - Drag Link; Drag Link Repair Kit; Steering Drag Link; Center Link


Ford Drag Link Part Number: HC3Z-3304-A
$177.48 MSRP: $281.82You Save: $104.34 (38%)Product Specifications- Other Name: Rod Assembly - Drag Link; Drag Link Repair Kit; Steering Drag Link; Center Link


Ford Outer Tie Rod, Driver Side Part Number: F2TZ-3304-B
Product Specifications- Other Name: Rod Assembly - Drag Link; Drag Link Repair Kit; Outer Tie Rod End; Center Link; Tie Rod End; Drag Link
- Position: Driver Side


Ford Outer Tie Rod, Driver Side Part Number: E8TZ-3304-A
Product Specifications- Other Name: Rod Assembly - Drag Link; Drag Link Repair Kit; Outer Tie Rod End; Center Link; Tie Rod End; Drag Link
- Position: Driver Side


Ford Inner Tie Rod Part Number: E5TZ3A130B
Product Specifications- Other Name: End Assembly; Inner Tie Rod End; Tie Rod End; End - Spindle Rod Connecting
- Position: Inner


Ford Inner Tie Rod Part Number: 2M5Z-3280-B
Product Specifications- Other Name: Rod; Steering Tie Rod End, Inner; Inner Tie Rod End; Tie Rod End
- Manufacturer Note: Inner tie rod, with wrench-flats. When replacing tie rod be sure to replace the boot and clamps to ensure a proper seal and minimize contamination., SVT
- Position: Inner
| Page 1 of 3 |Next >
1-20 of 48 Results
Ford Drag Link
If you own Ford and want to keep it in top shape, choosing OEM Drag Link is a smart move. They are precisely engineered and follow strict factory standards. They are made in advanced facilities that use cutting edge technology. Each part goes through thorough testing to confirm strength and safety, so you can trust it. FordPartsDeal.com gives you genuine Ford Drag Link at some of the affordable online prices without cutting quality. Every OEM Ford part includes the manufacturer's warranty, easy returns, and super-fast delivery. So why wait? Shop now and get your vehicle back to peak condition.
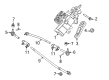
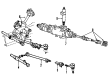
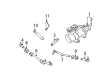
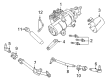
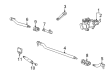
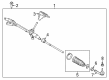
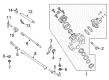
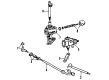
The stout rod that connects the pitman and steering arms is called the Ford Drag Link that transforms the movement of the steering box into the right angles that keep the truck straight. Ford trucks are supported by over 100 years of solidness, beginning with the mobile assembly line of Henry which put reliable power in working hands without inflating the cost or complexity of working machinery. Ford Turbocharged EcoBoost engines suck the power of V8s despite using fewer cylinders, stingy with fuel but still pulling heavy items, and battery-powered Lightning models provide instant torque with no tailpipe emissions. Ford SYNC allows drivers to bark a song request or a change of route, whereas Co-Pilot 360 monitors drift in lanes and slams the brakes when somebody cuts in, therefore making the entire rig feel more relaxed and secure. The narrow chassis, massy steering geometry combined with a factory greasable Drag Link are combined to ensure that front wheels respond meekly on the rough job sites or on the greasy highway. The process of reversing that Drag Link begins with parking level, chocking rubber, and putting the axle on stands followed by centering the wheel where the box rests at neutral. Loosen castle nuts several degrees, knock out cotter pins and pop the tapered parts out of a puller, no hammer strikes that will mushroom threads. Install a new grease compress, wet end, fit new pins, fill in with new chassis grease, drop the truck on terra firma, roll it forward to assure that the Ford wheel still points in the same direction, and check that the new Drag Link is set.
Ford Drag Link Parts and Q&A
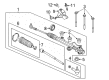
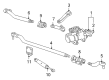
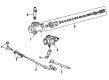
- Q: What are the necessary steps to service and repair the steering sector shaft arm drag link on Ford E-250?A:In order to service and repair the center link (specifically, the steering sector shaft arm drag link), the steering sector shaft arm drag link or tie rod end needs to be replaced if the ball stud is too loose in the socket of the tie rod end, if the steering sector shaft arm drag link is bent, or if the taper for the tie rod end is loose. Also, if there are nicks, cuts or tears in the front suspension steering ball stud dust seal, the dust seal should be replaced, and a rubber steering sector shaft drag link or tie rod end should not be straightened. Start by removing the steering drag link castellated nuts and then the cotter pins which must be disposed of. Next, loosen the castellated nuts and remove the outside tie rod end from the RHS steering knuckle and remove the left-hand inner end from the steering sector shaft drag link. Next, unplug the castellated nut from the steering sector shaft arm drag link, take out the cotter pin and unplug the nut. With the help of a Pitman Arm Puller, disconnect the steering sector shaft arm drag link, and remove the tie rod adjusting sleeve from the drag link, noting the number of turns needed to remove. To install, repeat removal process and install new cotter pins. Make sure that the two bolts and nuts of the tie rod adjusting sleeve clamp for the tie rod end are oriented within 45 degrees (+/-) of each other; the threaded part of the bolts on the left tie rod end must face the front of the vehicle, the threaded part of the bolts on the right tie rod end must face the rear of the vehicle. Finally, lock castellated nuts and tie rod adjusting sleeve bolts, inspect toe-in and clear vision.
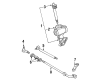
- Q: How to service and repair the inner drag link on F-250 and F-350 Rear Wheel Drive on Ford F-350 Super Duty?A:Service and repairs for the inner drag link of F-250 and F-350 RWD vehicles begin with wheel position alignment at straight-ahead and hoist lift placement in neutral gear mode. When installing the outer adjusting sleeve clamp nut tighten it to 55 Nm (41 lb-ft) while loosening it first. First place the steering wheel in straight-ahead position then hoist the vehicle into neutral gear before removing the steering linkage damper-to-drag link bracket nut along with bolt and placing the damper safely aside for reinstallation with a torque of 90 Nm (66 lb-ft). Discard the inner tie-rod end cotter pin before removing its nut retainer and nut and tighten the nut to 175 Nm (129 lb-ft) during replacement. A Steering Arm Remover tool helps disconnect the inner tie-rod end from the inner drag link before placing the tie rod to the side. The installation process of the nut requires a torques setting of 175 Nm (129 lb-ft) after removing the inner drag link cotter pin, nut retainer and nut. Record the number of turns needed to detach the inner drag link and adjusting sleeve before physically separating the inner drag link through the sector shaft arm while removing the assembly of inner drag link with adjusting sleeve. The remaining adjusting sleeve clamp nut requires loosening before you tighten it to a torque specification of 55 Nm (41 lb-ft) for installation. All drag link and tie-rod end retainers must be placed properly on their respective nuts before adding cotter pins to keep steering linkage components from failing prematurely. You must clean all corrosion and dirt off the damper surfaces before you install it to maintain leak prevention. After replacement proceed through the removal steps backwards for installation while using new cotter pins and perform necessary adjustments to the toe.


Related Ford Parts
 Ford Steering Column
 Ford Ignition Lock Cylinder
 Ford Rack And Pinion
 Ford Idler Arm
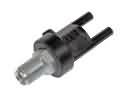 Ford Power Steering Control Valve
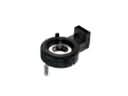 Ford Steering Angle Sensor
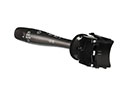 Ford Turn Signal Switch
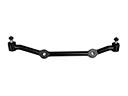 Ford Center Link
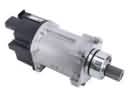 Ford Power Steering Assist Motor
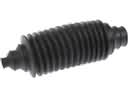 Ford Rack and Pinion Boot
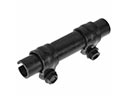 Ford Tie Rod Adjusting Sleeve
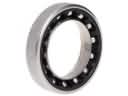 Ford Upper Steering Column Bearing
Browse Ford Drag Link by Models
Ranger Mustang Explorer Focus F-150 Excursion Thunderbird Transit Connect Probe Bronco II EcoSport F-250 Contour E-150 Econoline F-350 F-350 Super Duty E-150 E-250 E-250 Econoline E-250 Econoline Club Wagon E-350 Club Wagon E-350 Econoline E-350 Econoline Club Wagon E-350 Super Duty F-250 Super Duty Transit-150 Transit-250 Transit-350 Transit-350 HD