FordParts
My Garage
My Account
Cart
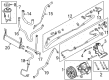
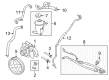
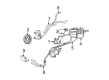
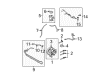
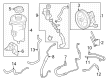
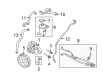
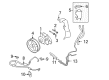
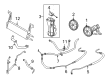
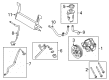
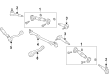
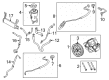
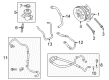
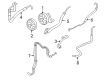
OEM Ford Power Steering Hose
Power Steering Pressure Hose- Select Vehicle by Model
- Select Vehicle by VIN
Select Vehicle by Model
orMake
Model
Year
Select Vehicle by VIN
For the most accurate results, select vehicle by your VIN (Vehicle Identification Number).
507 Power Steering Hoses found


Ford Power Steering Return Hose Part Number: BC3Z-3A713-M
$54.58 MSRP: $91.45You Save: $36.87 (41%)Ships in 1-2 Business DaysProduct Specifications- Other Name: Tube Assembly; Power Steering Hose; Upper Return Line
- Replaces: BC3Z-3A713-E


Ford Power Steering Pressure Hose Part Number: 9L3Z-3A719-F
$68.18 MSRP: $112.18You Save: $44.00 (40%)Ships in 1-2 Business DaysProduct Specifications- Other Name: Hose Assembly; Power Steering Hose; Pressure Hose; Pressure Line Assembly
- Replaces: 9L3Z-3A719-D, 9L3Z-3A719-B


Ford Power Steering Pressure Hose Part Number: YC3Z-3A713-CB
$74.67 MSRP: $125.36You Save: $50.69 (41%)Product Specifications- Other Name: Hose; Power Steering Return Hose; Power Steering Hose; Reservoir Hose; Return Line
- Manufacturer Note: Booster To Reservoir
- Replaces: XC3Z-3A713-CA


Ford Power Steering Pressure Hose Part Number: 8T4Z-3A719-A
$101.22 MSRP: $166.55You Save: $65.33 (40%)Ships in 1-2 Business DaysProduct Specifications- Other Name: Hose Assembly; Power Steering Hose; Pressure Hose
- Replaces: 7T4Z-3A719-A, 7T4Z-3A719-B


Ford Power Steering Return Hose, Front Upper Part Number: 8C2Z-3A713-A
$91.51 MSRP: $153.64You Save: $62.13 (41%)Ships in 1-2 Business DaysProduct Specifications- Other Name: Tube Assembly; Power Steering Return Hose, Front Upper; Power Steering Hose; Lower Return Hose
- Position: Front Upper
- Replaces: 6C2Z-3A713-CA, 7C2Z-3A713-C


Ford Power Steering Return Hose Part Number: BL1Z-3A713-B
$92.81 MSRP: $155.82You Save: $63.01 (41%)Ships in 1-2 Business DaysProduct Specifications- Other Name: Tube Assembly; Power Steering Hose
- Replaces: AL3Z-3A713-E, BL1Z-3A713-A


Ford Power Steering Cooler Part Number: 8L3Z-3D746-F
$101.69 MSRP: $170.73You Save: $69.04 (41%)Ships in 1-3 Business DaysProduct Specifications- Other Name: Coil - Cooling; Power Steering Return Hose; Power Steering Hose; Lower Return Hose; Upper Return Hose
- Replaces: 5L3Z-3D746-A, 8L3Z-3D746-C


Ford Power Steering Return Hose Part Number: 7T4Z-3A713-B
$63.32 MSRP: $104.18You Save: $40.86 (40%)Ships in 1-2 Business DaysProduct Specifications- Other Name: Tube Assembly; Power Steering Hose; Upper Return Hose
- Manufacturer Note: For First Service 3E764 + 3A713 Must Be Updated To April 2011 Design, And 3D746 Must Be Deleted
- Replaced by: CT4Z-3A713-E


Ford Power Steering Return Hose Part Number: BC3Z-3691-C
$56.36 MSRP: $92.73You Save: $36.37 (40%)Ships in 1-2 Business DaysProduct Specifications- Other Name: Hose Assembly - Reservoir To Pump; Power Steering Reservoir Hose; Power Steering Hose; Reservoir Hose
- Manufacturer Note: Reservoir To Pump


Ford Power Steering Return Hose Part Number: BL3Z-3A713-A
$56.69 MSRP: $93.27You Save: $36.58 (40%)Ships in 1-2 Business DaysProduct Specifications- Other Name: Hose; Power Steering Hose; Return Line Assembly
- Replaced by: BL1Z-3A713-F


Ford Return Hose Part Number: BL1Z-3A713-F
$56.69 MSRP: $93.27You Save: $36.58 (40%)Ships in 1-2 Business DaysProduct Specifications- Other Name: Hose; Power Steering Return Hose; Power Steering Hose
- Replaces: 7L1Z-3A713-C, 9L3Z-3A713-A, BL3Z-3A713-A


Ford Power Steering Return Hose Part Number: 7C3Z-3A713-E
$69.06 MSRP: $113.64You Save: $44.58 (40%)Ships in 1-2 Business DaysProduct Specifications- Other Name: Tube Assembly; Power Steering Hose; Return Line
- Manufacturer Note: Gear To Cooler


Ford Power Steering Return Hose Part Number: BC3Z-3A713-L
$59.89 MSRP: $98.55You Save: $38.66 (40%)Ships in 1-2 Business DaysProduct Specifications- Other Name: Tube Assembly; Power Steering Hose; Lower Return Line
- Replaces: BC3Z-3A713-D


Ford Power Steering Return Hose Part Number: BL3Z-3A713-J
$79.01 MSRP: $130.00You Save: $50.99 (40%)Ships in 1-2 Business DaysProduct Specifications- Other Name: Hose; Power Steering Hose; Return Line
- Replaces: 9L3Z-3A713-D, BL3Z-3A713-G


Ford Power Steering Pressure Hose Part Number: BC3Z-3A719-N
$65.75 MSRP: $108.18You Save: $42.43 (40%)Ships in 1 Business DayProduct Specifications- Other Name: Hose Assembly; Power Steering Hose
- Manufacturer Note: Used With 6K Gear
- Replaces: BC3Z-3A719-J


Ford Power Steering Return Hose Part Number: BC3Z-3A713-K
$66.30 MSRP: $109.09You Save: $42.79 (40%)Ships in 1-2 Business DaysProduct Specifications- Other Name: Tube Assembly; Power Steering Hose; Lower Return Line; Upper Return Line
- Replaces: BC3Z-3A713-C


Ford Power Steering Return Hose Part Number: BL3Z-3A713-L
$73.26 MSRP: $120.55You Save: $47.29 (40%)Ships in 1-2 Business DaysProduct Specifications- Other Name: Hose Assembly; Power Steering Hose; Upper Return Hose


Ford Lower Return Hose Part Number: BC3Z-3A713-P
$105.75 MSRP: $174.00You Save: $68.25 (40%)Ships in 1 Business DayProduct Specifications- Other Name: Hose; Power Steering Return Hose; Power Steering Hose
- Position: Lower
- Replaces: BC3Z-3A713-A


Ford Power Steering Return Hose Part Number: 7T4Z-3A713-A
$75.36 MSRP: $124.00You Save: $48.64 (40%)Ships in 1-2 Business DaysProduct Specifications- Other Name: Tube Assembly; Power Steering Hose; Lower Return Hose


Ford Power Steering Pressure Hose Part Number: 3C3Z-3A714-BB
$63.09 MSRP: $100.18You Save: $37.09 (38%)Product Specifications- Other Name: Hose Assembly; Power Steering Hose; Pressure Hose; Return Hose
| Page 1 of 26 |Next >
1-20 of 507 Results
Ford Power Steering Hose
If you own Ford and want to keep it in top shape, choosing OEM Power Steering Hose is a smart move. They are precisely engineered and follow strict factory standards. They are made in advanced facilities that use cutting edge technology. Each part goes through thorough testing to confirm strength and safety, so you can trust it. FordPartsDeal.com gives you genuine Ford Power Steering Hose at some of the affordable online prices without cutting quality. Every OEM Ford part includes the manufacturer's warranty, easy returns, and super-fast delivery. So why wait? Shop now and get your vehicle back to peak condition.
Ford Power Steering Hose pressurized fluid is directed quickly hence manipulating the wheel is light and precise. Ford reimagined mass production through the moving assembly line, followed by crating EcoBoost engines to get quick acceleration and fuel efficiency, followed by wiring SYNC voice control to reduce distraction, rolling out Co-Pilot360 to brake and steer whenever the driver slips, and now gluing cars together with the same ruthless emphasis on practical technology that makes every mile less expensive, safer, and clean. Ford never settles. To make the prices accessible to buyers, Ford reduce parts costs between sedans, pickups, and EVs so that buyers can access modern convenience without luxury markups added through decades of resourceful production. Ford also supports its lineup with world wide parts supply that cuts the downtime and keeps the drivers on road even when roads are rough and the miles are high. Power Steering Hose connects the pump to the rack and directs high pressure fluid (hydraulic) and allows any car even the heavy ones to pivot on the tip of a finger. Power Steering Hose choices are of either tough rubber lines or hybrid systems with pre-bent sections of steel, which shake off heat and vibration. There are no leakages in Power Steering Hose, crimped fittings are applied which become locked under thousands of psi. Power Steering Hose suits a broad range of models, and thus one rough hose will give the tighter maneuverability to both aged cruisers and new EVs alike on every ride every day.
Ford Power Steering Hose Parts and Q&A
- Q: How to service and repair the power steering hose to fluid cooler return on Ford F-150?A:The first step for servicing or repairing the steering gear to fluid cooler return hose requires positioning the vehicle on a hoist with it in neutral gear. The installation of fresh O-ring seals becomes necessary as soon as one disconnects the steering gear lines. The first step involves commencing with the power steering line clamp plate bolt removal followed by clamp plate rotation before disconnecting the return line while throwing away the O-ring seal. Always secure the bolt to 23 Nm (17 ft. lbs.) during the reinstallation process. First unclasp the line then unattach its return path from the power steering fluid cooler before taking the hose off the line. The power steering system filling process should be started after completing the reverse steps from removal.
- Q: How to Service and Repair the Power Steering Hose on Ford Focus?A:The starting point for servicing or repairing power steering lines requires you to remove the battery and its tray before cutting off the pressure line from its retainer with pressure and return lines. Automatic transmission vehicles need to detach the Turbine Shaft Speed (TSS) sensor electrical connector from the transmission before placing the connector and wiring harness safely out of the pressure line path. The service requires uninstalling two components: the lower radiator air deflector and the power steering pump pulley. Detach the electrical connector from the Power Steering Pressure sensor then take off the PSP sensor from the pressure line while securing it with 20 Nm (177 lb-in) torque before reinstalling. When reinstalling the pump tighten the power steering pressure line fitting to a torque of 65 Nm (48 lb-ft). The first step entails removing the A/C compressor line bracket from the compressor stud through harness wiring and losing then tightening the pressure line-to-stud nut to 9 Nm (80 lb-in). The procedure starts with loose fitting of A/C line bracket screw and then positions both A/C line and pressure line brackets away from the A/C compressor stud. First disconnect the pressure line bracket-to-starter stud retainer wire harness then remove the pressure line bracket-to-starter stud nut before placing the pressure line bracket to the side by tightening it to 9 Nm (80 lb-in). Detach the steering line-to-steering gear retainer bolt before releasing the pressure line. Afterward remove the pressure line from the steering gear by unbolting the clamp plate and rotating it to 23 Nm (17 lb-ft) torques settings during reassembly. The technicians should remove the pressure line from each set of four pressure and return line retainers. The selector lever cable must be detached from automatic transmission components by pinching retainer clips and gently pulling out to break the connection between the cable bracket and subsequently pulling the cable end free from the shift shaft lever while setting the disconnected cable and retainers away from the pressure line. The power steering system requires filling after the pressure line removal when the routing installation is correctly in place.


Related Ford Parts
 Ford Steering Column
 Ford Shift Interlock Solenoid
 Ford Tie Rod
 Ford Idler Arm
 Ford Pitman Arm
 Ford Power Steering Reservoir
 Ford Steering Angle Sensor
 Ford Steering Shaft
 Ford Power Steering Assist Motor
 Ford Rack & Pinion Bushing
 Ford Rack and Pinion Boot
 Ford Steering Column Seal
Browse Ford Power Steering Hose by Models
Ranger Bronco Mustang Explorer Focus Fusion F-150 Escape Edge Excursion Expedition Taurus Thunderbird Flex Transit Connect Explorer Sport Trac Crown Victoria Probe Bronco II Escort F-250 Aerostar Aspire Contour Country Squire E-150 Econoline Explorer Sport F-350 Five Hundred Freestar Freestyle LTD Taurus X Tempo Windstar F-350 Super Duty LTD Crown Victoria E-150 E-150 Club Wagon E-150 Econoline Club Wagon E-250 E-250 Econoline E-250 Econoline Club Wagon E-350 Club Wagon E-350 Econoline E-350 Econoline Club Wagon E-350 Super Duty F-150 Heritage F-250 HD F-250 Super Duty Transit-150 Transit-250 Transit-350 Transit-350 HD