FordParts
My Garage
My Account
Cart
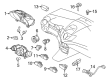
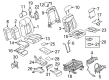
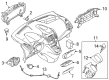
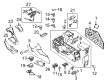
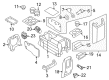
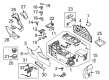
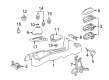
OEM Ford Seat Heater Switch
Seat Heater Level Switch- Select Vehicle by Model
- Select Vehicle by VIN
Select Vehicle by Model
orMake
Model
Year
Select Vehicle by VIN
For the most accurate results, select vehicle by your VIN (Vehicle Identification Number).
34 Seat Heater Switches found


Ford Seat Heat Switch, Passenger Side Part Number: 8A5Z-14D694-AA
$44.52 MSRP: $72.73You Save: $28.21 (39%)Ships in 1-3 Business DaysProduct Specifications- Other Name: Switch Assembly; Seat Heater Switch, Right; Switch; Seat Heater Switch
- Position: Passenger Side


Ford Switch Assembly, Front Part Number: 98AZ-14D694-AA
$55.25 MSRP: $90.91You Save: $35.66 (40%)Ships in 1-2 Business DaysProduct Specifications- Other Name: Seat Heater Switch, Front, Left; Power Seat Switch
- Position: Front


Ford Seat Heat Switch Part Number: CJ5Z-14D694-B
$69.62 MSRP: $114.55You Save: $44.93 (40%)Ships in 1-3 Business DaysProduct Specifications- Other Name: Switch Assembly; Seat Heater Switch; Switch


Ford Switch Assembly Part Number: F8RZ-14D694-KA
$16.03 MSRP: $25.45You Save: $9.42 (38%)Product Specifications- Other Name: Seat Heater Switch; Power Seat Switch; Switch
- Manufacturer Note: RH AND LH


Ford Switch Part Number: F85Z-14D694-AA
$45.80 MSRP: $72.73You Save: $26.93 (38%)Ships in 1-2 Business DaysProduct Specifications- Other Name: Switch Assembly; Seat Heater Switch; Power Seat Switch


Ford Seat Heat Switch, Driver Side Part Number: D2BZ-14D694-D
$45.80 MSRP: $72.73You Save: $26.93 (38%)Ships in 1-2 Business DaysProduct Specifications- Other Name: Switch Assembly; Seat Heater Switch, Left; Switch; Seat Heater Switch
- Position: Driver Side


Ford Seat Heat Switch, Passenger Side Part Number: D2BZ-14D694-C
$45.80 MSRP: $72.73You Save: $26.93 (38%)Product Specifications- Other Name: Switch Assembly; Seat Heater Switch, Right; Switch; Seat Heater Switch
- Position: Passenger Side


Ford Switch, Driver Side Part Number: AL3Z-14D695-AA
$45.80 MSRP: $72.73You Save: $26.93 (38%)Product Specifications- Other Name: Switch Assembly; Seat Heater Switch
- Position: Driver Side

Ford Heat Switch Part Number: EP5Z-14D694-AA
$54.25 MSRP: $90.91You Save: $36.66 (41%)Ships in 1-2 Business DaysProduct Specifications- Other Name: Switch Assembly; Seat Heater Switch; Seat Heat Switch; Switch

Ford Seat Heat Switch Part Number: CM5Z-14D694-B
$68.23 MSRP: $114.55You Save: $46.32 (41%)Ships in 1-3 Business DaysProduct Specifications- Other Name: Switch Assembly; Seat Heater Switch; Switch

Ford Seat Heat Switch Part Number: CV6Z-14D694-A
$84.47 MSRP: $141.82You Save: $57.35 (41%)Product Specifications- Other Name: Switch Assembly; Seat Heater Switch

Ford Seat Heat Switch, Driver Side Part Number: BE8Z-14D694-DA
$44.52 MSRP: $72.73You Save: $28.21 (39%)Ships in 1-2 Business DaysProduct Specifications- Other Name: Switch Assembly; Seat Heater Switch, Left; Switch; Seat Heater Switch
- Manufacturer Note: BLACK
- Position: Driver Side

Ford Seat Heat Switch, Rear Driver Side Part Number: 7A1Z-14D695-AA
$44.52 MSRP: $72.73You Save: $28.21 (39%)Ships in 1-2 Business DaysProduct Specifications- Other Name: Switch Assembly; Seat Heater Switch, Rear Left; Switch; Seat Heater Switch
- Position: Driver Side


Ford Seat Heat Switch, Center Part Number: 9L1Z-14D694-AA
$28.63 MSRP: $45.45You Save: $16.82 (38%)Ships in 1-2 Business DaysProduct Specifications- Other Name: Switch Assembly; Seat Heater Switch, Center; Power Seat Switch; Switch; Seat Heater Switch
- Manufacturer Note: RH/LH
- Position: Center
Ford Seat Heat Switch Part Number: DT1Z-14D694-A
$55.25 MSRP: $90.91You Save: $35.66 (40%)Ships in 1-3 Business DaysProduct Specifications- Other Name: Switch Assembly; Seat Heater Switch; Switch

Ford Seat Heat Switch Part Number: CM5Z-14D694-A
$69.62 MSRP: $114.55You Save: $44.93 (40%)Ships in 1-2 Business DaysProduct Specifications- Other Name: Switch Assembly; Seat Heater Switch
- Replaces: CV6Z-14D694-B


 Product Specifications
- Other Name: Switch Assembly; Seat Heater Switch, Center Right, Left; Seat Heater Switch
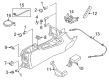
- Manufacturer Note: Passenger seat - located in floor console,
- Position: Center Passenger Side


Ford Seat Heat Switch, Passenger Side Part Number: 8A1Z-14D694-AA
Product Specifications- Other Name: Switch Assembly; Seat Heater Switch; Switch
- Position: Passenger Side

Ford Seat Heat Switch Part Number: 3S4Z-14D694-AA
Product Specifications- Other Name: Switch Assembly; Seat Heater Switch, Right; Seat Heater Switch
- Manufacturer Note: Driver seat - located in floor console
- Position: Passenger Side


Ford Switch Assembly Part Number: 3L2Z-14D694-AA
Product Specifications- Other Name: Seat Heater Switch; Power Seat Switch; Seat Heat Switch; Switch
| Page 1 of 2 |Next >
1-20 of 34 Results
Ford Seat Heater Switch
If you own Ford and want to keep it in top shape, choosing OEM Seat Heater Switch is a smart move. They are precisely engineered and follow strict factory standards. They are made in advanced facilities that use cutting edge technology. Each part goes through thorough testing to confirm strength and safety, so you can trust it. FordPartsDeal.com gives you genuine Ford Seat Heater Switch at some of the affordable online prices without cutting quality. Every OEM Ford part includes the manufacturer's warranty, easy returns, and super-fast delivery. So why wait? Shop now and get your vehicle back to peak condition.
Ford Seat Heater Switch allows you to easily crank the warmness into all the cold seats. Ford became the mobility hallucination of Henry in 1903, the version that combined the relocation conveyor with the unceasing innovation and every day motorists received hybrids, trucks, cars, and currently, electric pickups without luxury premiums. Ford mixes EcoBoost power with thrift, SYNC voice control with no-hands playlists, a watchful nudge and lane assist of Co-Pilot360 provide the badge values of power, brains, and night or day driving rather than empty hype or gimmicky bells and whistles. Since releasing the original Model T, the company continues to rise in the number of ideas quickly, and under the credo of mass production and reasonable prices, the new technology can be found in any garage, in the present and future, without losing the comfort. Ford wires the Seat Heater Switch on a special circuit, allows drivers to select soft warmth or blistering toast, and provides indicator lights to confirm settings by a glance without taking their eyes off the road. The Seat Heater Switch also does not cause battery stress by operating at a constant but low amperage, and thus, long snow trips are comfortable as the car does not run out of charge. When it frosts, Ford allows the Seat Heater Switch to fire up inside a few seconds transforming frozen vinyl or leather into a warm cushion before the engine warms up. Since the Seat Heater Switch would fit directly into factory harnesses in all models, it would only take a few minutes to change a failed device and the winter confidence would be restored.
Ford Seat Heater Switch Parts and Q&A
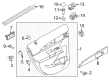
- Q: How to service the Seat Heater Switch for the rear seat on Ford Edge?A:The procedure for servicing the heated seat switch for rear seating begins by taking away the door handle bezel. The first step is removing the rear door handle bezel screw cover after which you should disconnect the rear door handle bezel screw. Once the components are detached it becomes possible to split the rear door handle bezel from the door trim panel. The rear door handle bezel's heated seat switch removal begins with disconnecting electrical connections then unclipping the assembly before grasping the heated seat switch from its place behind the back side of the rear door handle bezel. The installation procedure requires duplicating all steps that were performed at removal time. The selection of heated seat components for this model must be from its designated parts because interchangeable elements across model years or vehicle types create incompatibilities which lead to functional breakdowns and severe accident risks.
- Q: What Precautions Should Be Taken When Servicing the Seat Heater Switch to Ensure Safety and Proper Handling of Air Bag Components on Ford Escape?A:Wear safety glasses before servicing heated seat switch operations to protect from possible air bag incident injuries. Live side air bag modules should be handled by keeping the air bag and tear seam pointed in a direction that is away from your body at all times. It is prohibited to place a live module down on the cover tear seam during handling. Sodium hydroxide residue requires hand washing with soap and water after experiencing an air bag deployment. Probing the connectors through the air bag module leads to unwanted deployment of the system. Proper vehicle sensor alignment must be checked and the sensor mounting bracket along with wiring pigtail requires inspection for any signs of damage after a collision. All damaged SRS components need replacement regardless of air bag deployment. The technician must disconnect the ground cable from the battery while waiting at least one minute to drain back up power along with disconnecting any extra batteries when present. The restraint system diagnostic tool functions solely for service operations so it needs removal prior to vehicle driving. The diagnostic tool must be connected into the side air bag connector located at the floor connector to conduct side air bag system and safety belt pretensioner diagnostics. The diagnostic process needs to be restarted after reinstalling the original part if the problem remains unresolved. When side air bags activate the seatback pad along with trim cover and side air bag module should get replaced and seatback frame installation might become necessary. Start the removal procedure by disconnecting the ground cable of the battery before moving on to remove the seat control switch knob followed by the front seat cushion side shield and seat backrest handle and their associated screws and shield and electrical connector disconnections. First free the locking tab before extracting the heated seat switch then reinstall by following the previous steps backward.


Related Ford Parts
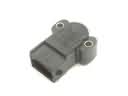 Ford Throttle Position Sensor
 Ford Ignition Switch
 Ford ABS Control Module
 Ford Speedometer
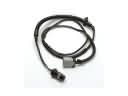 Ford Fuel Pump Wiring Harness
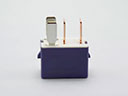 Ford Ignition Relay
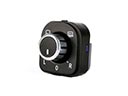 Ford Mirror Switch
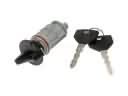 Ford Ignition Lock Assembly
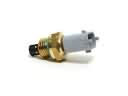 Ford Intake Manifold Temperature Sensor
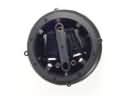 Ford Mirror Actuator
 Ford Occupant Detection Sensor
 Ford Temperature Sender