FordParts
My Garage
My Account
Cart
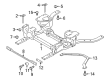
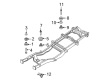
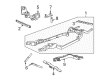
OEM Ford Front Cross-Member
Front Engine Cross Member- Select Vehicle by Model
- Select Vehicle by VIN
Select Vehicle by Model
orMake
Model
Year
Select Vehicle by VIN
For the most accurate results, select vehicle by your VIN (Vehicle Identification Number).
316 Front Cross-Members found


Ford Engine Cradle, Front Part Number: BR3Z-5C145-A
$392.65 MSRP: $615.63You Save: $222.98 (37%)Ships in 1-2 Business DaysProduct Specifications- Other Name: Cross Member Assembly; Engine Cradle, Front; Suspension Crossmember
- Position: Front


Ford Lower Crossmember, Front Part Number: BR3Z-5019-B
$261.08 MSRP: $383.38You Save: $122.30 (32%)Ships in 1-3 Business DaysProduct Specifications- Other Name: Cross Member Assembly; Suspension Subframe Crossmember, Front; Crossmember
- Position: Front Lower
- Replaces: BR3Z-5019-A


Ford Suspension Crossmember, Front Part Number: FB5Z-5C145-E
$594.59 MSRP: $880.87You Save: $286.28 (33%)Ships in 1-3 Business DaysProduct Specifications- Other Name: Frame Assembly; Suspension Subframe Crossmember, Front; Crossmember
- Position: Front
- Replaces: DB5Z-5C145-B, DB5Z-5C145-G, FB5Z-5C145-G


Ford Trans Crossmember, Center Part Number: CK4Z-6A023-A
$78.06 MSRP: $120.13You Save: $42.07 (36%)Product Specifications- Other Name: Support - Transmission Center; Support - Transmission Centre
- Position: Center


Ford Lower Brace Part Number: BR3Z-5025-A
$87.24 MSRP: $126.98You Save: $39.74 (32%)Ships in 1-3 Business DaysProduct Specifications- Other Name: Cross Member Assembly; Engine Cradle Brace
- Position: Lower


Ford Front Crossmember Part Number: HC3Z-5030-B
$129.73 MSRP: $188.83You Save: $59.10 (32%)Ships in 1 Business DayProduct Specifications- Other Name: Cross Member Assembly; Frame Crossmember, Front
- Position: Front


Ford Suspension Crossmember, Front Part Number: AE8Z-5019-A
$190.80 MSRP: $277.73You Save: $86.93 (32%)Ships in 1-2 Business DaysProduct Specifications- Other Name: Cross Member Assembly; Suspension Subframe Crossmember, Front; Crossmember
- Position: Front


Ford Front Crossmember, Inner Part Number: BC3Z-2510624-A
$143.29 MSRP: $208.57You Save: $65.28 (32%)Ships in 1-2 Business DaysProduct Specifications- Other Name: Member - Floor Cross - Inner; Floor Pan Crossmember, Front
- Position: Front Inner


Ford Trans Crossmember Part Number: FL3Z-6A023-A
$299.45 MSRP: $439.72You Save: $140.27 (32%)Ships in 1-2 Business DaysProduct Specifications- Other Name: Support; Transmission Crossmember


Ford Suspension Crossmember, Front Part Number: CP9Z-5019-A
$365.33 MSRP: $536.47You Save: $171.14 (32%)Ships in 1-3 Business DaysProduct Specifications- Other Name: Cross Member Assembly; Suspension Subframe Crossmember, Front; Crossmember
- Position: Front


Ford Suspension Crossmember, Front Part Number: JB5Z-5C145-B
$490.98 MSRP: $720.97You Save: $229.99 (32%)Ships in 1-2 Business DaysProduct Specifications- Other Name: Frame Assembly; Suspension Subframe Crossmember, Front; Crossmember
- Position: Front
- Replaces: FB5Z-5C145-A


Ford Engine Cradle, Front Part Number: 9L8Z-5C145-A
$498.53 MSRP: $732.05You Save: $233.52 (32%)Product Specifications- Other Name: Cross Member Assembly; Engine Cradle, Front; Crossmember
- Position: Front


Ford Lower Crossmember, Rear Part Number: FR3Z-5025-A
$63.40 MSRP: $92.28You Save: $28.88 (32%)Ships in 1-3 Business DaysProduct Specifications- Other Name: Cross Member Assembly; Suspension Subframe Crossmember Brace, Rear
- Position: Rear Lower


Ford Suspension Crossmember, Front Part Number: CK4Z-5019-D
$303.44 MSRP: $445.58You Save: $142.14 (32%)Product Specifications- Other Name: Cross Member Assembly; Suspension Subframe Crossmember, Front; Crossmember
- Position: Front
- Replaces: CK4Z-5019-A, CK4Z-5019-B, CK4Z-5019-C


Ford Repair Kit Part Number: 9L3Z-5025-A
$80.77 MSRP: $117.57You Save: $36.80 (32%)Product Specifications- Other Name: Crossmember; Frame Crossmember


Ford Engine Cradle, Front Part Number: 8E5Z-5C145-E
Product Specifications- Other Name: Frame Assembly; Engine Cradle, Front; Crossmember
- Position: Front
- Replaced by: AE5Z-5874-B

Ford Engine Cradle, Front Part Number: 6E5Z-5C145-BA
Product Specifications- Other Name: Frame Assembly; Engine Cradle, Front; Crossmember
- Position: Front
- Replaced by: AE5Z-5874-B


Ford Front Crossmember Part Number: 5C3Z-5C128-AA
Product Specifications- Other Name: Crossmember
- Position: Front


Ford Front Crossmember Part Number: 3W1Z-5019-AA
$22.91 MSRP: $32.50You Save: $9.59 (30%)Product Specifications- Other Name: Cross Member Assembly; Frame Crossmember, Front
- Position: Front


Ford Front Crossmember Part Number: 2C3Z-5C128-AA
$117.31 MSRP: $170.75You Save: $53.44 (32%)Product Specifications- Other Name: Crossmember
- Manufacturer Note: Front lower blocker beam - reduced material gauge, FROM 11/04/02 TO 12/01/03
- Position: Front
| Page 1 of 16 |Next >
1-20 of 316 Results
Ford Front Cross-Member
If you own Ford and want to keep it in top shape, choosing OEM Front Cross-Member is a smart move. They are precisely engineered and follow strict factory standards. They are made in advanced facilities that use cutting edge technology. Each part goes through thorough testing to confirm strength and safety, so you can trust it. FordPartsDeal.com gives you genuine Ford Front Cross-Member at some of the affordable online prices without cutting quality. Every OEM Ford part includes the manufacturer's warranty, easy returns, and super-fast delivery. So why wait? Shop now and get your vehicle back to peak condition.
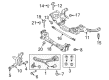
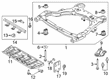
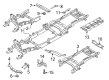
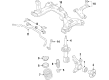
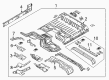
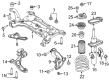
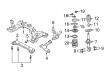
The Ford Front Cross-Member is applied to hold the front nose of the vehicle in place, as well as ensuring that the weight of the engine is put under control. Ford began in 1903 and reduced expenses through manufacturing that reversed the playing field in the industry. EcoBoost engines provide turbo power with thrift to ensure that people travel more with less fuel. SYNC allows voices to choose songs or paths and eyes are focused and hands are tense. Co-Pilot applies the brakes to dangers, pushes the wheel, and holds lanes straight. The electric pickup such as the F-150 Lightning silently rides and drops the carbon level of the tailpipe to zero. The motto behind every upgrade is safer, smarter, stronger trips made by everyone, pursued by Ford. Ford offers work, play, and family-friendly rides in its minivans to muscle cars. The Front Cross-Member is a structure placed between the frame rails and holds the engine and gearbox when hit harshly. The stamped steel corpus battles against twisting and rusting and binds the suspension arms precisely in place. The Front Cross-Member distributes forces of stress through the chassis, so the steering remains straight and the braking is also straight. The panel of this Front Cross-Member guard is mounted in such a way that the force of the crash passes under the cabin without caving the floor. Replace an old Front Cross-Member with a new one and regain sharp road manners in a short time. With that foundation refreshed, Ford drivers are subjected to fewer rattles and feel more stable on coarse pavements.
Ford Front Cross-Member Parts and Q&A
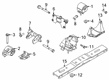
- Q: How to service and repair the Front Cross-Member and Rear Crossmember for the 3.7L and 5.0L engines on Ford Mustang?A:Begin the service and repair of transmission crossmember for 3.7L and 5.0L engines on a hoisted vehicle set to neutral. Install a suitable jack that supports the transmission before removing the insulator nuts and crossmember bolts which will disconnect the crossmember. Reset the transmission crossmember according to its original position and place transmission support insulator nuts along with crossmember bolts loosely. Neutralization of the transmission crossmember requires sliding it at three positions until the transmission support insulator gaps with the crossmember match each other. Always complete the procedure by tightening the transmission support insulator nuts to 70 Nm (52 lb-ft) while the transmission crossmember bolts reach 63 Nm (46 lb-ft). Finally, remove the transmission jack.
- Q: How to service the front cross-member for transmission support on Ford Ranger?A:Service of transmission support crossmember requires placing the vehicle into neutral position on a hoist. Remove first the two transmission mount nuts from the transmission support crossmember before you tighten them to 90 Nm (66 lb-ft) when finishing the work. The transmission support requires a suitable jack to hold it in place instead of allowing it to hang unsupported. You need to take out two horizontal bolts and nuts which are installed on each side of the transmission support crossmember before reinstallation where you must torque them to 127 Nm (94 lb-ft). You should unwind the four vertical bolts and nuts that exist on both sides of the crossmember while reinstalling them using a torque of 99 Nm (73 lb-ft). The last step requires performing the reverse procedure for installing the transmission support crossmember.


Related Ford Parts
 Ford Windshield Wiper
 Ford Car Mirror
 Ford Hood Release Cable
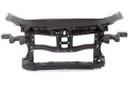 Ford Radiator Support
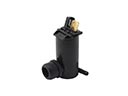 Ford Windshield Washer Pump
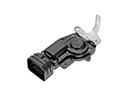 Ford Door Lock Actuator Motor
 Ford Floor Pan
 Ford Hazard Warning Switch
 Ford Shift Linkage Boot
 Ford Weather Strip
 Ford Windshield Washer Fluid Reservoir
 Ford Wiper Arm
Browse Ford Front Cross-Member by Models
Ranger Bronco Mustang Explorer Focus Fusion F-150 Maverick Escape Edge Excursion Expedition Fiesta Taurus Thunderbird Flex Transit Connect Bronco Sport Explorer Sport Trac Crown Victoria EcoSport Escort Aerostar C-Max Contour Five Hundred Freestar Freestyle Mustang Mach-E Police Interceptor Utility Taurus X Windstar F-350 Super Duty LTD Crown Victoria Police Interceptor Sedan E-350 Super Duty E-Transit F-150 Lightning F-250 Super Duty Police Responder Hybrid Special Service Police Sedan SSV Plug-In Hybrid Transit-150 Transit-250 Transit-350 Transit-350 HD