FordParts
My Garage
My Account
Cart
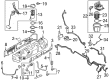
OEM Lincoln Fuel Rail
Engine Fuel Rail- Select Vehicle by Model
- Select Vehicle by VIN
Select Vehicle by Model
orMake
Model
Year
Select Vehicle by VIN
For the most accurate results, select vehicle by your VIN (Vehicle Identification Number).
39 Fuel Rails found


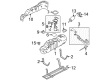
Lincoln Fuel Rail Part Number: 5C3Z-9F792-DA
$413.14 MSRP: $606.67You Save: $193.53 (32%)Ships in 1-3 Business DaysProduct Specifications- Other Name: Manifold Assembly - Fuel Supply


Lincoln Fuel Rail Part Number: CJ5Z-9D280-A
$664.65 MSRP: $1150.91You Save: $486.26 (43%)Ships in 1-3 Business DaysProduct Specifications- Other Name: Manifold Assembly - Fuel Supply


Lincoln Fuel Rail Part Number: 6M8Z-9D280-C
$86.91 MSRP: $138.00You Save: $51.09 (38%)Ships in 1-3 Business DaysProduct Specifications- Other Name: Manifold Assembly - Fuel Supply


Lincoln Fuel Rail Part Number: 7T4Z-9F792-G
$585.00 MSRP: $866.67You Save: $281.67 (33%)Product Specifications- Other Name: Manifold Assembly - Fuel Supply
- Replaces: 7T4Z-9F792-F


Lincoln Fuel Rail Part Number: GT4Z-9F792-A
$233.81 MSRP: $343.33You Save: $109.52 (32%)Ships in 1-3 Business DaysProduct Specifications- Other Name: Manifold Assembly - Fuel Supply
- Replaces: AT4Z-9F792-A


Lincoln Fuel Rail Part Number: 9L3Z-9F792-H
$499.40 MSRP: $733.33You Save: $233.93 (32%)Product Specifications- Other Name: Manifold Assembly - Fuel Supply
- Replaces: 9L3Z-9F792-G

Lincoln Fuel Rail, Driver Side Part Number: BL3Z-9D280-B
$209.72 MSRP: $356.36You Save: $146.64 (42%)Ships in 1-3 Business DaysProduct Specifications- Other Name: Manifold Assembly - Fuel Supply
- Position: Driver Side

Lincoln Fuel Rail, Passenger Side Part Number: BL3Z-9D280-A
$222.56 MSRP: $378.18You Save: $155.62 (42%)Ships in 1-3 Business DaysProduct Specifications- Other Name: Manifold Assembly - Fuel Supply
- Position: Passenger Side

Lincoln Fuel Rail, Passenger Side Part Number: BA5Z-9D280-A
$159.84 MSRP: $269.09You Save: $109.25 (41%)Ships in 1-3 Business DaysProduct Specifications- Other Name: Manifold Assembly - Fuel Supply
- Position: Passenger Side
- Replaces: AA5Z-9D280-A


Lincoln Fuel Rail Part Number: HL3Z-9D280-E
$221.33 MSRP: $354.55You Save: $133.22 (38%)Ships in 1-3 Business DaysProduct Specifications- Other Name: Manifold Assembly - Fuel Supply
- Replaces: HL3Z-9D280-C

Lincoln Fuel Rail, Driver Side Part Number: BA5Z-9D280-B
$412.01 MSRP: $660.00You Save: $247.99 (38%)Ships in 1-3 Business DaysProduct Specifications- Other Name: Manifold Assembly - Fuel Supply
- Position: Driver Side
- Replaces: AA5Z-9D280-B

Lincoln Fuel Rail Part Number: XL1Z-9F792-DG
$757.35 MSRP: $1122.00You Save: $364.65 (33%)Product Specifications- Other Name: Manifold Assembly - Fuel Supply
- Manufacturer Note: DOHC
- Replaces: XL1Z-9F792-DA

Lincoln Fuel Rail Part Number: 7L1Z-9F792-B
$135.98 MSRP: $185.04You Save: $49.06 (27%)Ships in 1-2 Business DaysProduct Specifications- Other Name: Manifold Assembly - Fuel Supply

Lincoln Fuel Rail, Driver Side Part Number: JT4Z-9D280-D
$195.81 MSRP: $332.73You Save: $136.92 (42%)Ships in 1-3 Business DaysProduct Specifications- Other Name: Manifold Assembly - Fuel Supply
- Position: Driver Side
Lincoln Fuel Rail, Passenger Side Part Number: JT4Z-9D280-C
$221.49 MSRP: $376.36You Save: $154.87 (42%)Ships in 1-3 Business DaysProduct Specifications- Other Name: Manifold Assembly - Fuel Supply
- Position: Passenger Side
Lincoln Fuel Rail, Driver Side Part Number: FT4Z-9D280-B
$251.45 MSRP: $427.27You Save: $175.82 (42%)Ships in 1-3 Business DaysProduct Specifications- Other Name: Manifold Assembly - Fuel Supply
- Position: Driver Side
Lincoln Fuel Rail, Passenger Side Part Number: FT4Z-9D280-A
$266.43 MSRP: $452.73You Save: $186.30 (42%)Ships in 1-2 Business DaysProduct Specifications- Other Name: Manifold Assembly - Fuel Supply
- Position: Passenger Side
Lincoln Fuel Rail Part Number: P2GZ-9D280-A
$87.48 MSRP: $138.91You Save: $51.43 (38%)Ships in 1-2 Business DaysProduct Specifications- Other Name: Manifold Assembly - Fuel Supply
Lincoln Fuel Rail Part Number: HL3Z-9D280-F
$177.48 MSRP: $281.82You Save: $104.34 (38%)Ships in 1-3 Business DaysProduct Specifications- Other Name: Manifold Assembly - Fuel Supply
- Replaces: HL3Z-9D280-D


Lincoln Fuel Rail Part Number: 5W7Z-9F792-AC
$312.13 MSRP: $458.33You Save: $146.20 (32%)Product Specifications- Other Name: Manifold Assembly - Fuel Supply
- Replaces: 5W7Z-9F792-AA
| Page 1 of 2 |Next >
1-20 of 39 Results
Lincoln Fuel Rail
If you own Lincoln and want to keep it in top shape, choosing OEM Fuel Rail is a smart move. They are precisely engineered and follow strict factory standards. They are made in advanced facilities that use cutting edge technology. Each part goes through thorough testing to confirm strength and safety, so you can trust it. FordPartsDeal.com gives you genuine Lincoln Fuel Rail at some of the affordable online prices without cutting quality. Every OEM Lincoln part includes the manufacturer's warranty, easy returns, and super-fast delivery. So why wait? Shop now and get your vehicle back to peak condition.
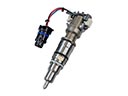
Lincoln Fuel Rail maintains the gasoline under pressure and constant levels to ensure that all the cylinders kick off in the correct manner and at the correct time. Lincoln follows the Quiet Flight concept, making cabins some quiet areas which mute the wind and road noise. Deep seats, full leather trims and hot digital panels will ensure passengers rest and maintain eye focus. The brand has been pursuing progress since 1917, and the move to union with Ford in 1922 opened up larger opportunities. In this day, Lincoln equips every automobile with Co-Pilot360 assist, lane keeping prods, warning of blind spots and parking maneuvers that are effortless. Even optional ActiveGlide still takes hands off the wheel when on mapped highways as sensors monitor the edges of the lanes. First, Lincoln offers feedback on the drivers by listening and implementing software updates on an annual basis rather than holding back for next-gen releases. Customer support representatives are familiar with models and reply to chat messages on apps instantly and without delays. The Fuel Rail is extremely hot and vibratory, which is why it is constructed in stainless steel and intelligently routed to absorb pulses. That pressure is sensed by the sensors and the PCM varies pulse width to lean cruising or max thrust, quick changes guaranteed. Since Lincoln combines Fuel Rail and throttle-body, port, and direct injection designs, one hard component encompasses all powertrains. A blocked Fuel Rail will suffocate combustion and cause high emissions whereas a clear path will ensure happy turbo spools and cool pistons. The difference is observed by the owners: easily starting engines, sharp throttle, long trips on one tank, all due to the robust Fuel Rail.
Lincoln Fuel Rail Parts and Q&A
- Q: How should one safely service the fuel rail and what steps are involved in the process on Lincoln Navigator?A:Fuel rail servicing demands safety precautions because highly flammable mixtures are present at the area which requires avoiding both smoking and open-fire situations. The safety requirement to relieve fuel system pressure needs to be followed before you disconnect any component during service as this system preserves its high pressure state even after engine shutoff. The handling of fuel injection equipment requires cleanliness maintenance while blanking plugs need to be used for every open tube orifice. Before separating liquid or vapor tube connectors for reuse it is essential to use compressed air to clean the retaining clip area. Proceed with connecting the battery ground cable then using methods to relieve fuel system pressure. Detach the Air Cleaner (ACL) outlet pipe followed by disconnecting the crankcase ventilation tube quick connect coupling from the ACL outlet pipe-to-Throttle Body (TB) adapter. Free the clamp to uninstall the air intake resonator assembly that must be tightened to 10 Nm (89 lb-in) for reinstall. Proceed with removing the three ACL outlet pipe-to-TB adapter bolts and fastening them to 10 Nm (89 lb-in) before extracting the ACL outlet pipe-to-TB adapter. Separate the Electronic Throttle Control (ETC) electrical connector from the Throttle Position (TP) sensor electrical connector after disconnecting the Evaporative Emission (EVAP) tube quick connect coupling from the intake manifold and the heated PCV intake fitting electrical connector as well as the fuel tube quick connect coupling. The eight fuel injector electrical connectors must be disconnected before removing the four fuel rail bolts to separate the fuel rail and injectors together into an assembly unit. Tighten the bolts to 10 Nm (89 lb-in) when reinstalling this unit. The installation process includes using fuel-resistant special material O-ring seals while applying engine oil to all new O-ring seals before installation. The upper and lower fuel injector O-ring seals should be discarded while separating the eight fuel injectors from their fuel rail position. Likewise the fuel injector-to-fuel rail locks need removal. The process finishes through execution of the removal steps in reverse order.
- Q: How should one service the fuel rail while ensuring safety and proper procedures on Lincoln Town Car?A:Service the fuel rail with safety measures in place which prohibits smoking or open flames near the fuel components because flammable mixtures remain present. First put the vehicle into neutral mode then use the hoist equipment. If you need to work with the fuel system you should reduce system pressure and disconnect the ground cable from the battery. Begin by disconnecting the locked fuel tube spring coupling of the fuel rail followed by the removal of the throttle body coupled with the EGR system module to exhaust manifold tube. The brake booster vacuum hose alongside the evaporative emission (EVAP) canister purge valve hose and PCV tube and EGR system module vacuum supply hose should be disconnected from the TB spacer area then carefully placed away. After removing the wire harness retainer from the crash bracket, personnel must uninstall both the crash bracket bolts and bracket before reinstallation. The bolts should be torqued to 25 Nm (18 lb-ft) at this step. Dismiss the wire harness retainer from the left-hand front fuel rail stud bolt then detach all eight fuel injector electrical connectors alongside the right-hand rear fuel rail stud bolt ground connector. Remove the vacuum and electrical connections of both the fuel rail pressure and temperature sensor and the EGR system module while disconnecting all electrical connectors. Replace the shield and bolt down its two intake manifold bolts using a torque of 10 Nm (89 lb-in). After removing the four fuel rail stud bolts the installer should tighten them to 10 Nm (89 lb-in) before reinstalling them. A special fuel-resistant material should be used to make O-ring seals due to leak risks from using ordinary O-ring seals. Carefully extract the combined fuel rail and fuel injector assembly. Proceed to discard original O-ring seals and apply clean engine oil to fuel injector O-ring suns before reinstallation following the reversal of removal steps.


Related Lincoln Parts
 Lincoln Fuel Injector
 Lincoln Fuel Pump
 Lincoln Fuel Tank
 Lincoln Air Intake Coupling
 Lincoln Cruise Control Servo
 Lincoln Fuel Filter
 Lincoln Fuel Injector O-Rings
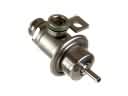 Lincoln Fuel Pressure Regulator
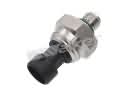 Lincoln Fuel Pressure Sensor
 Lincoln Fuel Pump Tank Seal
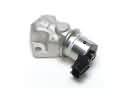 Lincoln Idle Control Valve
 Lincoln Throttle Body