FordParts
My Garage
My Account
Cart
OEM Mercury Oil Pan
Oil Drain Pan- Select Vehicle by Model
- Select Vehicle by VIN
Select Vehicle by Model
orMake
Model
Year
Select Vehicle by VIN
For the most accurate results, select vehicle by your VIN (Vehicle Identification Number).
34 Oil Pans found


Mercury Oil Pan Part Number: 3W7Z-6675-BC
$87.79 MSRP: $127.78You Save: $39.99 (32%)Product Specifications- Other Name: Pan Assembly - Engine Oil; Engine Oil Pan
- Replaces: 3W7Z-6675-BB


Mercury Oil Pan Part Number: 9L3Z-6675-B
$117.89 MSRP: $171.60You Save: $53.71 (32%)Ships in 1-3 Business DaysProduct Specifications- Other Name: Pan Assembly - Engine Oil; Engine Oil Pan


Mercury Oil Pan Part Number: 7T4Z-6675-A
$130.68 MSRP: $201.67You Save: $70.99 (36%)Ships in 1-3 Business DaysProduct Specifications- Other Name: Pan Assembly - Engine Oil; Engine Oil Pan
- Manufacturer Note: Use RTV Silicone Sealer In Place Of Gasket For This Application. Refer To Workshop Manual For Specification


Mercury Oil Pan Part Number: 9L8Z-6675-A
$140.84 MSRP: $205.00You Save: $64.16 (32%)Ships in 1-2 Business DaysProduct Specifications- Other Name: Pan Assembly - Engine Oil; Engine Oil Pan
- Replaces: 6E5Z-6675-CA


Mercury Oil Pan, Upper Part Number: 1L5Z-6675-AA
$146.10 MSRP: $212.67You Save: $66.57 (32%)Ships in 1-3 Business DaysProduct Specifications- Other Name: Bulkhead Assembly - Front; Engine Oil Pan, Upper; Upper Oil Pan; Frame Assembly
- Position: Upper
- Replaces: F77Z-6675-BD

Mercury Oil Pan Part Number: 8L8Z-6675-A
$94.95 MSRP: $138.22You Save: $43.27 (32%)Ships in 1-3 Business DaysProduct Specifications- Other Name: Pan Assembly - Engine Oil; Engine Oil Pan
- Replaces: 5L8Z-6675-AA, 7L8Z-6675-A

Mercury Oil Pan Part Number: 3M4Z-6675-AA
$123.68 MSRP: $180.03You Save: $56.35 (32%)Ships in 1-3 Business DaysProduct Specifications- Other Name: Pan Assembly - Engine Oil; Engine Oil Pan
- Manufacturer Note: Use RTV Silicone Sealer In Place Of Gasket For This Application. Refer To Workshop Manual For Specification

Mercury Oil Pan Part Number: 6M8Z-6675-AB
$130.99 MSRP: $190.67You Save: $59.68 (32%)Ships in 1-2 Business DaysProduct Specifications- Other Name: Pan Assembly - Engine Oil; Engine Oil Pan
- Manufacturer Note: Use RTV Silicone Sealer In Place Of Gasket For This Application. Refer To Workshop Manual For Specification

Mercury Oil Pan Part Number: 9E5Z-6675-B
$135.11 MSRP: $196.67You Save: $61.56 (32%)Ships in 1-3 Business DaysProduct Specifications- Other Name: Pan Assembly - Engine Oil; Engine Oil Pan
- Replaces: 9E5Z-6675-A, 8E5Z-6675-A

Mercury Oil Pan Part Number: F7RZ-6675-AA
$12.92 MSRP: $17.87You Save: $4.95 (28%)Ships in 1-2 Business DaysProduct Specifications- Other Name: Pan Assembly - Engine Oil; Engine Oil Pan
- Manufacturer Note: Use RTV to seal pan to ladderframe

Mercury Oil Pan Part Number: XF2Z-6675-EA
$56.67 MSRP: $78.40You Save: $21.73 (28%)Ships in 1-2 Business DaysProduct Specifications- Other Name: Pan Assembly - Engine Oil; Engine Oil Pan
- Manufacturer Note: 12V
- Replaces: F68Z-6675-BA
Mercury Oil Pan Part Number: XL3Z-6675-AA
$163.58 MSRP: $226.30You Save: $62.72 (28%)Ships in 1-2 Business DaysProduct Specifications- Other Name: Pan Assembly - Engine Oil; Engine Oil Pan
- Manufacturer Note: Incl. 6730 plug
- Replaces: F8AZ-6675-AA
Mercury Oil Pan Part Number: 2F1Z-6675-BA
$199.54 MSRP: $276.04You Save: $76.50 (28%)Ships in 1-2 Business DaysProduct Specifications- Other Name: Pan Assembly - Engine Oil; Engine Oil Pan
Mercury Oil Pan Part Number: F5DZ-6675-CA
$68.50 MSRP: $93.22You Save: $24.72 (27%)Product Specifications- Other Name: Pan Assembly - Engine Oil; Engine Oil Pan


Mercury Oil Pan, Lower Part Number: 5R3Z-6675-AA
$45.87 MSRP: $65.62You Save: $19.75 (31%)Product Specifications- Other Name: Pan Assembly - Engine Oil; Engine Oil Pan, Lower; Lower Oil Pan; Engine Oil Pan
- Position: Lower
- Replaces: 1L2Z-6675-FA


Mercury Oil Pan Part Number: F33Z-6675-A
Product Specifications- Other Name: Pan Assembly - Engine Oil


Mercury Oil Pan Part Number: 3F1Z-6675-DA
Product Specifications- Other Name: Pan Assembly - Engine Oil; Engine Oil Pan
- Replaces: 3F1Z-6675-BA, F7DZ-6675-AA


Mercury Oil Pan Part Number: 1L2Z-6675-BA
Product Specifications- Other Name: Pan Assembly - Engine Oil; Engine Oil Pan


Mercury Oil Pan Part Number: 1F2Z-6675-BA
Product Specifications- Other Name: Pan Assembly - Engine Oil; Engine Oil Pan
- Manufacturer Note: Use RTV Silicone Sealer In Place Of Gasket For This Application. Refer To Workshop Manual For Specification
- Replaces: 1F2Z-6675-AA, 5F2Z-6675-A

Mercury Oil Pan Part Number: F7CZ-6675-CB
Product Specifications- Other Name: Pan Assembly - Engine Oil; Engine Oil Pan
- Manufacturer Note: Incl. 6710 gasket & 6730 plug, ATX
| Page 1 of 2 |Next >
1-20 of 34 Results
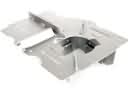
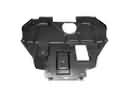
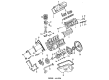
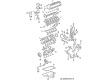
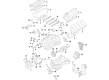
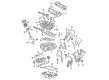
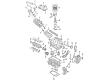
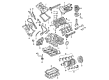
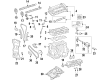
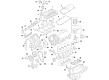
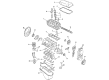
Mercury Oil Pan
If you own Mercury and want to keep it in top shape, choosing OEM Oil Pan is a smart move. They are precisely engineered and follow strict factory standards. They are made in advanced facilities that use cutting edge technology. Each part goes through thorough testing to confirm strength and safety, so you can trust it. FordPartsDeal.com gives you genuine Mercury Oil Pan at some of the affordable online prices without cutting quality. Every OEM Mercury part includes the manufacturer's warranty, easy returns, and super-fast delivery. So why wait? Shop now and get your vehicle back to peak condition.
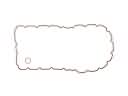
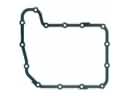
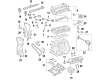
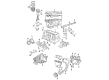
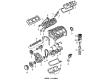
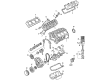
Mercury Oil Pan stores engine oil in a special place and it is ready to be cooled and cut in seconds by friction. In 1939 Mercury found its way to the showrooms with midsize rides that combined sharp lines, soft springs and prices that families could afford and still offered a step-up beyond bare bones motoring. Mercury made good on this guarantee by overstuffing cabins with more insulation, broader seats, and softer glass to make long drives feel relaxing and eliminate the need to raise the tone to highway level to have a normal conversation. Mercury continued to perfect Cougar and Grand Marquis models, smooth ride, reduce tire noise, and control steering, and it would be comfortable without the luxury cost in dozens of horsepower battles over decades. The owners have lauded the fact that the cars absorb pavement cracks, the wind hissing, the light but steady steering, and the fact that grandparents, children, and luggage can ride together in the cars for hours without sore buttocks, which created a loyalty that no newer badges with bigger horsepower figures could break. In the wet-sump design, the Oil Pan of a Mercury engine is a lubricating pan, a heat collector and depends on internal baffles to prevent the occurrence of slosh when drivers brake or flick the wheel. The stamped steel Oil Pan bears daily torture, but cast aluminum types cool more quickly and bounce off impacts by stones and resist the distortion that causes drips to become puddles. When there are hard corners, the Oil Pan routes oil directly back to the pickup feed bearings in advance before they become threatened by friction. Change a new gasket and the Oil Pan will be tightly closed, it will be pressurized and deprive leaks that would produce smoke of an opportunity.
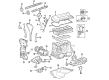
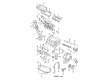
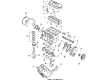
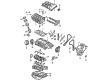
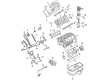
Mercury Oil Pan Parts and Q&A
- Q: How to remove the oil pan in 3.8L V6 and V8 engine on Mercury Capri?A:To remove the oil pan; unplug the car's negative terminal and then; unbolt and take out the air cleaner. Third, remove the fan shroud mounting bolts and align the shroud over the fan once again. Take out the oil level dipstick and, if the car is so equipped, the oil level sensor switch located on the side of the oil pan. If undertaken, unbolt the mounting screws connecting the vacuum solenoids to the firewall and place such screws aside. If needed the exhaust crossover pipe needs to be separated from the manifolds in order not to interfere when the oil pan is being removed. Remove the engine oil and also unscrew the oil filter out of the engine. For the models that are equipped with the automatic transmission, remove the shift linkage and transmission cooler lines at the case at the radiator. Disconnect the torque converter cover bolts and take out the cover, also unbolt the starter motor. Lose the three bolts joining the steering flex coupling and unbolt the steering gear from the subframe then let it hang clear of the oil pan. To temporarily adjust the mount you need to slightly unscrew the nuts which fix the transmission mount to the crossmember but don't remove them. The through bolts of the front engine mounts must be eased out: positioning a block of wood beneath the oil pan, you have to lift the engine with a jack to gain clearance between the Thermactor downstream air tube and the transmission dipstick tube. There are wooden blocks which should be inserted between the mounts and subframe; unscrew the oil pan mounting bolts and beware: the reinforcement strips may come off. Part the pan from the block gently with a rubber mallet or by using a wooden block and hammer so as not to mar the sealing surfaces. When working around a V8 engine, the oil pump, and pick-up tube bolts need to be adjusted before pulling the pan towards the rear. As for installation, before assembling, it is necessary to clean all the gasket surfaces and also to check the geometric accuracy of the oil pan flange, and, having found that it is distorted or has been, then such a flange should be brought to the correct condition, it is better to do this hot. Take out worn out rubber gaskets and replace with new ones with the help of RTV-sealant or gasket-contact adhesive as the case may be. Place the rubber gasket on the pan for later model V6 engines and vice versa install the oil pump along with the pan for V8 engines. Placing the pan om the block in a precariously correct manner, tighten the bolts slightly at first to a proper degrees and then tighten them in a star like manner. Last of all, perform all the steps starting the above process in reverse manner, pour oil in the engine and replace the filter and start the engine to find any leakage.