FordParts
My Garage
My Account
Cart
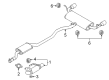
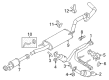
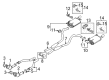
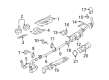
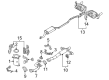
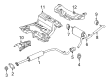
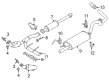
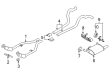
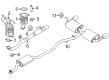
OEM Ford Muffler
Exhaust Muffler- Select Vehicle by Model
- Select Vehicle by VIN
Select Vehicle by Model
orMake
Model
Year
Select Vehicle by VIN
For the most accurate results, select vehicle by your VIN (Vehicle Identification Number).
507 Mufflers found


Ford Muffler & Pipe, Front Part Number: CT4Z-5230-A
$749.60 MSRP: $1065.52You Save: $315.92 (30%)Ships in 1-3 Business DaysProduct Specifications- Other Name: Muffler Assembly - Centre And Rear; Exhaust Muffler; Exhaust Muffler Assembly; Exhaust Pipe; Muffler
- Position: Front


Ford Muffler & Pipe, Front Part Number: 9C2Z-5230-C
$975.98 MSRP: $1387.31You Save: $411.33 (30%)Ships in 1-3 Business DaysProduct Specifications- Other Name: Muffler And Pipe Assembly - Rear; Exhaust Muffler; Exhaust Pipe; Muffler
- Position: Front


Ford Muffler & Pipe, Rear Part Number: 7L2Z-5230-A
$266.34 MSRP: $365.42You Save: $99.08 (28%)Product Specifications- Other Name: Muffler And Pipe Assembly - Rear; Exhaust Muffler; Direct-Fit Exhaust; Exhaust System Kit; Exhaust Pipe; Muffler
- Position: Rear
- Replaces: 6L2Z-5230-AK


Ford Muffler, Front Part Number: BL3Z-5230-F
$664.54 MSRP: $881.64You Save: $217.10 (25%)Product Specifications- Other Name: Muffler And Pipe Assembly - Rear; Exhaust Muffler; Direct-Fit Exhaust; Exhaust System Kit; Exhaust Pipe
- Position: Front


Ford Muffler, Front Part Number: BL3Z-5230-H
$694.24 MSRP: $921.04You Save: $226.80 (25%)Ships in 1-2 Business DaysProduct Specifications- Other Name: Muffler And Pipe Assembly - Rear; Exhaust Muffler; Exhaust Pipe
- Position: Front


Ford Muffler, Front Driver Side Part Number: DR3Z-5230-F
$706.61 MSRP: $937.46You Save: $230.85 (25%)Ships in 1-3 Business DaysProduct Specifications- Other Name: Muffler Assembly - Front; Exhaust Muffler, Left; Exhaust Muffler
- Position: Driver Side
- Replaces: BR3Z-5230-T, BR3Z-5230-AA, BR3Z-5230-S


Ford Muffler, Front Part Number: 7C3Z-5230-CA
$739.13 MSRP: $980.60You Save: $241.47 (25%)Ships in 1-3 Business DaysProduct Specifications- Other Name: Muffler And Pipe Assembly - Rear; Exhaust Muffler
- Position: Front


Ford Muffler & Pipe, Rear Part Number: F2GZ-5230-C
$1091.25 MSRP: $1447.76You Save: $356.51 (25%)Ships in 1-3 Business DaysProduct Specifications- Other Name: Muffler Assembly - Rear; Exhaust Muffler; Exhaust Pipe; Muffler
- Position: Rear


Ford Muffler & Pipe, Front Part Number: 7T4Z-5230-BA
$1686.71 MSRP: $2237.76You Save: $551.05 (25%)Product Specifications- Other Name: Muffler Assembly - Centre And Rear; Exhaust Muffler; Exhaust Muffler Assembly; Exhaust Pipe; Muffler
- Position: Front


Ford Front Muffler Part Number: DV6Z-5230-E
$161.45 MSRP: $210.45You Save: $49.00 (24%)Product Specifications- Other Name: Pipe - Exhaust Front; Exhaust Muffler; Exhaust Muffler Assembly; Muffler; Pipe - Exhaust - Front
- Position: Front


Ford Muffler, Front Driver Side Part Number: DR3Z-5230-G
$272.40 MSRP: $358.21You Save: $85.81 (24%)Ships in 1-2 Business DaysProduct Specifications- Other Name: Muffler Assembly - Front; Exhaust Muffler, Left; Exhaust Muffler
- Position: Driver Side
- Replaces: BR3Z-5230-U, BR3Z-5230-AB


Ford Muffler, Front Passenger Side Part Number: DR3Z-5230-C
$313.26 MSRP: $411.94You Save: $98.68 (24%)Ships in 1-3 Business DaysProduct Specifications- Other Name: Muffler Assembly - Front; Exhaust Muffler, Right; Exhaust Muffler
- Position: Passenger Side
- Replaces: BR3Z-5230-P, BR3Z-5230-Y


Ford Muffler W/Tpipe, Rear Part Number: CV6Z-5A289-E
$326.88 MSRP: $429.85You Save: $102.97 (24%)Product Specifications- Other Name: Muffler Assembly - Rear; Exhaust Muffler Assembly; Direct-Fit Exhaust; Exhaust System Kit; Exhaust Pipe; Muffler
- Position: Rear


Ford Front Muffler Part Number: CV6Z-5230-C
$381.36 MSRP: $501.49You Save: $120.13 (24%)Ships in 1-3 Business DaysProduct Specifications- Other Name: Pipe - Exhaust Front; Exhaust Muffler; Muffler; Pipe - Exhaust - Front
- Position: Front


Ford Muffler, Front Passenger Side Part Number: DR3Z-5230-D
$388.17 MSRP: $510.45You Save: $122.28 (24%)Ships in 1-3 Business DaysProduct Specifications- Other Name: Muffler Assembly - Front; Exhaust Muffler, Right; Exhaust Muffler
- Position: Passenger Side


Ford Muffler, Front Part Number: FL3Z-5230-C
$390.44 MSRP: $513.43You Save: $122.99 (24%)Product Specifications- Other Name: Muffler And Pipe Assembly - Rear; Exhaust Muffler; Exhaust Pipe
- Position: Front


Ford Muffler, Front Passenger Side Part Number: DR3Z-5230-B
$424.49 MSRP: $558.21You Save: $133.72 (24%)Ships in 1-3 Business DaysProduct Specifications- Other Name: Muffler Assembly - Front; Exhaust Muffler, Right
- Position: Passenger Side
- Replaces: BR3Z-5230-X


Ford Muffler, Front Passenger Side Part Number: DR3Z-5230-L
$724.50 MSRP: $961.19You Save: $236.69 (25%)Product Specifications- Other Name: Muffler Assembly - Front; Exhaust Muffler, Right
- Position: Passenger Side


Ford Muffler, Front Driver Side Part Number: DR3Z-5230-M
$778.50 MSRP: $1032.84You Save: $254.34 (25%)Product Specifications- Other Name: Muffler Assembly - Front; Exhaust Muffler, Left
- Position: Driver Side


Ford Muffler & Pipe, Front Part Number: CT4Z-5230-B
$1524.38 MSRP: $2022.39You Save: $498.01 (25%)Product Specifications- Other Name: Muffler Assembly - Centre And Rear; Exhaust Muffler; Exhaust Muffler Assembly; Exhaust Pipe; Muffler
- Position: Front
- Replaces: BT4Z-5230-A
| Page 1 of 26 |Next >
1-20 of 507 Results
Ford Muffler
If you own Ford and want to keep it in top shape, choosing OEM Muffler is a smart move. They are precisely engineered and follow strict factory standards. They are made in advanced facilities that use cutting edge technology. Each part goes through thorough testing to confirm strength and safety, so you can trust it. FordPartsDeal.com gives you genuine Ford Muffler at some of the affordable online prices without cutting quality. Every OEM Ford part includes the manufacturer's warranty, easy returns, and super-fast delivery. So why wait? Shop now and get your vehicle back to peak condition.
Ford Muffler silences the engine noise and directs exhaust to flow smoother along the tailpipe to ride smoother. Ford continues to drive mobility to the next level with concepts that started when Henry opened the factory in 1903. Smart logistics and robot assembly allow the automobiles to come out within a short time period and at an average salary bracket. SYNC enables drivers to make calls, stream and reroute using plain speech rather than button hunts. Ford demonstrates that fun does not necessarily guzzle as its EcoBoost engines combine turbo power and economical consumption. Ford supports the hardware by Co-Pilot360, a solution that brakes, drives, and monitors blind spots to prevent trouble before it arises. Ford will reduce emissions without reducing muscle by having electric trucks and hybrids. The Muffler is made of corrosion-resistant stainless or aluminized steel and employs the use of branching chambers, tuned baffles, and destructive-interference passages to eliminate the ugly frequencies before they reach the cabin and infrared-friendly back pressure across the rev range. Muffler geometry directs spent gases utilizing a clean exit path slicing turbulence and eliminating fuel wastage. The welds are durable, thus, Muffler shakes off the road salt and pothole shocks and decades of thermal fluctuations. As the revs rise, the Muffler maintains the soundtrack civilized making conversations and playlists sharp.
Ford Muffler Parts and Q&A
- Q: How to service the muffler on a 3.8L engine on Ford Mustang?A:The first step to maintain a 3.8L muffler requires safely supporting the elevated vehicle. The service requires a proper jack to stabilize the rear axle before you remove the upper arm-to-differential bolt. You must disconnect the rear shock absorbers from the axle housing by taking out the nut and bolt then discarding this nut. Start with lowering the rear axle before removing the dual converter assembly flange nuts. The exhaust pipe assembly should be detached from the rear exhaust hanger insulator then exhaust hanger insulators and the muffler need to be removed. Using oil or grease-based lubricants should be avoided because they will deteriorate rubber components of the insulators. Installation of exhaust hanger insulators becomes simpler by using a mixture of soap with water. The end of the installation process involves following the steps used to remove the components backward.
- Q: How to service and repair the muffler and tailpipe on Ford Ranger?A:One should start the muffler and tailpipe service and repair by putting the vehicle into neutral gear and hoisting it up. You need to eliminate the 2.3L engine exhaust downpipe-to-muffler bolts and nuts alongside the 3.0L and 4.0L engine catalytic converter-to-muffler bolts and nuts. Complete the process by taking off the three rubber isolators then extract the combination of muffler and tailpipe from the vehicle assembly. Designate the front section of installation as the starting point to ensure you only tighten exhaust system fasteners after all components are prepared and properly positioned throughout the repair process. The use of oil or grease-based lubricants should be avoided on isolators because they cause rubber deterioration which leads to separation from the exhaust hanger bracket. Clean up the exhaust downpipe or catalytic converter mating surface and the muffler and tailpipe assembly surface while making sure to avoid any damage to these parts. Place the muffler with tailpipe architecture into the vehicle while connecting its three rubber components. Use the exhaust downpipe-to-muffler and tailpipe assembly gasket then mount the corresponding bolts and nuts with loose tension. Install the catalytic converter-to-muffler and tailpipe assembly gasket simultaneously with the loosely installed bolts and nuts that belong to this section on 3.0L and 4.0L engines. To guarantee proper fitment of the exhaust system it needs to be aligned at the end.


Related Ford Parts
 Ford PCV Valve
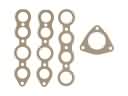 Ford Exhaust Manifold
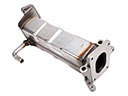 Ford EGR Cooler
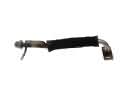 Ford EGR Tube
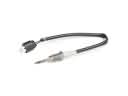 Ford Exhaust Gas Temperature Sensor
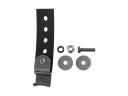 Ford Exhaust Hanger
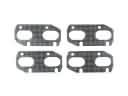 Ford Exhaust Manifold Gasket
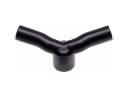 Ford PCV Hose
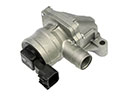 Ford Air Pump Check Valve
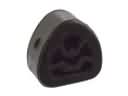 Ford Muffler Strap
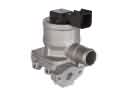 Ford Secondary Air Injection Check Valve
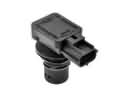 Ford Vapor Pressure Sensor
Browse Ford Muffler by Models
Ranger Bronco Mustang Explorer Focus Fusion F-150 Maverick Escape Edge Excursion Expedition Fiesta Taurus Thunderbird Flex Transit Connect Bronco Sport Explorer Sport Trac Crown Victoria Probe EcoSport Escort F-250 C-Max E-150 Econoline Explorer Sport F-350 Five Hundred Freestar Freestyle Police Interceptor Utility Taurus X Windstar F-350 Super Duty Police Interceptor Sedan E-150 E-150 Club Wagon E-150 Econoline Club Wagon E-250 E-250 Econoline E-350 Club Wagon E-350 Econoline E-350 Econoline Club Wagon E-350 Super Duty F-150 Heritage F-250 HD F-250 Super Duty Police Responder Hybrid Special Service Police Sedan SSV Plug-In Hybrid Transit-150 Transit-250 Transit-350 Transit-350 HD