FordParts
My Garage
My Account
Cart
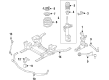
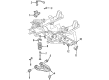
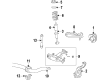
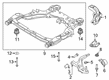
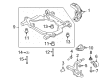
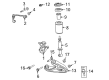
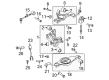
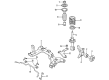
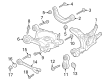
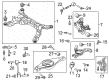
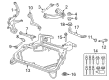
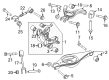
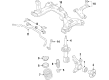
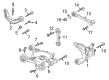
OEM Ford Control Arm
Suspension Arm- Select Vehicle by Model
- Select Vehicle by VIN
Select Vehicle by Model
orMake
Model
Year
Select Vehicle by VIN
For the most accurate results, select vehicle by your VIN (Vehicle Identification Number).
448 Control Arms found


Ford Lower Control Arm, Front Passenger Side Part Number: FR3Z-3078-A
$106.63 MSRP: $175.45You Save: $68.82 (40%)Ships in 1-2 Business DaysProduct Specifications- Other Name: Arm Assembly - Front Suspension; Front Right Rearward Control Arm and Ball Joint Assembly.; Rear Lower Control Arm; Control Arm
- Manufacturer Note: Aft Position
- Position: Passenger Side


Ford Upper Control Arm, Front Passenger Side Part Number: 5L3Z-3084-B
$128.18 MSRP: $210.91You Save: $82.73 (40%)Ships in 1-2 Business DaysProduct Specifications- Other Name: Arm Assembly - Front Suspension; Front Left Upper, Front Right Upper Control Arms; Control Arm and Ball Joint Assembly.
- Position: Passenger Side
- Replaces: XL3Z-3084-AA


Ford Upper Control Arm, Front Driver Side Part Number: AL3Z-3085-B
$193.82 MSRP: $321.82You Save: $128.00 (40%)Ships in 1-2 Business DaysProduct Specifications- Other Name: Arm Assembly - Front Suspension; Front Left Upper Control Arm and Ball Joint Assembly.; Suspension Control Arm; Control Arm
- Manufacturer Note: LH Upper
- Position: Driver Side


Ford Lower Control Arm, Front Passenger Side Part Number: FA5Z-3078-A
$254.04 MSRP: $421.82You Save: $167.78 (40%)Ships in 1 Business DayProduct Specifications- Other Name: Arm Assembly - Front Suspension; Right Control Arm Bracket; Control Arm and Ball Joint Assembly.; Bracket; Control Arm
- Manufacturer Note: Complete Assembly Includes Hydro Bushing / Bracket
- Position: Passenger Side
- Replaces: DA5Z-3078-A, MCF-2226, MCF-2371


Ford Lower Control Arm, Front Passenger Side Part Number: BA5Z-3078-A
$246.88 MSRP: $436.36You Save: $189.48 (44%)Product Specifications- Other Name: Arm Assembly - Front Suspension; Front Right Control Arm and Ball Joint Assembly; Control Arm
- Position: Passenger Side
- Replaces: 9A5Z-3078-A, MCSOE-118


Ford Lower Control Arm, Front Passenger Side Part Number: 7L3Z-3078-C
$369.92 MSRP: $632.73You Save: $262.81 (42%)Ships in 1-2 Business DaysProduct Specifications- Other Name: Arm Assembly - Front Suspension; Front Right Lower Control Arm and Ball Joint Assembly; Control Arm
- Position: Passenger Side
- Replaces: 4L3Z-3078-CA


Ford Track Bar, Black, Rear Part Number: AA8Z-5500-A
$63.37 MSRP: $161.82You Save: $98.45 (61%)Ships in 1-3 Business DaysProduct Specifications- Other Name: Arm Assembly - Rear Suspension; Suspension Trailing Arm, Rear; Suspension Control Arm, Rear; Suspension Track Bar, Rear
- Position: Rear
- Replaces: 8A8Z-5500-A


Ford Lower Control Arm, Front Passenger Side Part Number: 4L8Z-3078-R
$86.42 MSRP: $145.09You Save: $58.67 (41%)Ships in 1-2 Business DaysProduct Specifications- Other Name: Arm Assembly - Front Suspension; Front Right Control Arm and Ball Joint Assembly; Control Arm
- Position: Passenger Side
- Replaces: 4L8Z-3078-AA


Ford Link Rod, Rear Part Number: FR3Z-5A972-A
$89.89 MSRP: $150.91You Save: $61.02 (41%)Ships in 1-2 Business DaysProduct Specifications- Other Name: Link; Suspension Integral Link, Rear; Suspension Control Arm, Rear; Lateral Link; Lateral Arm; Integral Link
- Manufacturer Note: RH/LH
- Position: Rear

Ford Lower Control Arm, Front Passenger Side Part Number: FR3Z-3078-C
$103.46 MSRP: $187.27You Save: $83.81 (45%)Ships in 1-2 Business DaysProduct Specifications- Other Name: Arm Assembly - Front Suspension; Front Right Rearward Control Arm and Ball Joint Assembly.; Rear Lower Control Arm; Control Arm
- Position: Passenger Side


Ford Lateral Link, Black, Rear Part Number: DG1Z-5A972-J
$133.92 MSRP: $225.45You Save: $91.53 (41%)Ships in 1-2 Business DaysProduct Specifications- Other Name: Link; Lateral Arm and Ball Joint Assembly, Rear; Integral Link; Lateral Arm; Link Rod
- Position: Rear
- Replaces: 8A5Z-5A972-B, 8A5Z-5A972-A, BA5Z-5A972-A, BA8Z-5A972-A, DG1Z-5A972-B, DG1Z-5A972-A


Ford Lower Control Arm, Front Passenger Side Part Number: FR3Z-3078-E
$134.14 MSRP: $200.00You Save: $65.86 (33%)Ships in 1-3 Business DaysProduct Specifications- Other Name: Arm Assembly - Front Suspension; Suspension Control Arm, Front Right Rearward; Control Arm
- Manufacturer Note: Aft Position
- Position: Front Lower Passenger Side


Ford Front Lower Control Arm Part Number: AE5Z-3078-A
$67.41 MSRP: $110.91You Save: $43.50 (40%)Ships in 1-2 Business DaysProduct Specifications- Other Name: Arm Assembly - Front Suspension; Control Arm and Ball Joint Assembly; Front Lower Forward.; Rear Lower Control Arm; Front Arm; Control Arm
- Manufacturer Note: RH/LH
- Position: Front Lower
- Replaces: 7E5Z-3078-R, BE5Z-3078-A, MCF-8, MCSOE-40


Ford Trailing Arm, Rear Part Number: BB5Z-5500-A
$88.84 MSRP: $146.18You Save: $57.34 (40%)Ships in 1-2 Business DaysProduct Specifications- Other Name: Arm Assembly - Rear Suspension; Suspension Trailing Arm, Rear; Suspension Control Arm, Rear; Trailing Link; Suspension Trailing Arm
- Position: Rear


Ford Lower Control Arm, Front Passenger Side Part Number: BE8Z-3078-C
$67.07 MSRP: $110.36You Save: $43.29 (40%)Ships in 1-2 Business DaysProduct Specifications- Other Name: Arm Assembly - Front Suspension; Suspension Control Arm and Ball Joint Assembly; Control Arm Assembly; Control Arm
- Position: Passenger Side
- Replaces: BE8Z-3078-A, MCSOE-81


Ford Lower Control Arm, Front Driver Side Part Number: BE8Z-3079-C
$74.92 MSRP: $123.27You Save: $48.35 (40%)Ships in 1-2 Business DaysProduct Specifications- Other Name: Arm Assembly - Front Suspension; Front Left Control Arm and Ball Joint Assembly; Control Arm
- Position: Driver Side
- Replaces: BE8Z-3079-A, MCSOE-82


Ford Lateral Link, Rear Lower Part Number: FR3Z-5K898-B
$83.32 MSRP: $137.09You Save: $53.77 (40%)Ships in 1-3 Business DaysProduct Specifications- Other Name: Rod; Suspension Control Arm, Rear Lower Forward; Lateral Arm, Rear; Lateral Arm
- Manufacturer Note: RH/LH
- Position: Rear Lower

Ford Lower Control Arm, Front Passenger Side Part Number: C1BZ-3078-A
$75.25 MSRP: $123.82You Save: $48.57 (40%)Ships in 1-2 Business DaysProduct Specifications- Other Name: Arm Assembly - Front Suspension; Control Arm
- Position: Passenger Side

Ford Lower Control Arm, Front Driver Side Part Number: 4L8Z-3079-L
$88.62 MSRP: $145.82You Save: $57.20 (40%)Ships in 1-2 Business DaysProduct Specifications- Other Name: Arm Assembly - Front Suspension; Front Left Control Arm and Ball Joint Assembly; Control Arm
- Position: Driver Side
- Replaces: 4L8Z-3079-AA


Ford Lower Control Arm, Front Driver Side Part Number: C1BZ-3079-A
$75.25 MSRP: $123.82You Save: $48.57 (40%)Ships in 1-2 Business DaysProduct Specifications- Other Name: Arm Assembly - Front Suspension; Suspension Control Arm, Front Left; Control Arm
- Position: Driver Side
| Page 1 of 23 |Next >
1-20 of 448 Results
Ford Control Arm
If you own Ford and want to keep it in top shape, choosing OEM Control Arm is a smart move. They are precisely engineered and follow strict factory standards. They are made in advanced facilities that use cutting edge technology. Each part goes through thorough testing to confirm strength and safety, so you can trust it. FordPartsDeal.com gives you genuine Ford Control Arm at some of the affordable online prices without cutting quality. Every OEM Ford part includes the manufacturer's warranty, easy returns, and super-fast delivery. So why wait? Shop now and get your vehicle back to peak condition.
Ford Control Arm maintains the wheels straight and in position when going through all the bumps and turns. Ford has opened the door to mass mobility in 1903 and has continued to go the extra mile on the rolling assembly line that could cut build times by half and allow common households to afford a car anywhere in the world, then followed by EcoBoost engines that squeeze turbo power out of small blocks and sip fuel, SYNC voice technology that allows drivers to pick songs or route planners without taking their hands off the wheel, Co-Pilot360 assistive technology that stomps the brakes or gently steers wheels before disaster strikes, and battery trucks such as the F-150 Lightning. Ford continues to add intelligent software to make each dashboard touch like home but tomorrow ready. Ford associates these concepts with a hundred years of quality construction that individuals have faith in on highways and dirt roads. Control Arm is applied to connect the chassis to the wheel hub, pivots on bushings, and supports the forces always perpendicular to the vertical plane to keep the suspension geometry straight regardless of the speed. Cast aluminum Control Arm decreases the unsprung mass whereas the cast iron ones shake off off-road collisions. Tires lose their way and the steering wheel vibrates when a Control Arm is worn. The Control Arm has been upgraded with harder joints and with adjustable angles, which allow tuners to make corners tight and the ride not uncomfortable. Ford replacements are also swapped in by many drivers as a direct replacement and the car immediately returns to crisp handling.
Ford Control Arm Parts and Q&A
- Q: What are the steps involved in the removal, inspection, and installation of the lower control arm on 2000-2011 Ford Ranger?A:To remove the lower control arm, first loosen the wheel lug nuts, raise the front of the vehicle, and support it securely on jackstands before removing the front wheel. For 2WD models, take off the brake disc and dust shield, then remove the shock absorber and disconnect the stabilizer bar from the lower control arm. Compress the coil spring using a typical internal spring compressor tool, and for 4WD models, remove the torsion bar. Position a floor jack under the lower control arm for support, then remove and discard the cotter pin from the lower control arm balljoint stud, loosen the castellated nut, and use a small puller to separate the balljoint from the spindle/steering knuckle. Carefully remove the compressed coil spring for 2WD models and set it aside, then loosen the two control arm pivot nuts and bolts to remove the lower control arm. Inspect the bushings for cracks and tears, and if damaged, take the control arm to an automotive machine shop for new bushings, as this requires specialized tools. If the balljoint is worn, the entire control arm must be replaced. Check the lower control arm balljoint and boot seal for damage; if either is damaged, replace the lower control arm since the balljoint cannot be serviced. For installation, reverse the removal steps, ensuring to tighten the pivot bolts and nuts finger-tight only during assembly, and do not fully tighten until the vehicle is lowered to the ground. For 2WD models, ensure the coil spring covers the first hole in the lower control arm but is not visible through the second hole. After lowering the vehicle, tighten the lower control arm pivot bolts and nuts to the specified torque, and have the front-end alignment checked by a dealer service department or an alignment shop.

Related Ford Parts
 Ford Steering Knuckle
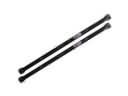 Ford Torsion Bar
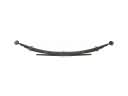 Ford Leaf Spring
 Ford Axle Beam
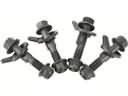 Ford Camber and Alignment Kit
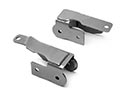 Ford Control Arm Bracket
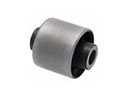 Ford Differential Mount
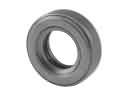 Ford Strut Bearing
 Ford Sway Bar Link Bushing
 Ford Trailing Arm Bushing
 Ford Wheel Seal
 Ford Wheel Stud
Browse Ford Control Arm by Models
Ranger Bronco Mustang Explorer Focus Fusion F-150 Maverick EXP Escape Edge Expedition Fiesta Taurus Thunderbird Flex Transit Connect Bronco Sport Explorer Sport Trac Crown Victoria Probe EcoSport Escort F-250 Aerostar Aspire C-Max Contour Country Squire Explorer Sport Five Hundred Freestar Freestyle LTD Mustang Mach-E Police Interceptor Utility Taurus X Windstar F-350 Super Duty LTD Crown Victoria Police Interceptor Sedan E-Transit F-150 Heritage F-150 Lightning F-250 HD F-250 Super Duty Police Responder Hybrid Special Service Police Sedan SSV Plug-In Hybrid Transit-150 Transit-250 Transit-350 Transit-350 HD